Light, dark and the bigger picture.
 The last actual building for Brettell road is now finished which means I can now give you a reasonable overview of how the layout will look. There is still more to do and more clutter to add yet.
  I want to add a couple of cranes to this scene too.
  Here’s how the area looks at night.
 The courtyard for the building shown last time and below at night
 A couple of overviews from the left side

 …and from the right side.
 Probably should include a couple of trains really!

Buildings and the march of progress
Work continues on buildings for Brettell Road
 The big warehouse now has a roof (thanks to Mr Horn for his laser cut tiles. Just the bridges and front/backscenes to do on this board and I can call it done.
  Looking the other way, I knocked up a very low relief building to go behind the pub.
  Across the alley way is this small building based on a local one I found in Brierley Hill.
  Work in progress on its neighbour. Again local influences but nothing specific. I don’t know if I will need a small outbuilding here to fill up the space or if ill just leave it open for clutter.
  The other side – I’ve a vague idea that this will be some sort of woodworking industry or perhaps a commercial vehicle repair shop.
 If you have explored the site you might have come across this picture before, I brought this loco years ago just because I like class 27s but thoughts have turned to doing something useful with it. This loco has become a bit of a clone of Brettell road itself in a way as it started out with the simple idea of just fitting a chip and sorting out the bogies and that would do. nothing to serious but like Brettell Road it’s all gone a bit wrong!
  moving the bogie springs in a bit and fitting the decoder was easy enough but the roof fan looked horrible. unfortunately the hole is too big for Brian’s nicely etched replacement so that ended up being a bit more of a faff than I hoped! Then there were the nose end doors. They needed adding along with the details. I renumbered it to an example I found at Saltley (Class 27s were quite regular visitors to the midlands in their early lives) and re-weathered it. Also while I remember the yellow panels were too wide so a spot of Pheonix BR loco green sorted that out.
  On the mention of roof fans this is one of Brian’s for the class 20. I always quite liked them. I think it stems from a pair sitting outside my bedroom window one Sunday as a kid while the down North Warwickshire line was being relayed. I quite like the idea of them working on their own so I decided to get a green one. The grill is made up of 4 parts. A plain ring that goes onto the roof first. The ring with with the bracing and then the mesh, finally the last ring goes on. Zap pink is ideal for this and make sure you get the mesh the right way up!
On the loco itself I replaced the bogie sideframes with Heljan Baby Deltic ones as first suggested by my friend Shane. I had done this on my Lima ones and, this being my first Bachmann example, I was surprised to find the supplied bogies were quite poor too. I filled the lower beam on the bogie ans sanded it smooth as I was doing one of the first batch. Buffers were from Lanarkshire models. 
Just a spot of finishing off
Recently attention has returned to the main warehouse with the top floor being finished off and the ceiling added. 
 I decided on a sort of rest room that wasn’t lit. I quite liked the idea of light from deeper in the building coming through the internal windows and bouncing off the tables and chairs.
  On the main floor, again just a hint of activity.
 After much experimentation and having tried different materials (thanks to those who made suggestions) I have settled on black latex from a surgical glove for the Kirtley weather hood.
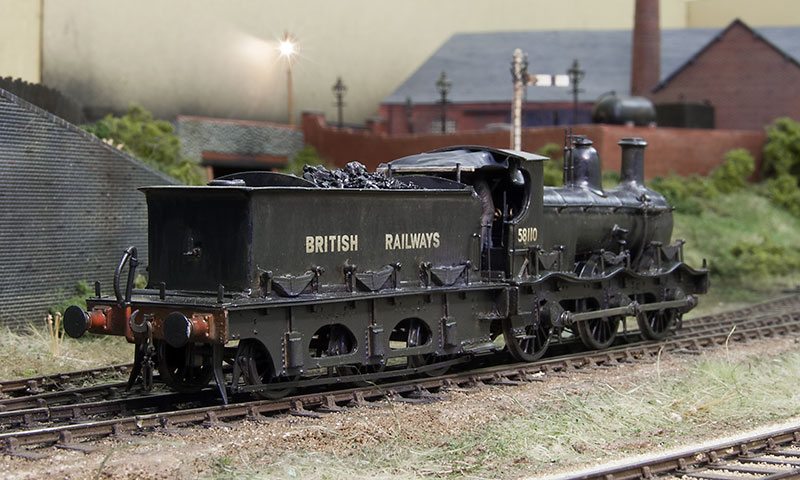
 After some good, constructive feedback I’ve made a few tweaks to the 94xx tank. The chimney cap has been swapped back to the original lima one which was mounted in my mini-drill and ‘improved’ with a sanding stick. The whistles have been replaced with a shielded set from Modelu and the toolboxes have been made 20 thou deeper.
  The 2 latest loco’s together. Is it me or does the pannier look like it dwarfs the Kirtley? Finally below another mood shot!
Haven’t had a loads of finished things post for a while.
So lets start with a buildings and a request, When I posted the image of the pub at night I was asked for a picture of the area in the light so here it is This also shows the water tower I was working on too, speaking of which…
 Remember the lower part of the Hornby water tower I was fiddling with and how I didn’t worry too much about details? This is the reason why – you can just about see it, if you know where to look!
  Moving on to some wagons. This is the Chivers kit for a Dia1674 LMS Bolster wagon. A nice simple kit to build although given the long wheelbase I did opt for Bill Bedford springing.
 This was supposed to be a quick win. I liked the local livery and thought that it would break up the sea of grey and bauxite wagons. Its a Bachmann product but an older one that was stretched to fit their 10ft wheelbase steel chassis. Some careful cutting in 4 places lost some of the extra length and while it is still too long it does now fit the longer Cambrian wooden chassis.
  I’ve finished off the vans I was working on too. Not a lot more to add about them really but here’s the pictures. LMS 6 wheel fish van – Chivers Kit.
 LMS GUV
  Palethorpes 6 wheel van
 And the larger bogie version – Transfers are from Cambridge custom transfers. Sheet BL153 covers the 6 wheel vans while sheet BL154 covers the bogie vans.
Finally aside from the crew and some coal (plus a slight warping of the footplate) the 94xx tank is done too. Here’s a few images.


the other half of the Hornby water tower
A while ago I posted an image of the Hornby water tower building that I had converted to a disused pump house. Well waste not want not I decided to use the water tank bit for a small industrial tank.  Here’s progress so far. The Hornby tank, like the building it came with is a tad basic so I reduced its length a bit and added more framing from microstrip. The base it sits on was made from evergreen section using a simple jig and was sprayed with plasticote suede to give a concrete texture.
  The handrails are some very nice turnings from Modelling Timbers who specialise in stuff for ships. they are actually 1:72 scale.
The pub and little industrial building have also been finished and planted. Below are a few images. 

making a start on the left hand upper side.
I was recently asked for a track plan but I thought a satellite style image was better so here it is.
 While the left hand end is coming along pretty well the right hand side is looking a bit neglected so more building work is required, starting with…
 …a bit of cheating. This is actually to go behind the large warehouse on the left and is a blatant short cut. The reason for its existence is an excuse for the chimney, perhaps when the warehouse was a factory in its previous life it had a small steam engine or something? In truth you will only see the chimney so I could have missed out the building completely or just used a box but I had an old Hornby water tower so why not just use that instead? I knocked up a new roof, gave it a light dusting of red primer and blanked of the windows with a bit of scrap ply I just need to paint the door and weather it.
  No such short cuts on the more visible bits though. This little building is based on a picture I found on the brumpic site. Construction is 2mm card clad with plasticard while the arches are left overs from New Street. The steps are plastruct and microstrip.
  The real life Brettell lane and surrounding area has an awful lot of pubs so I decided to have one on the layout. Construction is the same as above and the windows are modified Brassmasters ones. The roof slates are from Mr Horns laser cutter.
  This is the rear view in roughly the position it will occupy on the layout. I knocked up a little store hut too.
  I find things like guttering to be strangely therapeutic. The actual gutters are half round brass from Eileens while the rainwater downpipes are 1mm brass with a single strand of electrical wire double wrapped to form brackets. Experiments have shown mounting the gutter brackets on top of the wall is the most robust way to secure them with the roof adding extra reinforcement later.
illuminating secrets
 What we have here is a typical midland type yard lamp from RMLectronics, link here They kindly supplied me an incomplete model as I wanted to change the flat ladder supplied (an understandable commercial compromise) with one of Colin’s 3d versions. I felt the light was a bit white so I painted the LED with some revel translucent yellow. The effect of this can be seen below.
  Although Brettell Road is basically a personal plaything there has been interest in it going out to an exhibition or two at some point. With this in mind I have included a couple of viewer friendly hidden details in the warehouse for those who like a good look at little details.
  First up a lorry unloading scene using a modified base toys lorry and a couple of Airfix platform figures painted to look like factory workers.
  Secondly a hand crane included to give a suggestion of how goods get from one floor to the other. This is very loosely based on one at the SS Great Britain museum in Bristol (well worth a visit if you are in the area. There are a few remains of the railway there too along with some old wagons that are also worth a look.)
More progress on the warehouse
 Work has progressed on my warehouse. Starting with bedding in the building and adding the now familiar neglected feel to the end of the sidings. Just need a light airbrush of general gunk colour to tie it all together.
  I’ve installed the second floor which means the final lighting for the first floor is also in place. I used self adhesive copper tape instead of wire and found it made things so much easier. Something ill definitely be adopting for the other floors and buildings
Finally a couple of pics of the Deeley tank parked up for the night. 

who let the cat in?
Picking up where I left off last time, a few more dark pictures.

 I’m sure we have all had the frustration of glancing something interesting out of a train window but it being hidden away so that a proper look is impossible? That was the idea behind this image.
I’ve been building more wagons too.  More of the same! Another Airfix 16 ton mineral wagon and another 12 ton LMS diagram 1832A van from the Cambrian kit. (C101)
 I’ve done a Cambrian single plank wagon before too (diagram 1987, kit number C93) but the last one was a fitted example. The Standard 12 ton van, diagram 1/208 is a Parkside kit and is an upgrade for one of their older models (PC07A)
 A few more Parkside kits. The ‘french’ mineral wagon is one of their older kits (PC22) but I liked its quirky look, the prototypes for these were built just after the war . The 7 plank wagon is a 1923 example with fixed ends (PC73)
 Another Cambrian diagram 1667 5 plank open (C57) along with a Ratio GWR van of some description (v23 I think) this wagon is a bit of a freebie. I brought some cheap ‘random’ ratio bits and included in them was the sides and ends for 2 of these, the roof for 1 and no underframes. I had a box of underframes that I picked up from somewhere else so this wagon was born!
  Finally for wagons an ancient Three Aitch Mouldings kit for a LMS 20 ton coke hopper. Built with Bill Bedford W irons. I know Hornby are going to do one of these but building a kit is much more fun!
 A slight diversion as a GWR railcar trundles past!
 My warehouse is starting to look a bit more like a building now. The canopy is another old Arifix kit adapted to suit. I’ve mentioned before wanting to depict some life inside this and the following pictures hopefully do that.

 Most of the figures are Dart castings ones with a Bachmann gent thrown in. The last picture is the reason for the title of this entry as the cat is modelled on my own cat Moo! Anyway remembering that Brettell Road is set in the rain, Moo has obviously snuck in to somewhere nice and dry!
Dave Hewitt
Long time readers will have seen mention on many occasions of a little company called Unit Models. When I first came across them they did a range of resin bits mostly for US modellers in HO scale but what a range it was. Noting spectacular but they produced no end of useful little bits and pieces for people who scratchbuild buildings and the like. Things like vents, wall fans, lockers etc. The sort of stuff that was a bit of a ball ache to scratch build yourself.  The roof vents you see here are from them and as they didn’t do the exact ones I needed Dave was only to happy to do some for me, he didn’t even seem to charge any extra for them either! Well Sadly Dave passed away recently and the business is up for sale. I hope someone picks it up and continues to produce this specific but invaluable range of bits and bobs and its sad to see such a lovely chap taken from us. My thoughts with his friends and family.
Compromises and trying a different path
 What you see here are 3 walls for the same building. The one on the left faces the public, the one in the middle doesn’t but you can see it from the front of the layout and the one on the right you can’t see at all, at least not from this side. You will note that the middle wall doesn’t have representations of the arches but it does have the raised details and sills. This is because from the angle you can see the wall (you will have to look for it) you should just be able to make out texture and relief but not enough to see if those things are accurate or not. The right wall you can’t see at all so I didn’t bother with texture or even the top curve of the windows You will be able to see the windows from the other side so that is one reason they are there. The other is that I hope you will also see the effect the light from the windows will have on the little yard behind it.
  There is a reason that the walls in the first picture look pretty much finished and that is that I am approaching this build differently to my previous buildings. As its right at the front and you can see inside I want to detail the interior and to my mind the best way to do this was to build the structure in situe. We will see how it goes!

It’s all getting a bit grim!
 I have added the pillars that support the disused warehouse as well as the lower floor. As its nigh on impossible to see I didnt go too mad on the detailing of the lower floor. The pillars are from Scale Link and because they were intended for a footbridge were too short for what I wanted. I looked a the 7mm scale ones but they were too big so in the end I just added bits of evergreen section to the tops and bottoms to get the height I needed. Below is a view along the canal taken with a mobile phone.
 On the other side of the canal I wanted a very basic goods yard. The sort of thing where a lorry could be backed up to a wagon and unloaded by hand, no need for cranes or coal staithes or any of the other stuff you usually see. I did settle for a weighbridge as the most minimum of facilities, the build of which was featured in an earlier post. The floor was more powered paint dusted on dry and a few minutes of ‘driving’ a Base toys lorry around soon added some interest to the floor before it was sealed with Klear. I then used Tamiya gloss varnish to create puddles and baking soda for the raindrops. The whole scene was sprayed with Halford’s gloss lacquer to make it all look wet and tie everything together.
  In front of this will be another largish building which is shown here in the early stages of construction. I wanted to deliberately do things backwards as we human being aren’t actually very good at random things. We tend to see patterns easily and even if you have never studied art or illustration we have a natural bias towards well composed things. It would have made a better ‘picture’ if the building was behind the yard but in reality the railway is usually at the back of things not the front, It’s usually tucked away not the main feature.

More vehicles, greenery and a first for me.
 The above 2 vehicles represent a return for me in a small way in that both come from manufacturers I have used before and in both cases I was a little bit disappointed previously . On the left an Austin A40 from Road transport images who I used before for a dodge cab on New Street. In the case of the dodge cab I felt it was a bit too rounded and didn’t really capture the look of the real thing all that well but I must say I’m much happier with this little van which was an impulse buy at this years Scaleforum. This is one of their all in one kits which is unusual for them as they usually sell all their bits separately so you can build the vehicle you want. Road Transport Images
The Lorry is a Ford Thames from John Day models. In this case my previous experience was with a diesel-powered Transit bus and again I wasn’t all that impressed. This model couldn’t be further from the transit though as its much better cast with very little work to do. I swapped the supports in the bed for wire as they were a tad scruffy and the bed and cab both needed a little bit of evergreen 40thou section to make them fit a little better but I like it! John Day Models
 I decided that the track in my little yard looked too neat so I have attacked it with some powder paint (rubbed in with a finger then sealed with Klear) and some weeds. I’m much happier with how it looks now.
 Although I don’t have a goods shed I do need a loading gauge. I’m reliably informed that these were used to ensure that wagons leaving the yard were within gauge and not as some sort of protection for goods sheds. The above example is a typical midlands one and started out from the Smiths kit, I filed off the moulded lifting gear and replaced it with some spare handwheels (from Brassmasters) and bits of wire and brass.
 I mentioned in the title a first for me and this is it. Not that i’ve never built a weighbridge before (Although I haven’t) but i’ve never actually built a kit building before. When I was a kid my dad built some for me, usually Airfix kits and Linka, but all my buildings have been scratchbuilt up to now. So in the interests of breaking new ground this is a Wills kit. I turned the door over as hinges on the outside indicated it opened outwards which seemed a bit odd to me. I also filed off the panels on the end and rescribed the bricks and fancied a brick-built chimney but it is still a kit building. Oh and the guttering is bits of brass from Eileens!
Finally, you may have spotted earlier that Ive bedded in (most of) the abandoned warehouse, a few pictures follow:

Abandoned warehouse, nearly there!
 My abandoned warehouse is nearly there now. A spot of paint, Brassmasters windows and roof tiles kindly supplied by Mr Horn. These images show it roughly positioned. You can see a glimpse of the canal which I have also decided to depict as derelict and ill come back to that in a future post.
 Unusually for me the more interesting side is actually the side that people will see! The yard has been suitably strewn with waste from plastic strip and Scalelink bits. The 2 tanks are from Unit models.

A little bit of building work
 I’ve started on the buildings for Brettell road with one that locals to the Stourbridge area will recognise as heavily influenced by the bonded warehouse. Construction is based on 2mm card overlaid with South Eastern Finecast garden wall bond. The large tiles were kindly laser cut for me by Tim. I get a kind of perverse satisfaction by putting the interesting bits facing away from the viewers!

The public facing side is plainer than a really plain thing. Only the little bit of detail at the top of the smaller building giving any vague nod to any sort of design or creativity!

I plan to depict this building as abandoned, with all sorts of clutter in the now disused courtyard area. The base of the courtyard is foam-board and bearing in mind my wet theme I cut some holes in the top surface so that I could heat the plasticard with a hairdryer and give some variation to the floor for puddles. You can see how I approach the top of the wall with individual evergreen bricks (some missing of course!)  Close up of the courtyard showing the battered doors. I decided to depict the main building chained up with the now customary padlock in place!
A technological rethink
A while ago I wrote about the benefits of using modern techniques and processes, specifically laser cutters. However I have sort of come to change my view on this a little recently. You see, if you are doing more than 1 thing that is the same then laser cutting can offer a distinct time-saving. If however what you are doing is pretty much bespoke then the extra effort is, I have concluded, not really worth it. Take my retaining walls for Brettell Road. I did draw up the larger one but it took for ever. It turned out to be much quicker and easier to just get some sheets of embossed plasticard and get stuck in! I have to admit those that protest on forums that laser cutting is cheating really don’t have a clue what they are talking about because it’s a lot, lot harder than the old way. 

These walls use Slaters bricks and I have done the top row by cutting individual blocks from evergreen strip and gluing them in place. Even taking the time to do this (Which isn’t exactly taxing but is long-winded) these walls didn’t take all that long to do.

Wagon building continues and I have amassed a fair few now (probably enough for Brettell Road if I am honest). This is a diagram 1/019 BR medium goods wagon from the Parkside kit which, as is customary for their stuff, pretty much falls together out of the packet. The usual extra bits and bobs have been added to the underframe. 
On the left a BR 13 ton steel open again from Parkside while on the right a 13 ton sand tippler from Red Panda. I originally built this for Amlwch but never actually ran it on that layout so it can go here instead. It’s good to see that the small but useful range of Red Panda kits have recently resurfaced from Parkside. 
Finally this is pretty much what I hope Brettell Road will be all about, dark and wet! It’s always been my intention to depict a rainy night somewhere in the Black Country and this is the first time I’ve really been able to get an image that illustrates what I am looking for.
New(ish) technology or modelling witchcraft?
New technology, there are those who embrace it or those who reject it or seeing it as cheating in some way. It’s not a new phenomena or even restricted to railway modelling, I remember such discussions when digital illustration started to appear. With a hobby of course it’s up to you how you pursue it. Do you want the end result to be the best it can be or do you enjoy the route to the end result more? No one is ‘right’ in such circumstances but if someone choses to embrace new technology is it fair to accuse them of cheating in some way?
The finescale end of the hobby has always had a reputation for valuing the journey over the destination and for a long time detailed or converted RTR was frowned on as not proper modelling by those who scratchbuild stuff when in many cases the RTR looked much more like it was supposed to than the scratchbuilt stuff anyway. In reality though the finescalers have usually been the ones to embrace new technology and ideas first and the current crop of high quality RTR is largely down to people wanting something better. You hear it all the time, we’ve never had it so good and it’s probably true but things don’t get better if people just accept what they are given – they have to ‘want’ better too. It’s probably worth at this point mentioning that we never had it so good 20 years ago and we will probably still be saying it 20 years from now. Does anyone really believe that the current crop of RTR is the best we are ever to see?
So to the point – Laser cut buildings. Already people are saying that its cheating, that you just push a button and a building pops out of a machine but in reality it’s just a very very clever scalpel and while I believe the end result is better is it any easier or quicker?

What you see above is a simple canal bridge drawing for Brettell Road. Its drawn in illustrator and while I have used some time-saving tricks like custom brushes for the arch and a custom fill for the brick pattern it seemed to take a lot longer than just getting a sheet of brick plasticard and cutting it out. The thing is though I could convert the pattern to lines (expand appearance for those interested) and then tweak it. For example I could easily recreate the half width header near the corners in an English Bond wall while doing so with plasticard would have been a massive faff. In fact I wonder if anyone has even bothered, I know I didn’t think it worth the effort!

Above is the actual wall loosely positioned on its canal bed and towpath. The top row are routed and cut by Tim.

However laser cut can be a bit clinical. For the towpath I wanted a cobbled section but also a dirt section to – the finished cut was attacked with files and sandpaper to roughen it up. Going back to the point of New technology and illustration, I always thought, if Michelangelo or Leonardo Da Vinci had Photoshop would they have used it? Id bet that they would!
Getting started on the shopping centre
As mentioned in the last post, the class 08 springs were a side project, the main reason for my visit to Tim’s was to get started on the shopping center. The ramps at the Wolves end were drawn up as a set of parts in Illustrator and cut put on Tim’s laser cutter. The first of the 2 beams has now been basically assembled and mocked up for a picture.
 At the moment the top beam is loosely held on with blue-tac but you get the idea. The Laser cutter has turned what would be a bit of a mission into something that’s been quite a nice project so far and at least assembly wise, pretty easy.
Looking the other way
So far most of the pictures of the layout look away from the station. Most pictures people take at New Street look inwards. Problem is that while there’s no shopping center in place the common views of the real station don’t really work on the model. Having said that the opportunities are slowly opening up. Below is the latest ‘new’ view of the layout. It’s not just the camera that is looking towards the building. I plan to use a combination of Laser cutting and etching for the repetitive bits of the main building. Work has started on drawing parts up with a view to creating something solid in the new year. With it comes decisions though.
 The above picture (© Andy Thompson and used with his kind permission) shows where I plan to start. Namely with the ramps at the Wolve’s end. The picture also shows the effect that I am still considering with regard to making the layout ‘wet’ (see an earlier post). First decision concerns the sign above the nose of the 87. My era depicts the changeover from the Birmingham Shopping Center to the Pallasades Shopping Center. in this instance that means the above sign or no sign at all.
 Before laser cutters the sign would have been quite tricky but now it’s probably the easier option. I’m drawn to the image above though as it appeals to my ‘urban grim’ tastes. I’ll probably go for the none sign version I think!
To see more of Andy’s pictures click here.
There goes another angle!
As progress continues on the layout the angles available for photographs get reduced as more stuff gets put in the way. The biggest killer to this will be the overhead line equipment but as all of the track has to be built and fully tested before it can be added that’s an awful long way off yet.
At the Derby end of the station the station approach will cover some of the tracks and these are held up with concrete beams. It’s these concrete beams that are the latest thing to ruin the view. these are made from wood except for 1 leg on platform 12 which is evergreen square tube. There will be a signal mounted to that beam so the leg needed to be hollow. The basic structures were sprayed with multiple coats of Halfords filler primer to lose the wooden texture. The structure nearest the camera is freelance as the real road is supported by a wall which I have left of the layout to allow people to view the station throat.
 Close up of part of the beams on platform 10/11. The camera had picked up the wood grain a bit more than you see in real life but perhaps i should have done more coats of the filler primer. Texture comes from good old Plasticote Suede paint and it is weathered with enamels.
FAQ Part 1
One of the most common questions I get asked when I tell people I am going to model the shopping centre is ‘What will we actually see?’ So far I have had to try to describe that the intention is to leave off the rear wall of Platform 12 to give the viewer the impression that they are standing on the platform. With work complete on all of the canopies for board three I can now just show you what you will see if you ever come to see New Street at a show somewhere.
 This is the view from just under the roof at the Wolverhampton end, looking into the station.
 The view from the middle of the platforms looking towards the Wolverhampton end

A few signs of life!
Hopefully these views demonstrate why I felt I have to have the roof on as it just wouldn’t be New Street without it.
Building the platform canopies
I know it sounds a bit odd as the station was under a giant slab of concrete but New Street did have canopies in the traditional sense, although typically utilitarian. The ones furthest from the front of the layout are the easiest by the virtue that they are straight so that seemed like the logical place to start.
 Above shows the top side (that you wont be able to see) but demonstrates the construction which is standard 6mm foamboard. The outer edges are 30 thou plasticard scored at 30mm intervals to represent panels. The reason for the 2 rows per side of foamboard is its easy to drill a 3mm hole through the inner one and pop an LED through (I use cheap strings of Christmas tree lights to save a lot of soldering).
 This is the underside. The ribs are just evergreen board and batten sheets, the whole lot was sprayed black and then sanded to get back to the black and white pattern. The cutouts are for pillars and structures on the platform which will need to support the shopping center above. By using foamboard you can position it on the platform and then press down to get an imprint of where the holes need to be. Below is the finished result which I feel captures the feel of the place before its facelift in the early 1990’s.

best laid plans
Planning is good as it saves on materials but every now and then its a good idea to check against what you are doing (if only to get a different feel for it). That’s what this picture is all about.
 The string mock up shows the raft above the Eastern end of the station. The main string that crosses the baseboard is the edge of the shopping centre roof while the one that heads towards the bottom right corner shows the station approach. (the clutter on the track is the result of a few tweaks to the platform edges for clearance purposes.
 The above drawing shows the shopping centre from the Western end with a class 47 for scale. You can see that I plan for the shopping centre to over hang the front of the layout a bit (which will be on the right).
 This is the plan of the roof – I have decided to change the angle of the right hand end to fit with the layout of the station undereith better. To give a sense of scale between this and the real location the building in the upper left corner and marked in red is shown below.
 I believe that it is the back of the Burlington Hotel. The footbridge shown in the foreground was added in the early 1990’s so it’s too new for the layout.
He’s not still on about timetables and lights is he?
Afraid so! The good news is my waffling on about timetables is now complete as the walls at the wolves/derby end are now done.
 There are 8 of these boards, each with 16 timetables.
 If I do say so myself its starting to get the feel of the place now. ie. grim!
The bad news is I am now thinking about the lights that go under the roof. As these are on all of the time they are going to have to work! Not knowing the best way to do this I built a quick mock up of a section of the ceiling.
 the light on the left is just a LED shining through a hole in the foamboard. The one on the right has its ‘section’ lined with foil. The difference is quite marked.