shuffling and testing.
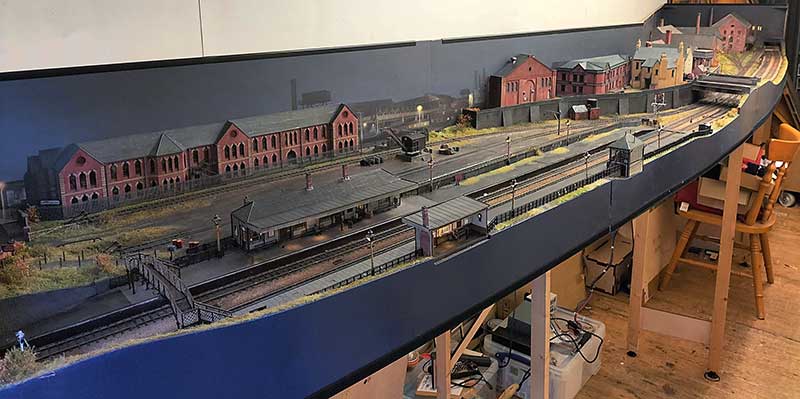
A bit of re-jigging of the shed means I have been able to put all of the scenic boards for Brettell Road up together. Its 5 months since the Cradley show – Time flies doesn’t it?
Theres a few things to fix after the show. A couple of the points needed a check over as they weren’t totally reliable. I also found 2 dead sections that hadn’t shown up during the show so I fixed those too. 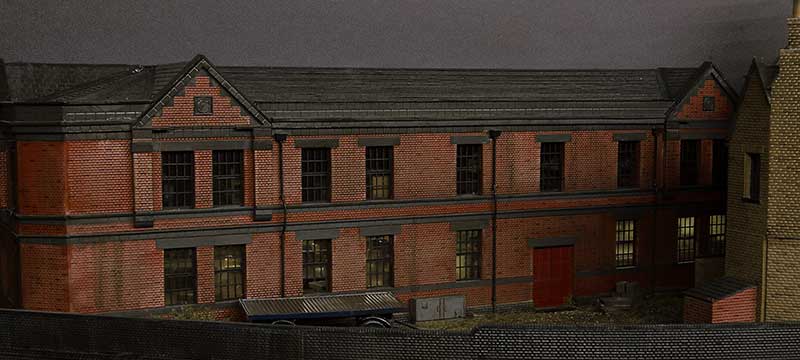 The lights on the upper floor of this building failed before the show but after the building had been planted onto the layout. It was too close to the show to fix it before so this is something to look at now I have time. I also want to add a few yard lights and sort out the telegraph poles on the layout because as they stand now they don’t make a huge amount of sense.
The other thing to fix was the route setting on the main lines. Signalling purists are advised to look away now! Before the track and signals were all operated separately via the throttles with only the yard set up as a route. (My Digitrax system allows me to program routes into it.) So thats been changed for operator convenience so that throwing a signal sets the route as well. I know the route should be set then the signal pulled rather than this way round. You can set the signals to danger on their own but in case you forget the routes will set all the other signals to danger for you anyway. I hoping this will be pretty simple to use.
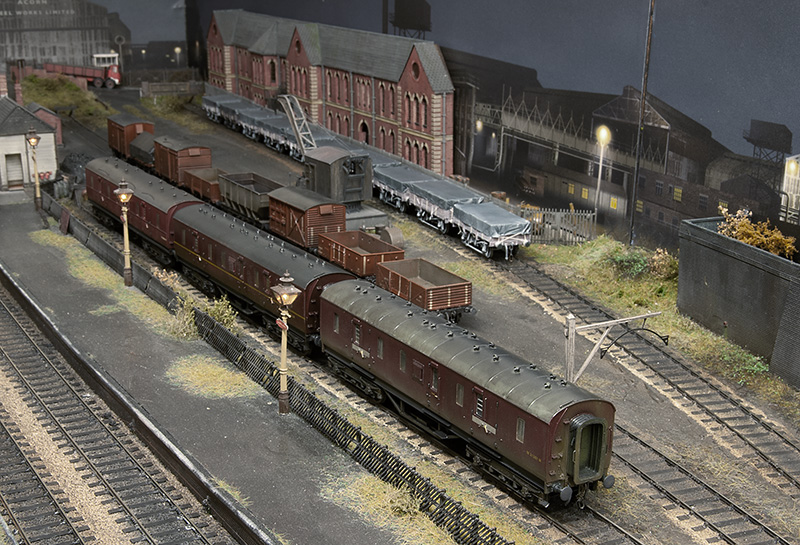 Since the show I have a small stockpile of new rolling stock to be tested. The rule is all stock must go everywhere without falling off, even though in this image only the middle road of wagons will go into the yard at shows. Of this little lot only 4 wagons were rejected and returned to ‘works’ for some fettling. These 4 have now been passed too.
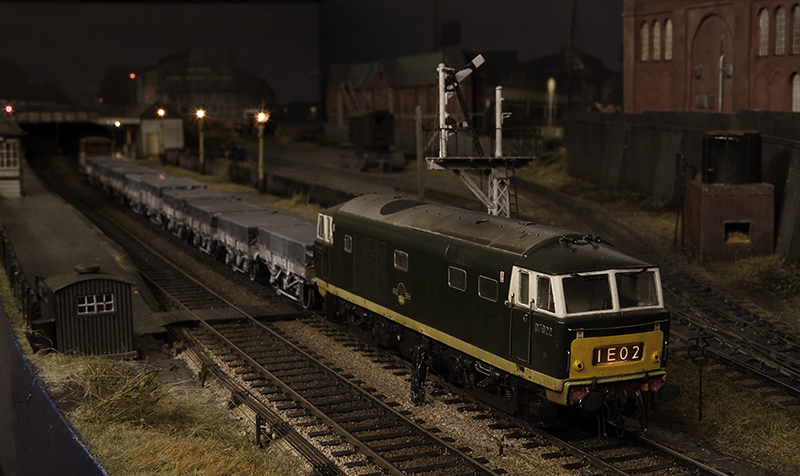
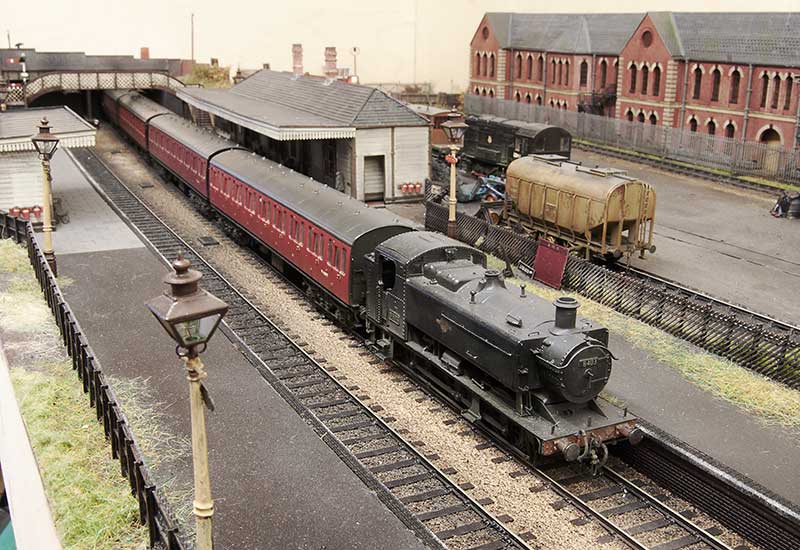
Below, just some more traditional layout style pictures. 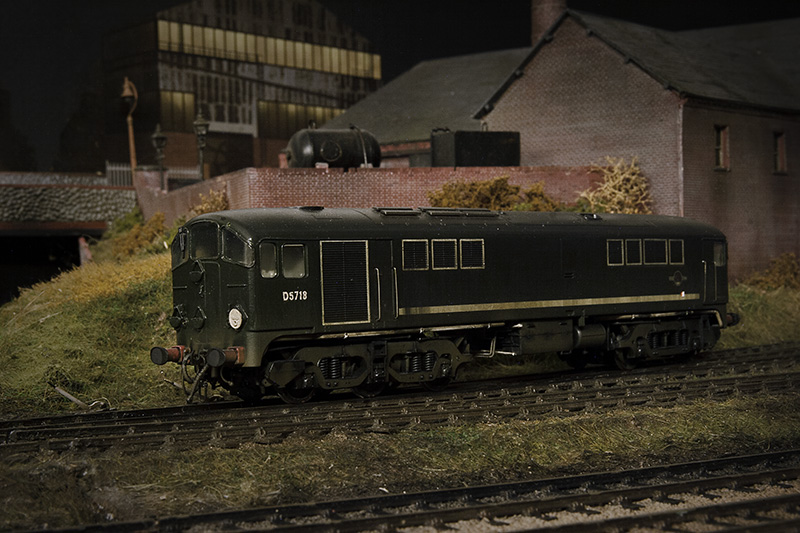
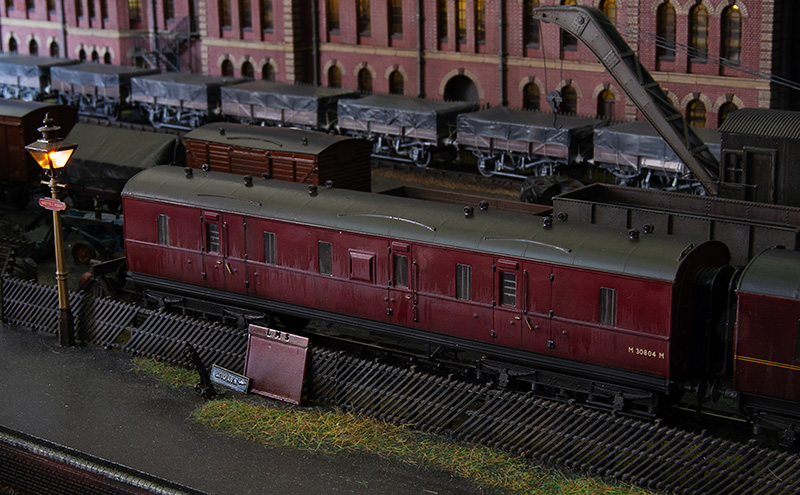
The good old Mainline LMS BG
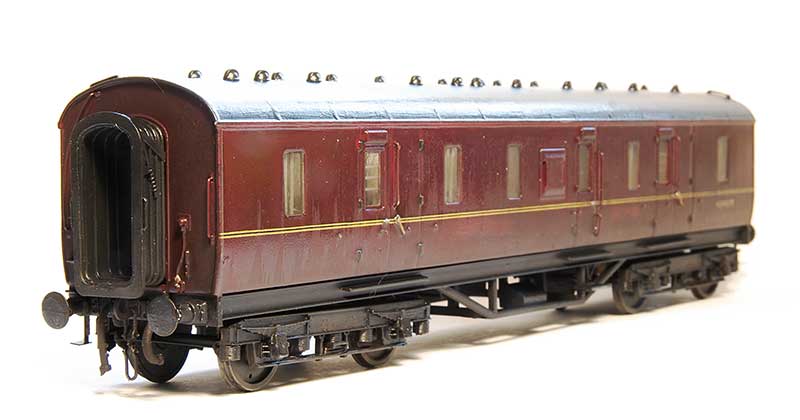
The subject this time is this…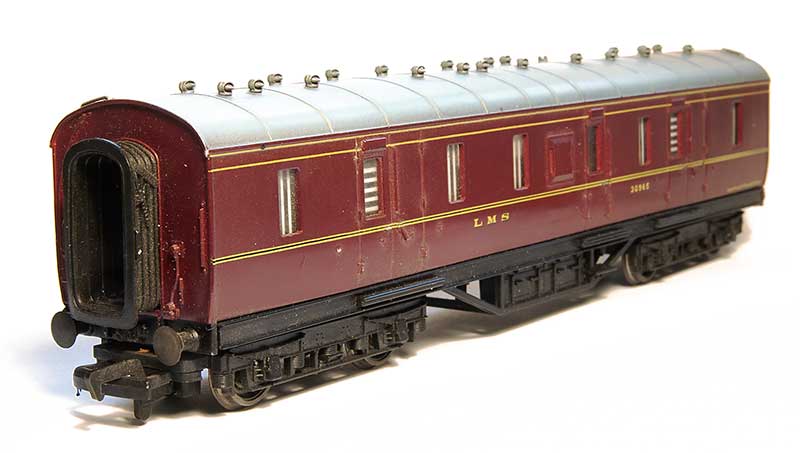
… the good old Mainline LMS BG. A great model for its time but not without room for a little bit of TLC. There is an error here that once you see it you cant un-see and that is that the underframe is too wide by 2mm. Ive talked in the past about looking at dimensional errors as a percentage. 2mm off over the width of a coach is a much larger percentage than 2mm over its length but theres an additional factor in play here and that is relationships. If the whole model was 2mm to wide you might (but probably wouldn’t) get away with it but when only part of it is, it just looks weird. Let’s be realistic here we are talking about 1mm per side but that 1mm means the edges of the solebar framing sticks out from the bottom of the body rather than tucking under it. Also the footsteps don’t line up properly but thats a minor thing.
So the options then. You could just replace the underframe with a Comet one but at the time they were out of stock and the trussing is a flat etch so no real improvement over the one already there. Or you could slice 2mm out of the centre of the floor and glue it back together. The issue with this is I don’t think the trussing itself is over width. To me the simplest solution was to make a new floor from plasticard (29.5mm x 196mm) and transplant the trussing from the mainline model. The new solebars are 4mm channel from evergreen.
 So heres the model had already done on its new underframe. The bogies are Brassmasters with the original sideframes attached. Buffers have been replaced with more accurate ones from Lanarkshire models.
 As is usually the way for me I got a little carried away. Why build one new floor when you can build several? Theres a few subtle differences here such as the roof vents and footsteps.
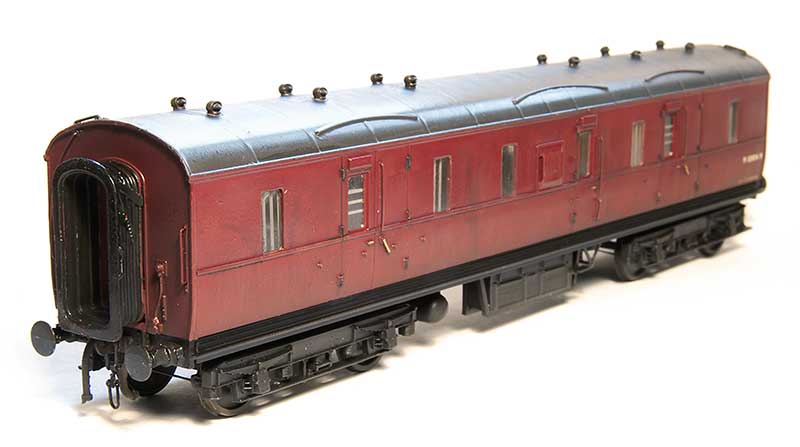
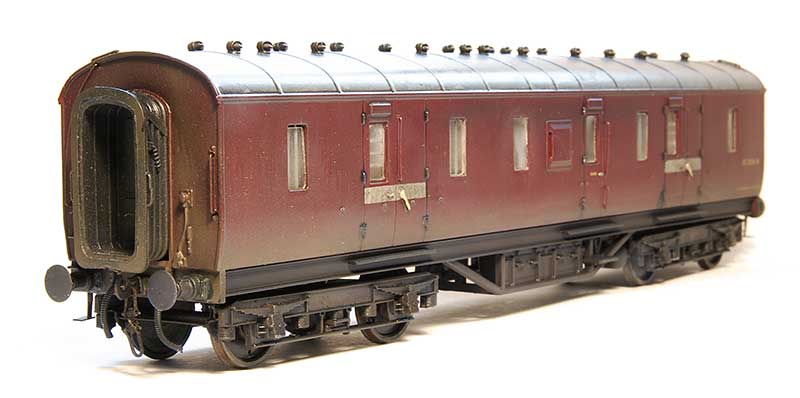
As with any grouping of things there tends to be one member thats a little bit weirder than the others and this is it. The diagram 1715 version. OK it looks kind of the same but the qay it was build was quite different and actually much more like the much later BR Mk2 in that the body was where all the strength is and it didn’t need a traditional underframe. The solebars themselves are also different in that the outer face is solid. Other variations are the positioning of the roof vents, bodyside beading (which comes in a whole load of variations on these coaches anyway), the extra rain strips and the full length footboards
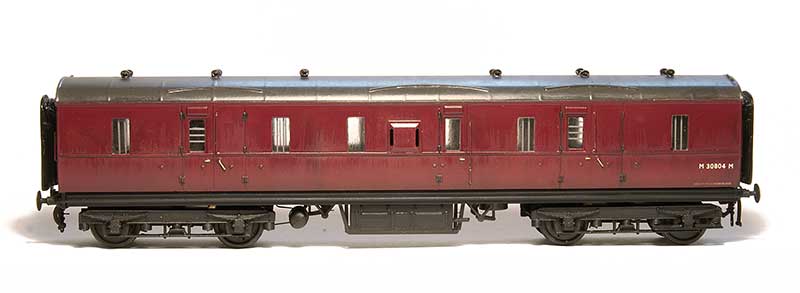 This is the more normal side. Note the dynamo is at the opposite end to the more standard versions.
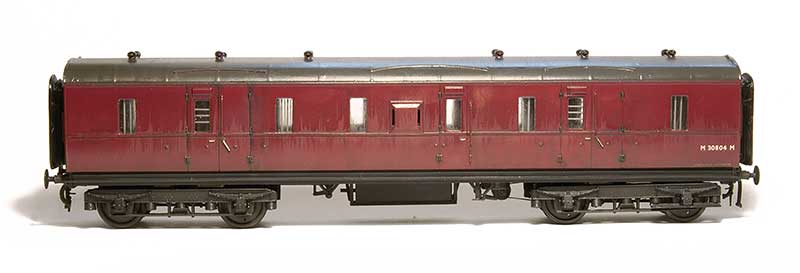 The other side is decidedly more odd with basically next to nothing there. It almost looks like the model hasn’t been finished. Note also the steps on the bogie.
Just a quick note to thank Mark Tatlow and Graham Speechley for their help locating images of the diagram 1715 version.
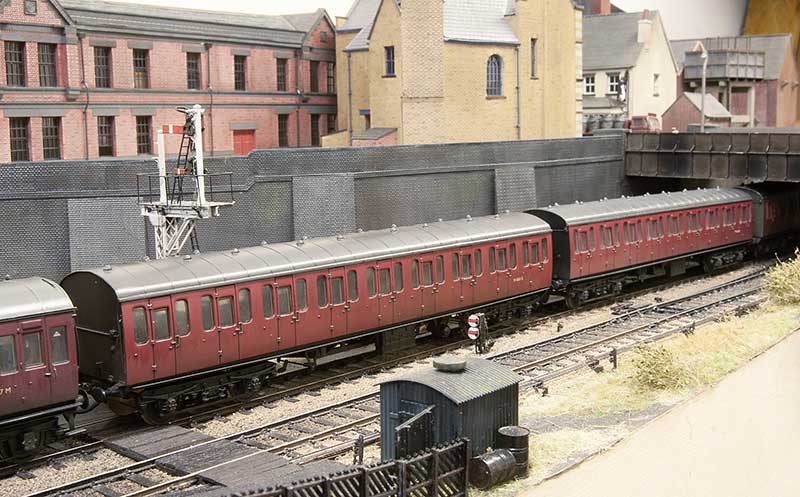
Stretching things out a bit.
One aspect of making Brettell Road longer is that the original fiddleyards will need to be replaced. As such the opportunity will be taken to increase their length from four feet to five which means I can increase the cassettes from three feet long to four and a half. Any bigger than that and cassettes start to become unpractical and a bit sketchy anyway.
 A four and a half feet long freight train on Brettell road.
 A four coach passenger train. When I built this originally one of the (then 3 coaches) wasn’t finished as I hadn’t detailed up the underframe yet and just swapped the bogies. This was due to Brettell Road’s first outing coming up (Scaleforum 2018) and it never got moved from the ’roundtuit’ list since.
 But when another cheap coach popped up I decided to get this little train ticked off so they were both detailed up together. Leaving just one thing outstanding…
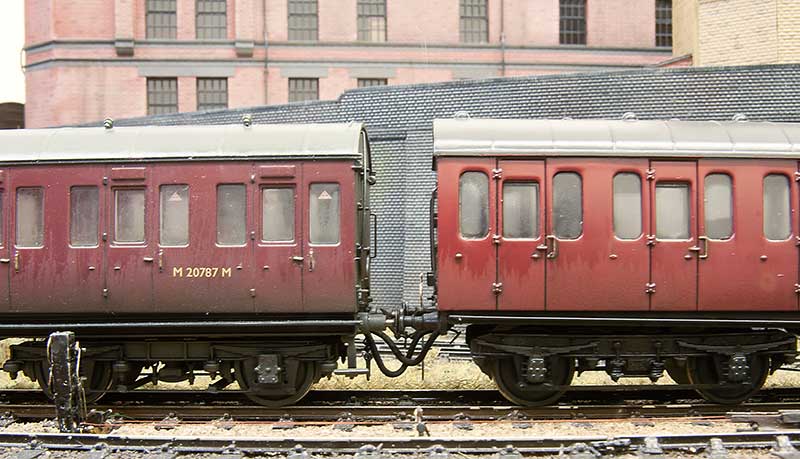 …the brake pipes. I admit to not using working ones on my wagons, as the layout is principally a shunting one, but as this is a fixed rake of coaches why not? I came up with the original idea for this back around 2005 and articles appeared in update and MRJ. The original update article can be downloaded from here. Where I have differed from my original article is to have one long pipe for the vac pipe and another long pipe for the steam heat pipe I figured 4 short pipes would just stick together in a clump! So theres a magnet on the end of the pipe that connects to a magnet in the bufferbeam. All simple stuff really but it does mean that the coaches and their pipes have to be couple up or the pipe will drag on the track and no doubt get stuck!
Old ‘uns and a possible change to how the layout is presented

So to draw a line under the last post. The Lima CCT is finished off and ready for service.

So is the crane. It rides very high as supplied so I ground the bearing slots down and removed a bit of material from under the axleboxes (its still a smidge to high). Seems strange that Hornby raised the ride height on all their models to accommodate their tension lock coupling. Why not just make that smaller instead?
The end shackles are from Roxey and the cables are the heavier e-z line. Transfers are from Cambridge Custom Transfers. The single plank wagon is just standing in at the moment.

One of the issues with Brettell road is the height it sits at. The subject of layout height is a thorny one but I take the view that operator comfort trumps everything else. After all we will be working on the layout for a couple of days . Currently its a bit low which I’ve got round by asking show organisers to provide chairs. From a sitting position its just about the right height.
However I’ve been thinking of doing a more traditional style, separate roof and here it is mocked up. Its designed so that it all slots together and no screws or bolts will be required. It will still have a material roof to shield the ambient light but it should make the layout itself a little lighter too. The plan is for the original pelmet to be removed.
A couple of old ‘uns in progress
Recent attention had been on a couple of older RTR efforts. Starting with…

…a Lima CCT. Yes I know there’s a Bachmann one now but the Lima one isn’t all that bad given its age. It suffers from the sometimes common Lima trait of getting most of it about right but then blowing it on something obvious for no apparent reason. In this case the W-irons are just too far from where they should be.
This can be addressed with replacement from ABS (or at least it used to be!). New roof vents and underframe bits and bobs plus filing off the, freelance, window frames and we’re about there.

Next the old Hornby hand crane. This one uses rollers and a counterweight from Jon Hall. I’ve widened the jib and added extra details.
Return to Motorails
 A long time ago now I started work on 3 motorail coaches for New Street. The motorail train at 15 coaches will be the longest on the layout. The first coach was relatively easy (the blue and grey one in the picture) but the blue ones stalled because I wanted to do the ones that had Mk1 style divided windows. I got as far as drawing up and etch but never got it actually produced. However Brian of Extreme etches has done a set of window frames for the BG coach and these are the same so i can finally tick these 2 off as well. Some standard GUVs had these windows too so ill be doing some of those as well.
A post post!
 Originally I wasn’t going to really have ‘through trains’ on Brettell Road – the through line was only going to be used by the industrial shunter but like most of the plans for this layout it all went a bit wrong. So now that the branch is used by BR as well it made sense to have a short parcels train. I had already done a LMS GUV from the Lima model but in another hark back to my childhood train set I always liked my Lima Siphon G as well. I’m not quite sure what happened to the original one I had but I found a bashed up one on Ebay for a few quid and set to work.
  The Lima body has had the lower vents added from the cooper craft (ex blacksmiths) etch. Kindly picked up for me from Scalefour southwest last year by Steve Carter of the Scalefour Society. The bogies are MJT on the brassmasters frames, as are the buffers, with small steps from the Frogmore Confederacy Range (both available from here). The gangway is a Hornby DMU one which I cut into from the bottom and glued back together to give that characteristic drooped look.
  The other side with some of the vents left open.
  In terms of somewhere for the guard to sit, the good old Mainline LMS BG. just new handrails, glazing and underframe bits on this one.
 A couple of RTR wagons from Bachmann. the Grain wagon has had its axleboxes replaces with Parkside spares and the brakes moved to line up with the wheels. Finally below just a few images of my Jinty pottering about.


One thing leads to another
On a couple of forums people asked for more details on the Lowmac compensation shown last time so…
 This is the underside. It’s best to set everything up with normal bearings first so that the rise height is correct. Then a simple case of adding a bit of scrap etch for the axle to rest on.
 Once happy you can replace the bearing with ones that have been filed into a slot. This means the ends of the axle can move up and down, it really is that simple! On the subject of track holding…
 This is the Chivers kit for the LMS fish van (diagram 2115) of course ive done plenty of 6 wheeled bogies before but never a 6 wheeled wagon. Brassmasters do a clemenson chassis for 6 wheeled vehicles but as the fish van has stretcher bars I didn’t think it would work. To the right of the picture is a Bill Bedford pedestal suspension unit converted to inside bearings, the outer axles use normal suspension units. The plan is to join them all with wire so that the center axle can slide side to side. Speaking of 6 wheeled vans and clemenson chassis…
 A black country icon, the Palethorpes sausage van. this uses the ancient Hornby model (well 2 of them) and chivers sideframes. You can see from the picture where the 2 vans have been cut up to correct the length of the van as supplied. Note also the strange backwards brake lever.
 Where the fish van is quite open underneath these vans are not. They were fitted with onboard lighting and internal fans thus the dynamo and battery boxes. It’s all a bit cramped really!! Speaking of palethorpes…
 The 6 wheeled vans bigger brother. Surprisingly you only need 2 vans to do one of these too! the underframe is from the comet kit. And finally on the subject of bogie vans…
 the good old Lima GUV, fitted with new bogies and underframe details.
More mk1s
As coach building continues for New Street, much of it is more of the same and to some extent so is this
Another Bachmann mk1, fitted with replica bogies and the usual details. Like the rest of my Bachmann based NSE liveried stock I repainted the blue to something lighter which I feel better matches the early vehicles so painted. The IC liveried coach behind was completed at the same time.
Class 11 finished off.
 Not a lot to say really, the class 11 is done and ready for service. Here’s a few pictures.

 OK so the irony isnt lost on this one but its a good comparison between the class 11 and class 08 shunters. Of course class 08’s never carried LMS livery in their early days while the class 11s did. It will be interesting to see if anyone ever notices that 12049 is a bit more than a repainted 08!
 Whilst I had my airbrush out the Mk1 got all mucky too!
 I haven’t done any photo-shopped pictures for a while but here’s a spot of shunting.
back to the class 11 and a thought on coaches
My class 11 is ready for a visit to the paint shop  I prefer to give models a coat of undercoat when the basic work is done before adding details as this allows me to see any areas that need attention first. The rivets are archers and the ladders are Colin Craig’s.
 One thing you can’t do is just refit the brake gear as it will now sit too low and too far from the wheels. My solution was to trim the mounting blocks down and add new pegs from microstrip set to bring everything back in line.
  With plans afoot for my what if the Flatirons weren’t scrapped idea I have decided a short passenger train might be in order to go with it. As such I picked up an old Bachmann Mk1 suburban for a fiver on eBay and set to work. Starting with the bogies.
  These are the older style Bachmann bogies and P4 wheels would have simply dropped in but the out of line brake shoes kept catching my eye so I mounted them on my own etched subframes (available from Brassmasters). The top image shows how much of the original sideframe is reused.
  The principle work done to the mk1. Starting from the top the roof ribs have been reduced in size, Replica Railways windows have been added, bufferbeam details and steps along with underframe details from Masokits and Replica.
more coaches ticked off
 The Bachmann/airfix Mk2c is now done. Additional parts coming from Southern Pride (Roof Hatch, extra underframe box, and GM roof vents), Replica for the bogies, MJT for the dropped buckeye and retracted buffers and ABS for the extended ones.
 Also complete are my other 2 newspaper GUV conversions. I tend to like to do a one off prototype and then batch build the rest but there in lies a question. What size batch is best? OK a batch of 2 as in this case and the case of my Mk3 pullmans (shown below) isn’t much of a saving but large batches seem like too much of a mountain to climb. Take Mk2 coaches for an example (and probably the most extreme one on the layout) logically it would make sense to do them all together. It would be easier, and the results would be consistent but just working out how many that number is, is a job in itself. I’m sure I can get way past 50 without any effort at all and even 100 is only approximately 10 trains.
Such a number is enough to drive the enthusiasm out of even the most dedicated person but what about doing them train by train? For some trains that might just work. The Brum to Norwich train springs to mind as it’s just 6 early mark 2’s, 4 of which are TSO’s. That seems manageable but most trains are longer – some a lot longer. I have found video of a class 87 hauled motorail train at New Street that’s 15 vehicles long. Not that many of them are the same type either. This is the problem. I’ve identified a need for at least 5 Mk2D BFK’s, 2 of which are in the same train but these are a bit of a faff (not horrendous mind you). Doing them train by train is not efficient at all. So whats the answer? Does anyone else build in batches? If you do how do you approach it?

10th April 2014

Those who follow the workbench section of the site will know that I have been converting a Hornby class 110 into a class 114. Well its nearly done now (just a few tweaks to do) and a new page has been set up for it in the units section.
There are also new pictures in the coaches section and a new page for steel wagons (admittedly with only two to look at so far).
Take a brake
By my era most brake vehicles took the form of a BG of some description however there were some other brake coaches to be found. Most were air conditioned mk2 BFK’s and combining an Airfix BSO and FO together to get one is a common cut and shut project (See example here) I need at least 4 of them so far (2 are for the same train!). However what about the mk2 b’s and c’s
Doing things the hard way
One option is to have a go at improving the lima mk2b. New window frames would be the biggest improvement and I believe Extreme Etches are working on some. The lima underframe is a bit barren and what is there isn’t all that well represented so I have cut away the battery boxes and replaced them with some from Replica Railways. They suffer from the same shallow buffer beam and too high buffers as the mk2fs so these have also been addressed too. Bogies are, again from replica railways but there is some way to go yet on this one.  The easy way
All that is, I admit, a bit of a faff but the coach pictured above is one of the oldest models I own – it must be getting on for 35 years old or something so there’s a little bit of sentiment attached to it. I also plan to do the same with Lima SO’s and FO’s too and have been steadily stock piling them when I see them for a few quid on Ebay. Besides who doesn’t like a challenge?
There is however a much easier way and its linked to the Air Con BFK project mentioned earlier. You see you end up with spares when you do a BFK. If you do them in pairs the discarded half of the BSO can be mated together to make a mk2e (or with a bit more work a mk2f) SO. The discarded halves of the FO’s are a bit useless though. So with all these spare ends featuring wrap round doors it makes sense (to me at least) to lop the end off a Bachmann mk2a and replace it with the scrap end to produce either a mk2b or a mk2c.

Theres a bit more work in the C than the B as the roof will need to be changed and a hatch added (Southern Pride do them and the vents). Some Mk2c’s had the larger toiled window and no vents, some had smaller and vents like a mk2d so there’s a bit more work there too. Adding the airfix end also makes the coach longer too. On the underframe the boxes will need to be raised up as I have done with all of my Bachmann Mk2s and there’s a few extra bits and bobs to add but this is a nice and easy way to something a little different.
That Mk1
 Last week saw several new partwork magazines hit news agents and supermarkets. Along with Star Trek and Doctor Who was Your Model Railway Village which came with a piece of track and the above mk1 coach for just £3.99. Since then some of the forums have been awash with the usual ‘im buying 50 of them’ while others argue that they shouldn’t be so greedy and leave them for the new entrants to the hobby (yawn!). While the mag is little more than a pamphlet if im honest and I would doubt many would follow this through to the end anyway (including the publishers I expect), issue 1 has apparently done quite well for them. Ok you are not going to find a jinty stuck to the front of a forthcoming issue, you have to buy that separately (timed around Christmas if the publishers have any sense) the Mk1 is quite a surprise.
I do wonder who its intended for. Kids with train sets already who just want some cheap coaches or newbies who will probably find themselves in a crumpled heap on the floor of a model shop when they pop in to add another coach to their new collection and find them something like 7 times the price without a magazine!
The coach itself isn’t actually that bad. Id go as far as to say if it wasnt for the Bachmann mk1’s it might actually be one of the best RTR Mk1’s out there. Sure its crude but look at what we had before with Lima and Triang. At least it’s flush glazed, the gangway is roughly the right shape and the bogies are about the right size (the lima ones werent). It’s a tad long and the underframe is hopeless but it’s not that bad really. It is perhaps what Hornby’s railroad range should have been rather than re-released lima items at not far enough from top end prices. It certainly makes the gap in the market for Hornby’s own mk1s a lot smaller than it was.
But, and this is a bold statement, I do think this might be the most significant RTR release for a good few years. Before you think ive gone completely mad let me explain. We have had some excellent models recently, class 85, 350 blue pullman etc with increasing accuracy, detail and value added paraphernalia such as lights sound etc. Obviously the above mk 1 is nothing like them but the effect it seems to have had on a lot of forumites is enormously encouraging. People are talking about improving them themselves, converting them to other things and even at the price having a go at weathering with not a lot a lot to loose. That is why I think it’s so significant, it seems to be getting people thinking about doing stuff for themselves rather than expecting it done for them.
So to anyone who has brought this mag with a view to getting their scalpels or paintbrushes out give yourselves a pat on the back, THAT is what the hobby is all about!
Go compare!
As well as being a deliberately annoying advertising campaign comparing models is not really a good idea. Sure its good to see, out of 2 models side by side, which is better but ultimately a model should really be compared with the prototype it represents. On the surface the Lima 37 looked a better model than the old Hornby one (with its class 47 bogies) but the truth was neither really looked like a real 37. The irony was if you tidied up the old Hornby moulding the bodyshell, at least, was the closer of the two.
Now there’s a chance that some people may be thinking “whats he on about now, he often posts before and after pictures of his stuff” and indeed they would be right (there’s a whole page dedicated to the subject in the vehicles section). However it does pay to keep a track when modelling stuff on where you started from. I am sure we have all seen ‘detailed’ models that actually look worse than what the modeller started with. If we are honest we probably have all been guilty of doing it ourselves now and then. The other advantage to doing this is it helps people that are new(ish) to the hobby, and especially the modification of RTR stuff, decide for themselves if the effort is worth it to them. They may decide it would be too much work or risk for what they see as little gain and that’s absolutely fine. They have made an informed decision and no one can argue with it.
 All of this is really just a (somewhat dubious) justification for still waffling on about those Mk3 Pullmans. To me the modifications to the window frames, bogies and adding flush glazing (either DIY or Laserglaze) is a small amount of work for what I feel is a quite significant gain but by you might agree, you might not. All im really doing with the images above and below if giving you the tools to make your own mind up.

I havent been able to shake off the Parcels stock thing either with yet more Lima GUV’s receiving attention. Compared to the Newspaper one shown earlier, a motorail version is a nice easy project.

The bogies are Replica again and the buffer plates from DC kits (Replica do them as well). Retracted buffers (at the far end) and the dropped buckeye coupling are from MJT as are the roof vents) the lima ones are a bit vague/freelance). Extended buffers (this end) are from Four Most Models.
Mk 3 Pullmans
One of the trains I want to recreate is this one. A summer Saturday service using spare Manchester Pullman stock and a pair of 31/4s. The 31’s and the RFB are already done but whats also needed is 3 Mk3b Pullman coaches. Lima have done mk3 Pullmans so they are the obvious choice to use in this instance.
 One little tip that you can do to any Inter-City liveried Lima mk3s is to sort out the amount of silver on the window frames. Lima supplied their coaches with the whole frame painted silver while in reality there is only a fine silver beading arround the inside of the frame. As the coach seems to be moulded in the same colour as the grey I gently sanded the silver off before re-applying with a ruling pen (it doesn’t have to be an expensive one for this). The difference can be seen above.

The other area that the Lima coaches have always disappointed is the ends and particularly the treatment of the gangways. Within a set it pretty hard to see and not really something to lose any sleep over but as one of the Pullmans will be at the end of the rake I wanted to improve the look of the end.
On the left is a tarted up lima end with MJT retracted buffers and new handrails. Its worth continuing the striped arround the end as lima didn’t bother. On the coach on the right I have fitted Four most models extended buffers and cut holes for the tail lamps. Mk3 Pullmans had them at least as early as september 1986 if not from new, as you can see i havent bothered adding these to the inner coaches. The big change is to cut out the original gangway and to fit a spare Jeouf one on its place. Obviously the roof needed to be cut too so that it would fit.
8th August 2013
 Just a short update this time. There are several new images in the class 25 gallery as well as a new picture in the class 50’s. Click here to go to the class 25 page.
 There are also several new pictures to look at in the coaches section, click here
Revisited Locos part 3
Well these 3 are done. The original picture is recreated below.

Much happier now, in the end I did a full repaint on both clasa 25’s. I’ll add more pictures of the 25’s to their page over the next day or so.
While the 25 roof fan mod is an improvement over the Bachmann original the difference the Extreme Etches fan grill makes to their Peak is a bit more drastic!
 I never realised just how undersize the original fan moulding is. This one is much easier to fit though as the entire fan and its mounting ring is the size of the opening for the new fan.
Finally I know I said id wait but as I was respraying the 25’s in blue I did the Newspaper GUV too. Below is the result.

Gangwayed GUV – Part 2
 My Gangwayed GUV prototype is essentially complete (I have 2 more to do that I will do as a batch). The roof has been slightly reprofiled to mate with the body sides better and the little details added. Theres a few more bits to do (dynamo belt and safety chain along with couplings ETH and end pipes etc) but this one can now wait for the other 2 to catch up and then all 3 can go for paint.
Evenin’ Mail Guv?
As you may have guessed I am quite a fan of some of the old Lima Models but there were some real gems in the range that were a long way ahead of the competition at the time. The GUV is one such model, the Sealion is another, which bogies aside still stands up well against the current versions of the same vehicle. The Bachmann GUV is a better model out of the box but with a bit of work the lima one can be its equal. It’s also a lot cheaper which makes it good for bashing into different types.
One type I have wanted to do for a while is the Gangwayed Newspaper variety. Newspaper traffic was just drawing to a close at the time New Street is set.
 My chosen route was to use the lima body and underframe mated to a Replica BG Roof and ends with the same companies B5 bogies. The handrails and ‘blackboards’ were cut/filed off the bodyside and a new toilet widow added at one end. I also removed the raised window beading that GUV’s never had.
As the roof and ends are now permanently attached to the body I cut 3 large holes into the floor so that I could get back inside to do the windows later. The battery boxes have been cut off the underframe and replaced with new ones from Hurst Models while the buffers are MJT retracted ones. For some reason the dynamo was mounted the wrong way round so this has been cut off and re-attached.
To mount the B5 bogies a pad of 100x250thou microstrip was added to the flor and drilled for a 2mm bolt.
The other 4mm scale Mk2 Aircons
The Lima mk2f. Not a bad effort for the time with a better body shape than the Airfix Mk2D. It did have a few problems though.
It used their Standard B4 bogie which appears to be something like 3.8mm scale rather than 4mm. There was no attempt at flush glazing and its a bit odd lengthwise. I say a bit odd as it’s too short but in a strange way. I shall attempt to explain. Overall its 2mm short (which is less than 1 percent) but between the doors is 4mm short. The error seems to be in the shape of the ends and for some that’s a problem. I’m not convinced its worth the faff to put right so im just going to ‘tart one up a bit’.
 In order
- New buffers. MJT for retracted ones, Fourmost models for extended ones
- Deeper bufferbeam (a strip of 40×40 evergreen). This allows you to mount the buffers lower as they are too high on the original model
- End steps (from me when I have them)
- New handrails from 0.33mm wire
- Bogies steps (also from me)
- The air conditioner module needs cutting off and mounting further in from the front – The shroud is 9.5mm evergreen tube with the end chamfered on the inside.
- Spare brake gear from a Bachmann Mk2 – you could use the same S-kits/Genesis combination that I did for the air braked Mk1s though.
- New bogies from replica. A pad of 100×250 though evergreen glued to the lima floor will give you the right ride height.
Still to do – ETH gear and glazing (shawplan do laser glaze for these coaches if you dont want to cut your own. ) Of course you can just wait for the Bachmann ones.
OK whats wrong with this picture?

Not everything that was first class had the yellow stripe it appears. When the Mk3a RUB’s were converted to RFB’s the only external difference was the addition (sometimes in a fairly slapdash way) of the number 1 on one or both doors per side.
 The above image ( © 2012 John Turner/53a Models of Hull Collection and used with kind permission) shows just what a Heath Robinson affair was made of some of the vehicles. Note the 1 is a different size to that on the Mk2 nearest and that it’s in different places on both doors.
It’s all good fun and will give the ‘exhibition experts’ something to get excited about.
To see more of John’s superb collection of images click here.Thanks to those on the Coaching Stock Yahoo group for their assistance on this one.
Mark 3 buffet project finished (well nearly)
 Aside from weathering 3 of these my Mk3 buffet project is done. Quite a bit of work has gone into them and I bet no one notices! Ironically the one on the far left would have been almost out of the box if I’d used a Lima one but i used a Joeuf one as I already had it. (the roof had to be tweaked as well as the mould lines removed but that’s par for the course with Jeouf mk3’s.
The eagle eyed will spot that the blue and grey liveries don’t match and this is something I havent seen mentioned before but they don’t. Blue and grey loco hauled mk3s have a slightly different treatment to the blue and grey HST mk3s. By kind permission of Dennis Taylor the two images below illustrate the difference.
 image copyright of Dennis Taylor/80s Rail
HST First open – note the bottom of the grey runs through the door handle and above the grab rail.
 image copyright of Dennis Taylor/80s Rail
Loco Hauled first open. Note that the bottom of the grey is much lower and runs through the grab rail.
Dennis’ online galleries are well worth a visit for those modelling the 1980s. Click here to see them.