Just a few pictures.
Just decided to do a few images, including a view of the canal which I’ve never gotten round to and a few experiments.


Hornby Hacks 2 – The NBL class 21, part 2

My class 21 project is now finished. Above is a before and after comparison. Not a lot more to add really so here are a selection of images.


Hornby Hacks 2 – The NBL class 21, part 1
I’ve mentioned before that Brettell road is a ‘what if’ layout and that extends to the stock as well. So what if the NBL class 21s were trialed in the Midlands? It’s not a huge leap to make from reality really and its reported that they did appear on the Condor’s occasionally (anyone got any pictures of this?). I’ve always had a passing interest in the Hornby class 29 as its melancholy look seemed to stand out from the other diesels in their catalogue as a kid. I never had one though so why not get one now?
I prefer the original look of the class 21 to the re-engined class 29 so that’s the plan. The Hornby model has bits of both. (I know about the upcoming Dapol model but I figured going this way would be more fun!)
The Prototype

©53A models of Hull Collection, used with kind permission. Click here to go to the original.
Although the class 21 and class 22 became something of an irrelevance in the history of British locomotives their story does hold a bit of interest. NBL could have been said to be at least as experienced in British loco production as anyone else at the time with their LMS commissioned prototype 10800 and the class 16s which shared a strong resemblance. Both were powered by Paxman engines and both were somewhat problematic.
When it came to type 2 units (or type B at the time) they abandoned the Paxman power unit turning to their own built MAN units, built under licence from Germany. It’s not clear if NBL actually had any real experience in building these engines at the time and to say they were somewhat disastrous wouldn’t be far from the truth. NBL would return to Paxman to repower some of the class 21s and they would be class 29. Truth is they were little better. Poor cooling and badly laid out equipment only made matters worse for the class.
Where they do hold an interest is in that the class 21’s were diesel electric while the class 22’s were diesel hydraulic. If they hadn’t have been so problematic then a reasonable comparison of the 2 propulsion types would have resulted. This was the only opportunity for main line locos in the UK. The 2 classes look very similar with the class 21s being just a smidge under 5 feet longer and at least to my eye, looking more ‘designed’
D6109 the odd one out.
D6109 became the odd one out of the true class 21s having received most of the body modifications for conversion to a class 29 but not the Paxman engine (reportedly down to problems discovered in the frames). So D6109 became the only class 21 to get a headcode box. Interestingly there was one class 29 that didn’t but got all the other modifications.
The Model as it comes.
Being reasonably unfamiliar with the real thing some time has been spent comparing the model to pictures of the real loco and I’ve drawn up a (quite long) list of things I think are off.
 So here we go then
A – I think the peak of the roof is wrong – it looks flatter on the real locos. Also the rib behind it doesn’t seem as prominent as it is on the model.
B – The water fillers seem the wrong shape and are missing from one side completely/ the handrail next to it is too long.
C – The bodyside steps seem a bit too round and are too shallow.
D – Ignoring the moulded fan/etch thing for a moment. the whole panel with the radiator fan on is in the wrong place. It should like up with the bodyside grills.
E – There’s a lot of rivet detail on the model. It’s too heavy and I am not convinced it’s all really there on the prototype.
F – As with all Hornby diesels from this era there are moulded on paint guidelines.
G – I think the lower faring tucks under the loco more than it does on the model.
H – Wheels are too small and should be spoked not solid.
I – Central part of the lower bodyside faring looks a lot deeper than the prototype. It looks more like a class 31! I wonder if this was deliberate to compensate for the body being mounted too high as was the norm for Hornby models of the time?
J – Battery box detail is kind of suggested at best.
K – Bodyside door windows aren’t deep enough – they should line up with the bottom of the other bodyside windows. The lower bodyside rib goes across the door on the model – it doesn’t on the real loco.
L – Bodyside grills arent deep enough, they too should line up with the bottom of the bodyside windows.
M – Bogies look a bit filled in to me. Brake shoes don’t line up with the wheels (again common with Hornby diesels from the era. )
N – Steps under the doors are a bit freelance.
O – Bufferbeams blend into the lower bodyside – there’s a distinctive shape to these visible on the prototype.
P – Buffers and bufferbeam are too high.
Q – lower cab front isn’t deep enough
R – Horn covers are a bit basic
S – Cab end lights are very basic too! the upper ones are too near the cab edges.
T – More moulded on paint lines. the lines for the doors stand out. they should be grooves.
U – Headcode box – not on a class 21 (except D6109 as mentioned above.
V – Its well-known that the cab windows are not wide enough. I don’t think they are right vertically either. The prototype seems a pretty even height all the way along. Hornby’s are taller in the middle.
In addition the exhaust port is the wrong shape and somewhat freelance.
So, to work


Side views compared. Woking down from the roof I’ve replaced the exhaust and flattened the cabs a bit. The radiator grill was cut out as an offset before turning it around and sticking it back in so that it now lines up.
The bodyside steps have been drilled out and the handhold replaced (not really worth the effort with hindsight) and the bottom of the grill frames carved off to be replaced with microstrip. The bottom faring has been reduced (the white strip is where I took a bit too much off).
Power wise the model uses a Bachmann class 25 chassis with the bogie centers spaced out by about a mm each end. I kept the original Bachmann brakes and overlaid the Hornby sideframes after opening them up a bit. The original battery box was shortened and mounted in a new plasticard frame.

The cab fronts have been detailed with Extreme Etches window frames and headcode disks. The bottom of the can being extended and the original detail filed off. I scored the inside of the tumblehome and bent it in further to match the prototype pictures. The bufferbeams being cut off first and rebuilt. Hopefully a bit warmer weather and i can get it painted.
Project 1F Part 2
 Moving on to the body of my 1F i removed the plumbing on the right side as my chosen prototype didn’t have vacuum brakes. I also replaced the splashers with scale sized ones from Brassmasters. I decided that the lamp irons were a bit too chunky so replaced those too.
 The Brassmasters kit includes new coal rails. I thought the tool box on the the RTR model was too small so I uses a spare left over from my Kirtley build. I also removed the cab doors which due to the Bachmann design was dead easy to do. The moulded rear window bars were very crude and hadn’t been moulded properly anyway so those too were replaced. After these pictures were taken I replaced the buffers with Lanarkshire models examples. Below are a few images of the finished loco.


 The fireman (modelu) takes a breather!
Project 1F Part 1
 So, I found a pretty cheap Bachmann 1f on Ebay and as usual, attracted to its somewhat out of proportion looks I snapped it up. First stage was to see just how easy the Brassmasters Easychas actually was. Ive used one of these before on my Kirtley but i didn’t use it as intended so this time I decided to do things properly.
For those that don’t know the easychas is designed to fit around the RTR chassis and provide springing. Its designed to be used in 2 distinct ways. The super easy way that uses the original Bachmann coupling rods and brake rigging and the not quite as easy etched version. Naturally I went for the latter. If you decide to go for the former however you can get a sprung P4 (or EM) loco without even having to fire up the soldering iron! As it was the full monty approach only took an enjoyable afternoon to put together anyway. To coin an advertising slogan it does indeed do exactly what it says on the tin!

Tweaks
Afraid there’s nothing new in this post, just tweaks of things already seen.  Ok so you can’t see this one really but in testing the parcels stock shown last time, this point wasn’t as reliable as I liked. I have a view that all stock should go everywhere and while the parcels stuff probably wont run over this point at shows. it did show up the problem. To be honest its always been not quite right so having tracked down the problem to the nearest point blade the old one was removed and a new one filed up and put in its place. The old one and a few dead chairs can be seen in the ballast and I thought why not let the layout have a bit of its own history, so they are now firmly glued there.
 Looking the other way nothing more than a bit of oily track. After the initial coats of track grime and gunmetal I treated it with AK interactive wet effect and engine oil.
  At the recent Derby Show (where we were showing Moor Street) my friend and fellow layout operator Paul pointed out that railcar 14 had lamp irons on the nose. I dunno how I missed this. So given that I hadn’t sorted the horns either (should be 4 not 2) I have set to work. I also found that there were cab end handrails and Dapol had missed the double door handrails as well.
  Another small tweak that I’ve been meaning to do is to sort out the cab side windows on the class 20. The original Bachmann ones slid open and like most RTR gimmicks were a bit naff. So using a spare pair of window frames from Extreme Etches that I had lying around I’ve fixed this little bug bear.
  My Derby lightweight was always a bit of a rush job for Scaleforum. The gap between the vehicles being much too big was the main eyesore!
  Closed up and a masokits gangway fitted.
  Another problem was that the on board lights lit up the cab. Some simple blinds from black paper resolved that.
  Moving on to the warehouse. I’ve finished the guttering and added a low handrail along the top of the wall. Although Brettell Road is set well before the health and safety culture we have now there was still a reasonable chance of a driver falling off the wall!
  A bit of the gutter has fallen off at some point. So some water stains and higher weeds below are the results.
A post post!
 Originally I wasn’t going to really have ‘through trains’ on Brettell Road – the through line was only going to be used by the industrial shunter but like most of the plans for this layout it all went a bit wrong. So now that the branch is used by BR as well it made sense to have a short parcels train. I had already done a LMS GUV from the Lima model but in another hark back to my childhood train set I always liked my Lima Siphon G as well. I’m not quite sure what happened to the original one I had but I found a bashed up one on Ebay for a few quid and set to work.
  The Lima body has had the lower vents added from the cooper craft (ex blacksmiths) etch. Kindly picked up for me from Scalefour southwest last year by Steve Carter of the Scalefour Society. The bogies are MJT on the brassmasters frames, as are the buffers, with small steps from the Frogmore Confederacy Range (both available from here). The gangway is a Hornby DMU one which I cut into from the bottom and glued back together to give that characteristic drooped look.
  The other side with some of the vents left open.
  In terms of somewhere for the guard to sit, the good old Mainline LMS BG. just new handrails, glazing and underframe bits on this one.
 A couple of RTR wagons from Bachmann. the Grain wagon has had its axleboxes replaces with Parkside spares and the brakes moved to line up with the wheels. Finally below just a few images of my Jinty pottering about.


Hornby hacks 1 part 2 (and a few wagons)
My class 25/0 is now done. Here are some pictures. 

 I don’t normally like a pre-weathering shot as its not finished yet. But some people do. Below some now customary moody shots.

 (well you kind of expected the last one didn’t you?)
Wagon News
As I mentioned in one of the post scaleforum posts I found i had more wagons than really necessary. So im planing to just finish off those in the to do pile and try to resist adding any more.  Nearest is a diagram 2049 wooden ended open with steel reinforcement. this uses the Parkside sides and underframe with a Rumney Models kit for the ends. Behind is another standard 20 ton brakevan, this time from Bachmann.
Hornby hacks 1 part 1
I currently have 3 projects lined up that involve taking a razor saw to old Hornby models. This is the first one and to be fair there’s a lot more Bachmann in it than Hornby (but that wouldnt fit the title as well!).
Class 25/0
This has been on my to do list for years. When we used to help my friend David exhibit Amlwch we had all of the main variations of class 24 and 25 except for the 25/0. But then David sold the layout and it just went in to the abandoned project pile. With class 25’s being one of my favourite classes it made sense to resurrect the project for Brettell road so… …following the same pattern as my late body style class 25s this is a hybrid of Hornby cabs on a Bachmann body. The Bachmann model having the correct raised bodyside grills for a 25/0 but the wrong cab roof shape while the Hornby cabs having the right shaped windows (more of that in a moment) and the headcode boxes. As I am doing an original condition loco with valances the effect of chopping up the underframe as I did on my other 25s isn’t so much of a win but I did rearrange the bits of underframe you could see to better match my prototype. The original 25/0’s had no steam heating so there is no water tank.
The beading on the roof was redone in the correct place and the panel Bachmann missed off was added. These panels seemed to vary a lot. The grill is from Shawplan. Moving on to the cabs the comment of the windows being correct isn’t strictly accurate. The important thing is that the top of them is right but the center window is too small and the main windows, although right for a later 25 are too big for a 25/0. The side window is also a bit high and a bit too far forward. Filing and microstrip sorted them out. I re-used the bottom section of the Bachmann cab and cut the buffer beams off and mounted them to the body.  After a blast of primer to check that the joins were good I set to work adding in panel lines, the tail lights, cab front handrails and the row of rivets around the base of the base of the cab (archers transfers). The cab vents and exhaust are from the Brassmasters etch. Next stage will be paint.
Uh-oh – hes got distracted again!
Well sort of! When I was a kid my mum and dad took me and my brother to Matlock for the day. I might have been one of those family away day rail tours BR did back then. I can’t remember why we were there but I do remember wandering down the platform waiting for the train home and finding a little loco shed. Inside was this!  (picture © Philip Wheldale and used with permission).
I can’t remember if it was exactly the same and I seem to recall some sort of tarpaulin on the roof but I had absolutely no idea what it was. I could only see the front and it looked kind of sad sitting there. On getting home and checking my early loco numbers book I found out it was the last surviving co-bo and ever since they have always held a certain appeal. definitely weird and pretty much hopeless from the very start they were like the runt of the early diesels litter, whats not to like?
Anyway given that Brettell Road is a what if and none to serious. What if one made it to there in the late 50’s? Remember I have set it to be more midland railway than it should be so it’s not a leap of imagination to presume that Derby might have sent one to the area to see if they could find a use for it. So, just as Hatton’s stocks of the Heljan model were dwindling I ordered one. They only had the full yellow end version left by then.
A quick win would be to stick some P4 wheels in, weather it and jobs a good-un but that would be a bit too simple really so I set to with files and opened the cab windows out to their original sizes. A bit of wire restored the framing.  The actual windows were cut from the packaging the model came in to get the curves edges. The cab front was re-sprayed back to green (Precision locomotive green being a very close match) and then it was weathered. Ok A quick win-ish!
 The other side (yes I know it’s not the right headcode arrangement for a passenger train)
 I know this shot is rapidly becoming a Cliché but I am not bored with it yet!
For more of Philips photos click here.
Bring on the rejects!
When a magazine want images I usually take a load of new ones and send them over for selection. Invariably they don’t pick them all so here we find a selection of rejects!


Basically just an excuse for pictures!
Brettel road now has its final front and backscenes added. More work to do on the fronts yet but its starting to look like a proper layout!
 Here is a view of the warehouse with the new backscene in the distance. Ive decided to take some pictures of trains too. (sorry this post isn’t a bit more, erm, informative!)
  Railcar 22 trundles past towards Dudley
 Pannier tank arrives with the sausage train.
  Kirtley shuffles some ballast wagons around
 Class 20 descends the bank.
 Jinty waits for something to do.
  Deeley takes its turn at some wagon worrying.
  The railcar climbs back up the back towards Stourbridge.
 Yeah I know this looks a bit wierd but there is a prototype practice for it.
Buildings and the march of progress
Work continues on buildings for Brettell Road
 The big warehouse now has a roof (thanks to Mr Horn for his laser cut tiles. Just the bridges and front/backscenes to do on this board and I can call it done.
  Looking the other way, I knocked up a very low relief building to go behind the pub.
  Across the alley way is this small building based on a local one I found in Brierley Hill.
  Work in progress on its neighbour. Again local influences but nothing specific. I don’t know if I will need a small outbuilding here to fill up the space or if ill just leave it open for clutter.
  The other side – I’ve a vague idea that this will be some sort of woodworking industry or perhaps a commercial vehicle repair shop.
 If you have explored the site you might have come across this picture before, I brought this loco years ago just because I like class 27s but thoughts have turned to doing something useful with it. This loco has become a bit of a clone of Brettell road itself in a way as it started out with the simple idea of just fitting a chip and sorting out the bogies and that would do. nothing to serious but like Brettell Road it’s all gone a bit wrong!
  moving the bogie springs in a bit and fitting the decoder was easy enough but the roof fan looked horrible. unfortunately the hole is too big for Brian’s nicely etched replacement so that ended up being a bit more of a faff than I hoped! Then there were the nose end doors. They needed adding along with the details. I renumbered it to an example I found at Saltley (Class 27s were quite regular visitors to the midlands in their early lives) and re-weathered it. Also while I remember the yellow panels were too wide so a spot of Pheonix BR loco green sorted that out.
  On the mention of roof fans this is one of Brian’s for the class 20. I always quite liked them. I think it stems from a pair sitting outside my bedroom window one Sunday as a kid while the down North Warwickshire line was being relayed. I quite like the idea of them working on their own so I decided to get a green one. The grill is made up of 4 parts. A plain ring that goes onto the roof first. The ring with with the bracing and then the mesh, finally the last ring goes on. Zap pink is ideal for this and make sure you get the mesh the right way up!
On the loco itself I replaced the bogie sideframes with Heljan Baby Deltic ones as first suggested by my friend Shane. I had done this on my Lima ones and, this being my first Bachmann example, I was surprised to find the supplied bogies were quite poor too. I filled the lower beam on the bogie ans sanded it smooth as I was doing one of the first batch. Buffers were from Lanarkshire models. 
Just a spot of finishing off
Recently attention has returned to the main warehouse with the top floor being finished off and the ceiling added. 
 I decided on a sort of rest room that wasn’t lit. I quite liked the idea of light from deeper in the building coming through the internal windows and bouncing off the tables and chairs.
  On the main floor, again just a hint of activity.
 After much experimentation and having tried different materials (thanks to those who made suggestions) I have settled on black latex from a surgical glove for the Kirtley weather hood.
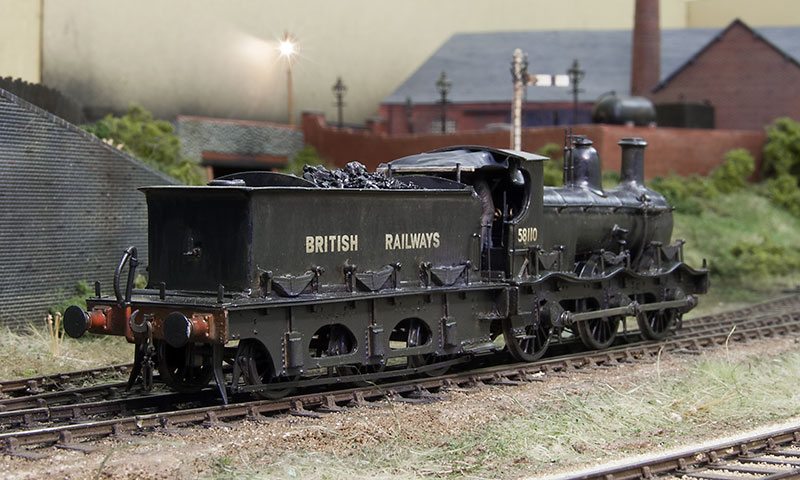
 After some good, constructive feedback I’ve made a few tweaks to the 94xx tank. The chimney cap has been swapped back to the original lima one which was mounted in my mini-drill and ‘improved’ with a sanding stick. The whistles have been replaced with a shielded set from Modelu and the toolboxes have been made 20 thou deeper.
  The 2 latest loco’s together. Is it me or does the pannier look like it dwarfs the Kirtley? Finally below another mood shot!
Haven’t had a loads of finished things post for a while.
So lets start with a buildings and a request, When I posted the image of the pub at night I was asked for a picture of the area in the light so here it is This also shows the water tower I was working on too, speaking of which…
 Remember the lower part of the Hornby water tower I was fiddling with and how I didn’t worry too much about details? This is the reason why – you can just about see it, if you know where to look!
  Moving on to some wagons. This is the Chivers kit for a Dia1674 LMS Bolster wagon. A nice simple kit to build although given the long wheelbase I did opt for Bill Bedford springing.
 This was supposed to be a quick win. I liked the local livery and thought that it would break up the sea of grey and bauxite wagons. Its a Bachmann product but an older one that was stretched to fit their 10ft wheelbase steel chassis. Some careful cutting in 4 places lost some of the extra length and while it is still too long it does now fit the longer Cambrian wooden chassis.
  I’ve finished off the vans I was working on too. Not a lot more to add about them really but here’s the pictures. LMS 6 wheel fish van – Chivers Kit.
 LMS GUV
  Palethorpes 6 wheel van
 And the larger bogie version – Transfers are from Cambridge custom transfers. Sheet BL153 covers the 6 wheel vans while sheet BL154 covers the bogie vans.
Finally aside from the crew and some coal (plus a slight warping of the footplate) the 94xx tank is done too. Here’s a few images.


94xx tank – thoughts on the footplate
With the chassis complete and test fitted thoughts turn to the footplate.  Left hand side. One little point to mention, I mounted the valve gear rivet backwards on the coupling rods as the hollow appearance seemed to match prototype pictures better.
I tend to carry forward things from one project to the next and stuff I’ve worked on before seems much more obvious in the future. In this case the splashers are too big and the rear one is in the wrong place. so these will need changing. Somewhere in the history of owning the model the forward footstep has broken off and been long lost.  The lower part of the firebox is much wider than the upper part – no doubt to accommodate the RTR mechanism. So this will need looking at. It also means that the details on it are all a bit flat.
  And after! I filed up new forward tank supports from a bit of H section. The forward steps are from a mainly trains etch, I replaced the steps under the cab too and the rear-most steps are knocked up from a bit of brass. The splashers were cut off about a mm from their base and remounted. the ones behind the toolboxes coming from a scrap chassis
  I carefully cut away the lower firebox sides – leaving the front bracket in place and made new sides from plasticard. The injectors were an enjoyable little project, soldered up from bits of brass and tube. Below is a close up of either side.
Return to the 94xx
A while ago I started work on a Lima 94xx tank I’ve had from my childhood. The idea was to match it to a high level pannier or Collett chassis as a quick project. However after speaking to Chris at High Level he decided that the 94xx wasn’t really like either and said he would be interested in doing a specific kit for the loco – the , at the time, recent announcement from Bachmann that they intend to look at the class too might have helped. Top view of the chassis before fitting the wheels – at this stage I decided to give it a basic coat of paint. Below is the underside.
  High Level Kits website
Kirtley finished (well nearly)
First up a short video of the inside motion doing its thing.
There’s still a bit of work to do on the Kirtley – add a crew and the weather sheet, some coal and the wet weather effect but its pretty much done. Below are a few pictures. 

 I have been doing a few wagons as an aside to the soldering iron.
  Another lowfit from Red Panda. This one has a Parkside chassis and buffers from my supply. I don’t know who made them or what type they are but they matched some of the pictures on Paul Bartletts wagon site Thanks to my friend Brendan for the lowfit transfers.
  The Dapol lowmac kit. Reworked with Lanarkshire models buffers, archers rivets and new axleboxes from the spares box. The brake lever is an etch and the ratchetey looking guide is from a piercing saw blade. This wagon is really too long to be rigid and there’s not a lot of room for any sort of springing or compensation units so the solution here (which I remember from a P4 society digest sheet years ago) is to file the bearings into a slot and use a bit of scrap etch in the centre of the axle to allow it to rock.
Kirtley part 3 – ready for primer
 My Kirtley project has reached the stage that its ready for primer. Buffers are from Lanarkshire models whilst the whistle and safety valves are from Markits. I’ve replaced the steps and cab roof with brass.
 Rear view. Some Kirtleys had a simple weather hood to protect the crew. It stretched from the cab roof to the tender front. Anyone got any thoughts on how to replicate this? It will need to be flexible.
trying a little tenderness.
I never planned for Brettell Road to be populated with anything other than tank engines but as with most things I have planned it’s all gone a bit wrong! So…
 I present you the Brassmasters easychas for the Bachmann 4f, not that its going in one mind you. I found a picture of an interesting little loco at Saltley in one of D.J. Nortons West Midlands books and there was a ancient kit for it too. However the chassis supplied is literally 2 bits of brass with 6 holes in it. It wasn’t really going to do!
The chassis has been built kind of as intended although I needed to shorten the tender wheelbase a bit. I also added a few Alan Gibson frame spacers to the chassis and a high level gear box (smaller motor is in the post) . The p4 frame spacers were a tad wide and I wonder if the EM ones might be better if you are following a similar approach?
 Having never built a tender loco before and figuring if you are going to do something you may as well go for the ultimate solution (or potential failure) I decided to have a go at Brassmasters working inside motion too. It certainly ticks the fiddly details box that’s for sure but was fun to build.
 This is what it looked like before fitting to the chassis. But what loco is it you might wonder?
 A Kirtley goods, I was attracted to its ancient appearance. These loco’s (the 700) class were introduced in 1869 and the last one made it to BR as 58110 being withdrawn in 1951 when she had seen 71 years service! The body and tender (shown losely mocked up) are the Keyser kit and the kit itself is nearly as old as I am. I’ve removed the springs to be replaced with something a little more refined and shortened the footplate so that it doesn’t overhang the bufferbeam, All the rivets have been sanded off, the ones on the smokebox were too crude and the tender of 58110 was flush riveted in the end. I’ve also reduced the with of the tender footplate slightly to add some 0.7mm L section from Eileens (the actual prototype being very thin in this area and nothing like the chunky cast floor thee kit comes with.
Class 11 finished off.
 Not a lot to say really, the class 11 is done and ready for service. Here’s a few pictures.

 OK so the irony isnt lost on this one but its a good comparison between the class 11 and class 08 shunters. Of course class 08’s never carried LMS livery in their early days while the class 11s did. It will be interesting to see if anyone ever notices that 12049 is a bit more than a repainted 08!
 Whilst I had my airbrush out the Mk1 got all mucky too!
 I haven’t done any photo-shopped pictures for a while but here’s a spot of shunting.
revisiting a class 47
One of my early class 47s featured a Lima body on an Athearn PA1 chassis as below.  This was done before I settled on the windscreen modification for the Lima 47 (I don’t think Shawplan actually had done them at the time) so I wanted to revisit it to make the face match the others on the layout. Along the way I had been collecting cheap ViTrains 47s so while it was in for an overhaul I swapped the chassis too. The results can be seen below.
back to the class 11 and a thought on coaches
My class 11 is ready for a visit to the paint shop  I prefer to give models a coat of undercoat when the basic work is done before adding details as this allows me to see any areas that need attention first. The rivets are archers and the ladders are Colin Craig’s.
 One thing you can’t do is just refit the brake gear as it will now sit too low and too far from the wheels. My solution was to trim the mounting blocks down and add new pegs from microstrip set to bring everything back in line.
  With plans afoot for my what if the Flatirons weren’t scrapped idea I have decided a short passenger train might be in order to go with it. As such I picked up an old Bachmann Mk1 suburban for a fiver on eBay and set to work. Starting with the bogies.
  These are the older style Bachmann bogies and P4 wheels would have simply dropped in but the out of line brake shoes kept catching my eye so I mounted them on my own etched subframes (available from Brassmasters). The top image shows how much of the original sideframe is reused.
  The principle work done to the mk1. Starting from the top the roof ribs have been reduced in size, Replica Railways windows have been added, bufferbeam details and steps along with underframe details from Masokits and Replica.
Some more plastic bashing
I fancied a diesel shunter for Brettell Road. I was quite taken with the idea of bringing my decades dead mainline class 03 back from the grave with a High Level Chassis but as I though about it I drifted away from the idea. A quick win would be just to get a Black 08 and swap the wheels but where is the fun in that?  So what I have ended up with is basically the class 08’s older brother, the class 11. Work so far started with a Bachmann 08. I fitted the smaller 3ft 11 wheels and Brassmasters coupling rods. Some general underframe detailing has been started along with the spring overlays from Mr Horn. Rather than file off all the bodyside doors I thought it easier to just replace the bodysides so that I had a nice flat base to work on.
  The cab roof of a class 11 is a lot more like a continuous curve than the 08 and it just so happens that when lima did their model they completely cocked it up! So much so that it appears they might have been working from class 11 drawings as it seems to match pretty well. So it’s a no brainer to swap the cabs over. I have also reduced the depth of the bufferbeam and will need to relocate the buffers.