Back to wagons – and a correction.
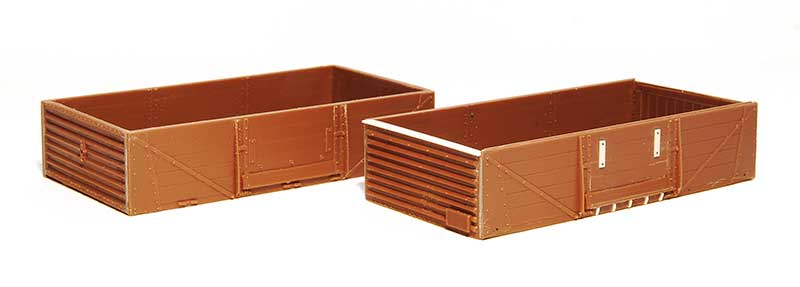
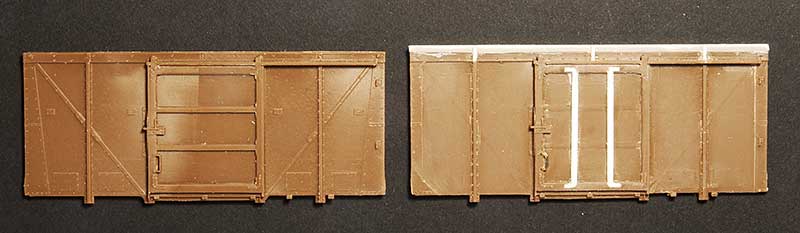
A while ago I did a batch of shock opens including an attempt at an ex-LMS diagram 1983 variant. Justin of Rumney Models noticed that I had used the same ends as the BR version with inset corrugations while the LMS wagon has corrugations that stick out. Something I had completely failed to notice myself. So that wagon had its top lip removed and renumbered back to a BR one. A new kit was brought (well a few actually – saves on postage!) and a second attempt made using cut down spare ends from a Parkside 12t van kit. The BR version is at the back. Theres a few other differences too like the bang plates for the doors, the shape of the panelling on the ends and the braces under the door.
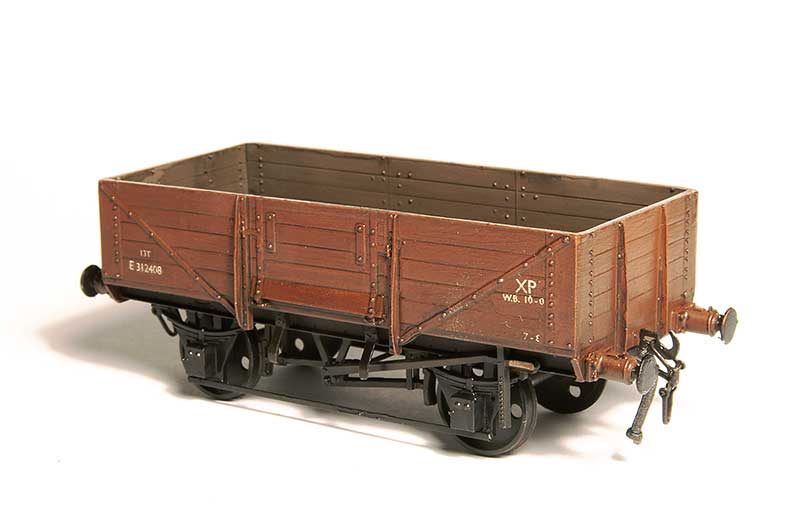
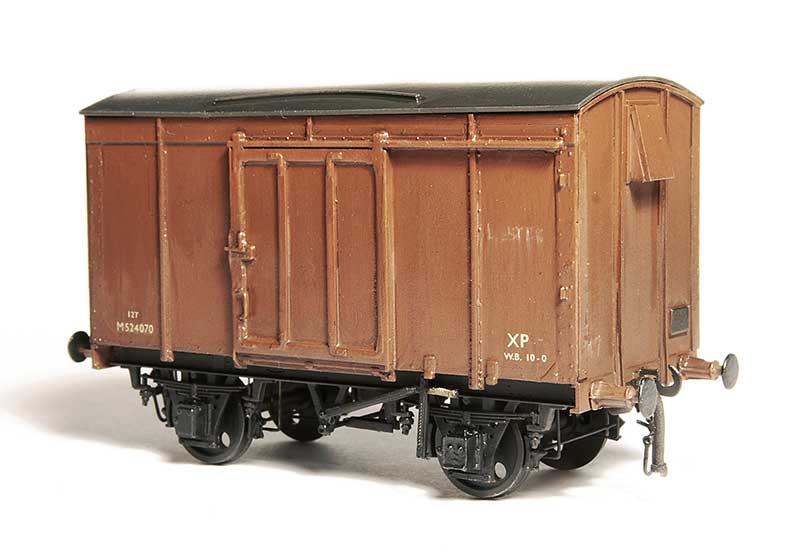
 The finished wagon in the company of yet another D2150 13t open.
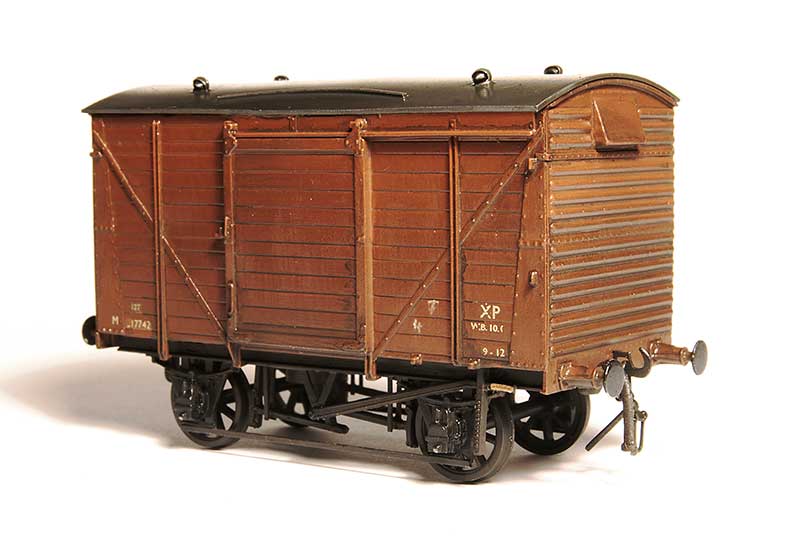
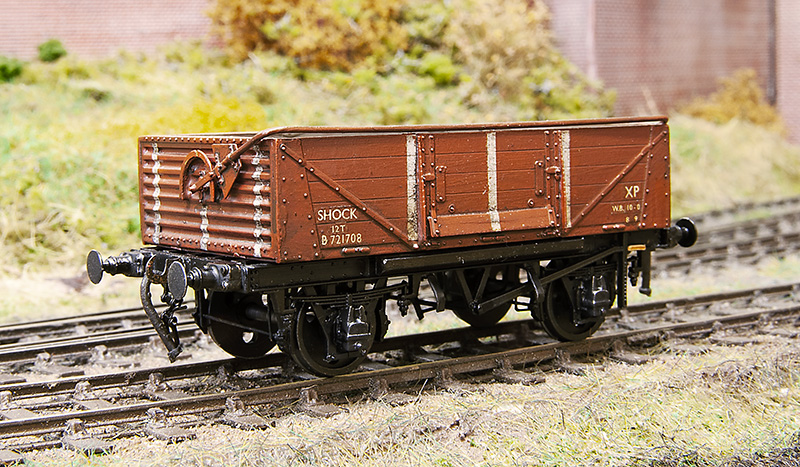 The BR wagon has had a Rumney models sheet rail added and been mated with a clasp brake chassis to produce a D1/040 variant. Buffers are from Lanarkshire Models.
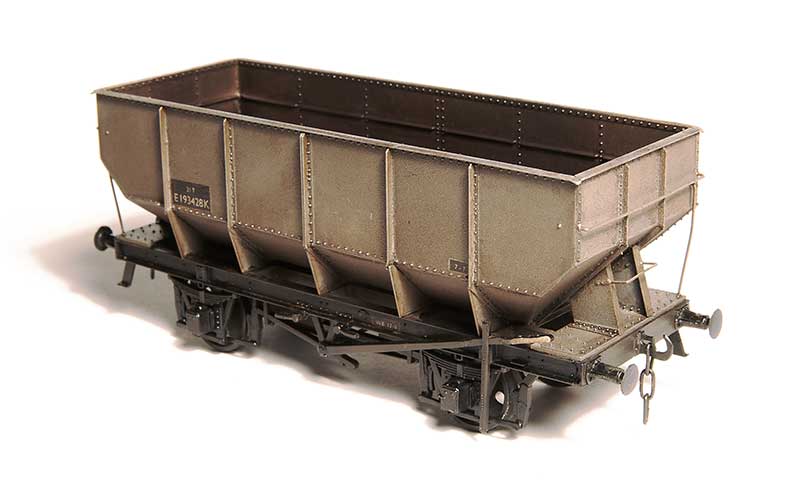
Moving on to a couple of hoppers. 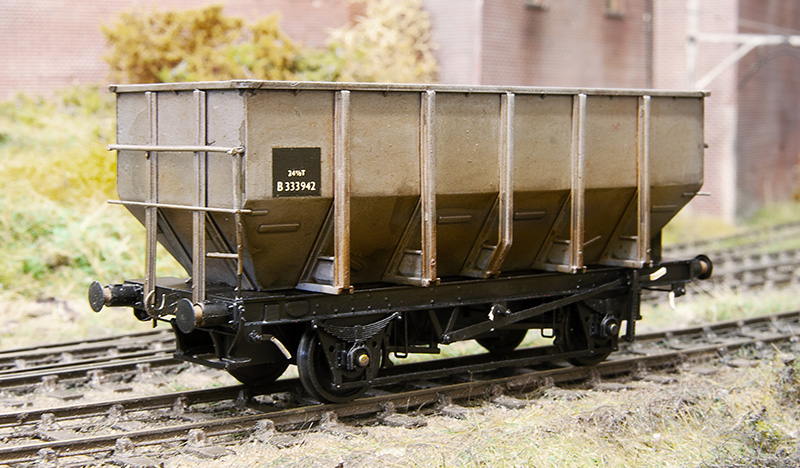 First up the Accurascale 24.5t hopper which i picked up cheaply from a private sale on Western Thunder. It came in brown livery and with a certificate saying it was a limited edition number 061 of 500. If this sort of thing matters to you and you have one you will be pleased to know that your model is now even more limited being 1 of 499 (You’re welcome!). It was separated into its component parts (a process that had already started in the box) and the body resprayed. These are not a straight drop in wheels job as the axles used are a little short and theres a boss on the back of the W-iron, much like Lima was doing 40+ years ago. Its not a huge problem though as a few turns of a bearing cutter (I use Ed’s tool) and a little bit of thinning the boss down and off you go. I also cut off the NM pockets.
What is a little bit more of an issue is it doesn’t weigh anything, just 21 grammes out of the box. Obviously if you plan to run your wagons loaded no problem but if you want them empty (as did ) then a little bit of trickery is required.
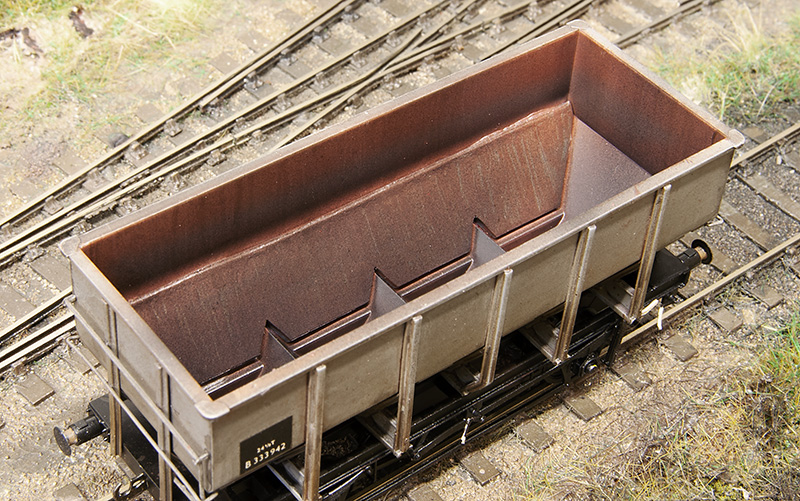 My solution was to make new lower sides from 1mm lead. This brings the wagon up to 50 grammes. If you would like to follow suit I drew up a little cutting template which you can download from here
 Another parkside 21 tonner based on a picture that came up on my facebook feed. (some of the wagons in the post are waiting a delivery of couplings you may notice). Theres often a discussion when these kits crop up that they are difficult to build but they really aren’t. The trick is to assemble a side and end as 2 pairs on a piece of glass with a cutting matt to ensure they are square, let these set fully before assembling the rest of the wagon and theres no problems Any slight gaps between the panels can be filled from the inside using Mr Surfacer 1000 liquid filler.
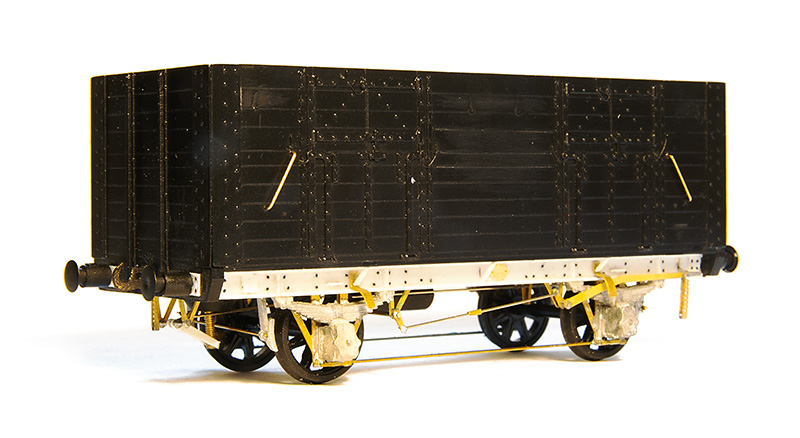 Now a few oddballs – this is an ex L&Y diagram 81 loco coal wagon from the old MAJ models kit. The kit is supplied with a wooden chassis which is correct for the earlier wagons but i wanted the later one so only used the body. The brake gear on these were a little weird to say the least
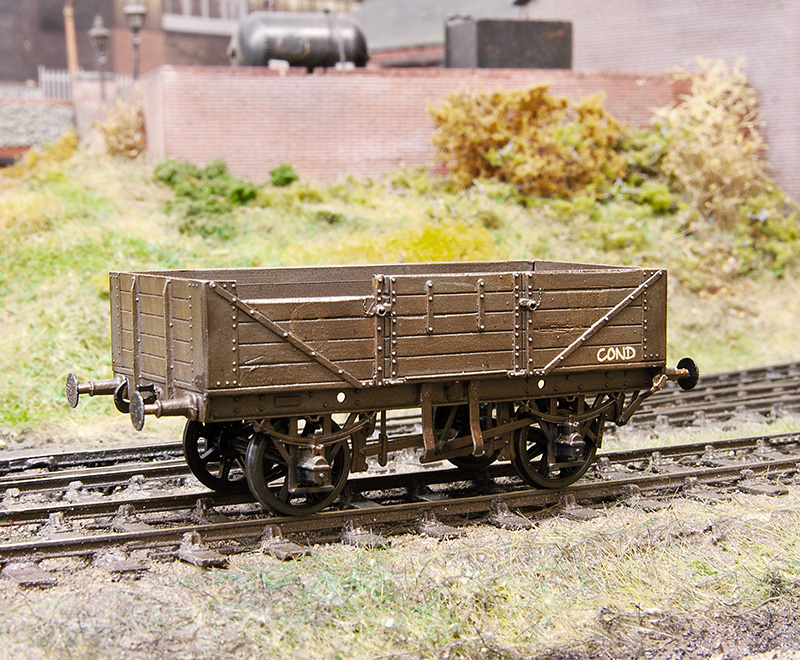
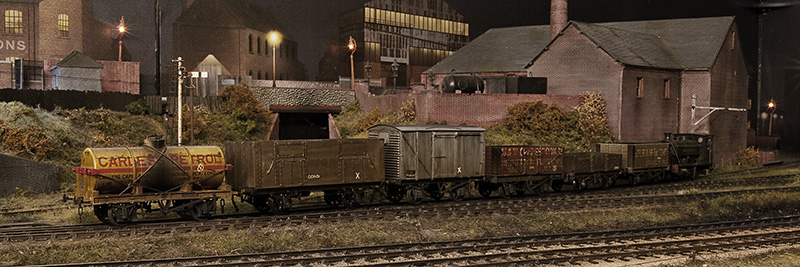
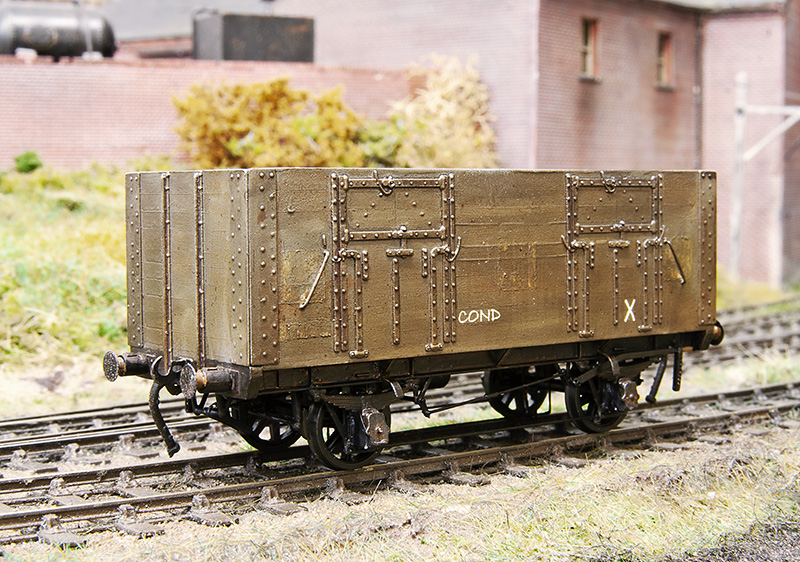 The plan is to have a short train of condemned wagons that is delivered to the yard as a trip working from Bescot. These are then to be collected by one of the Round Oak locos to be taken away for scrapping and the metal bits melted down in the furnaces. This is basically what happened and quite a few locos met their fate this way in real life. Unlike some of the more famous railway scrap yards stuff didn’t hand around for long so nothing from my scrap train will have any hope of reprieve sadly. The condemned markings are from Railtec,
 Another victim this time a GWR diagram 04 open from the cooper craft kit. Like another Coopercraft kit I’ve built this has the bearing holes mounted too low meaning that the wagon looked like it was on stilts. This one has slightly odd brake gear as well. You can just make out the old GW branding.
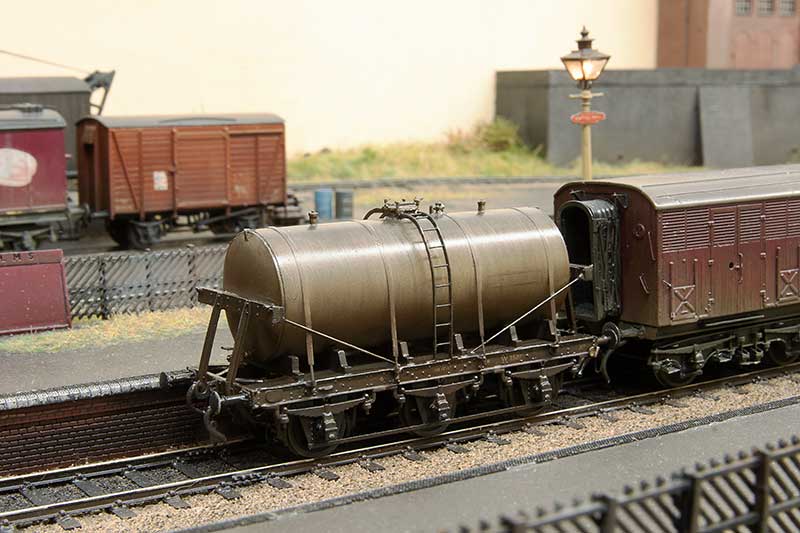
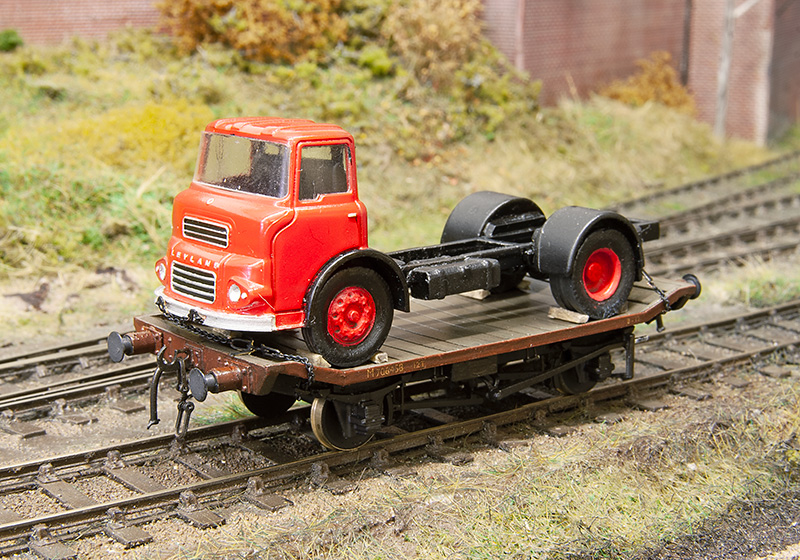 The LMS traction truck has finally been mated with its load.
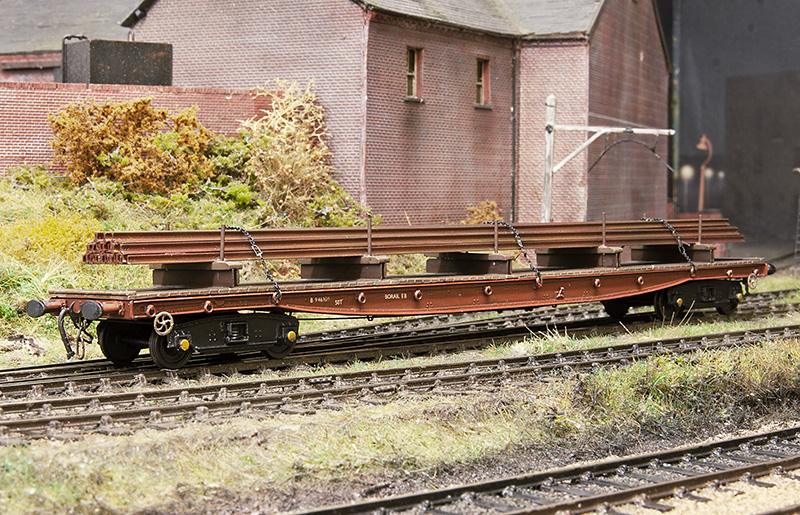 Also based on a picture that cropped upon my facebook feed is this Borail from the Cambrian kit. Making the load was far from the most interesting task I’ve ever done I can tell you and despite it being essentially hollow this wagon still hovered up 5 meters of rail!
Its all gone a bit Eastern Region
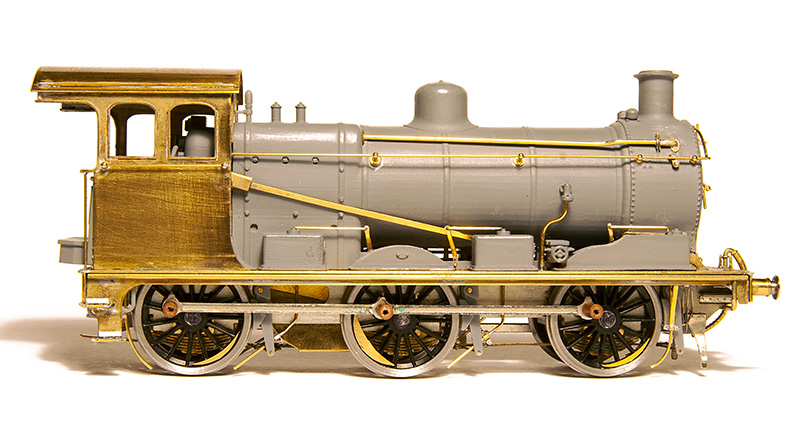
Over the last week or so Ive embarked on another test build for Brassmasters. This time a J17 kit thats been designed by David Barham. Its not really any use for Brettell Road but it would fit North Elmham (which I have been know to help out with).

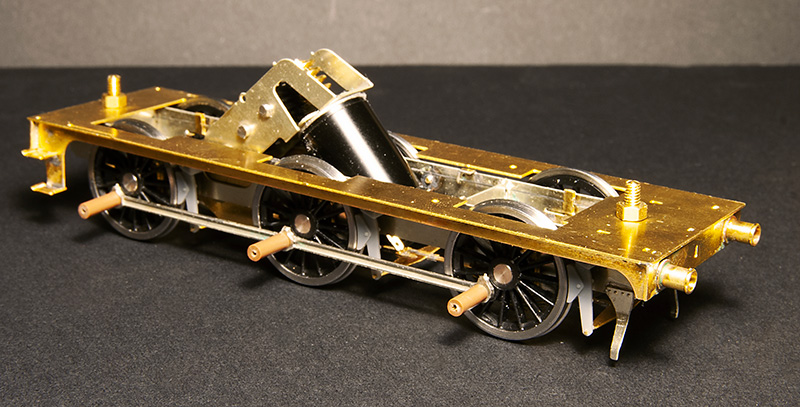
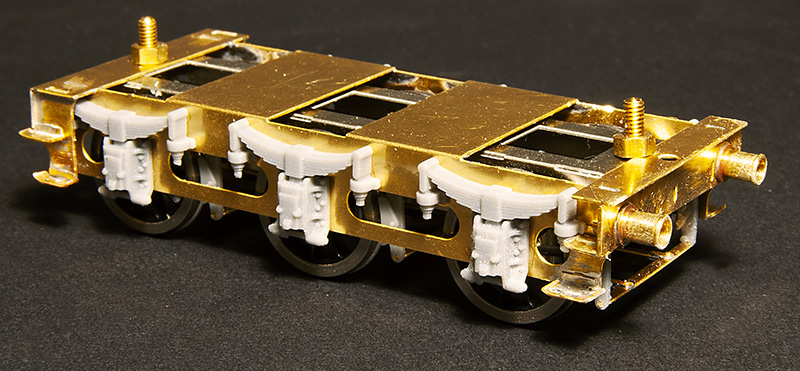
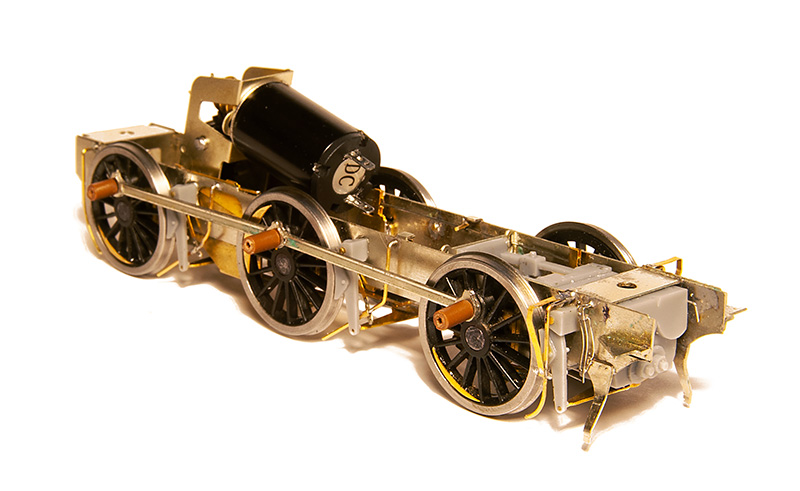
The basic chassis build with a High level Loadhauler gearbox. The loco and tender use CSBs throughout. The kit will be supplied with both printed and etched brake shoes.
 The tender subframe – Again with options on the brake shoes.
 Chassis and footplate.
 Tender with its outer frame.
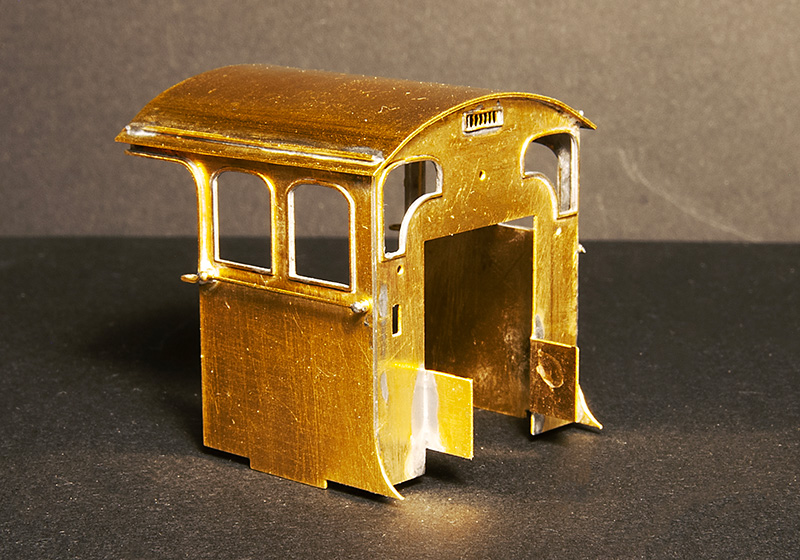 The cab
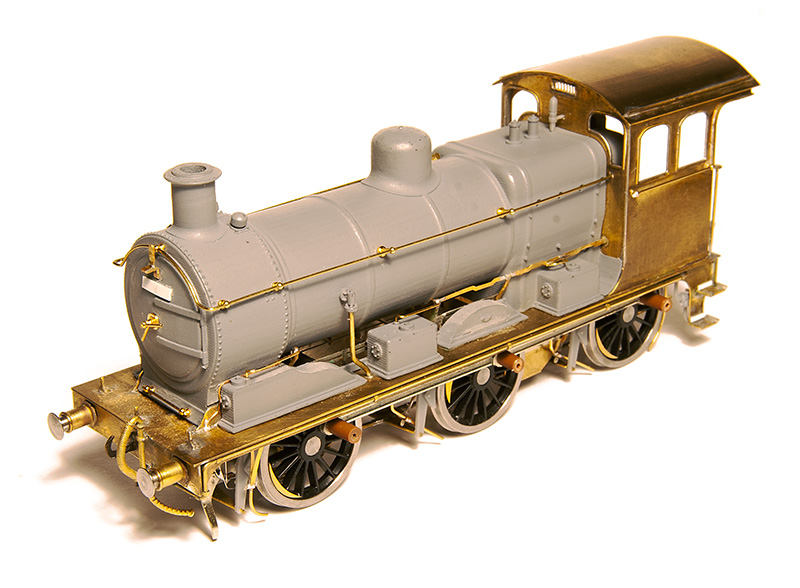
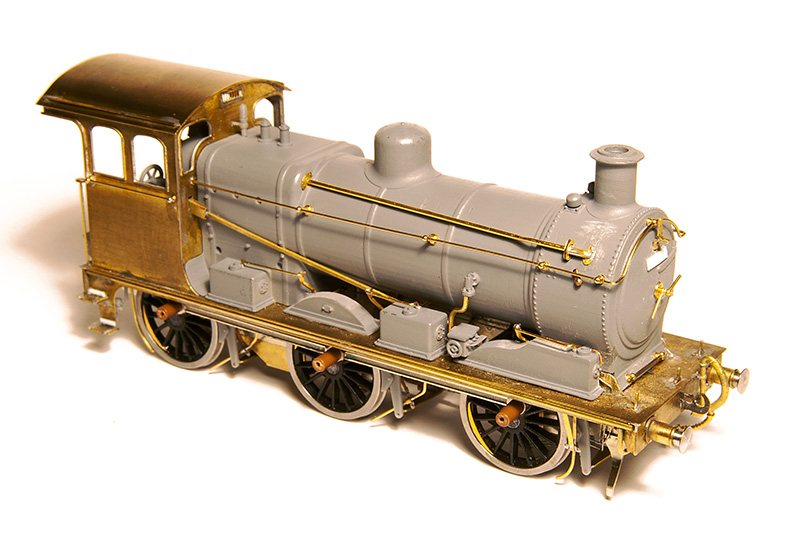
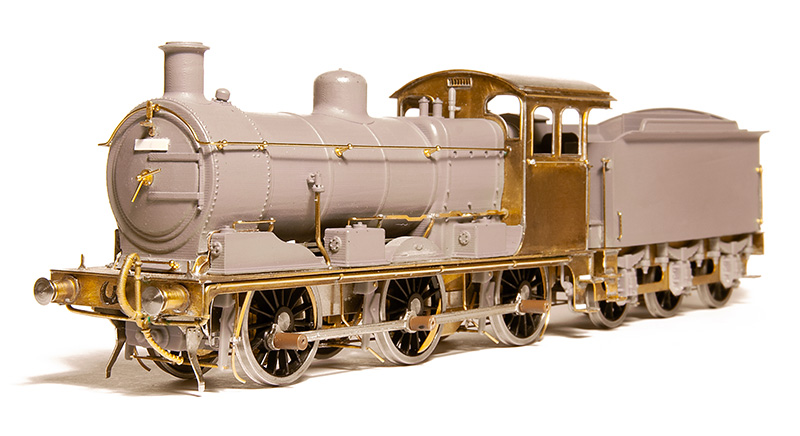
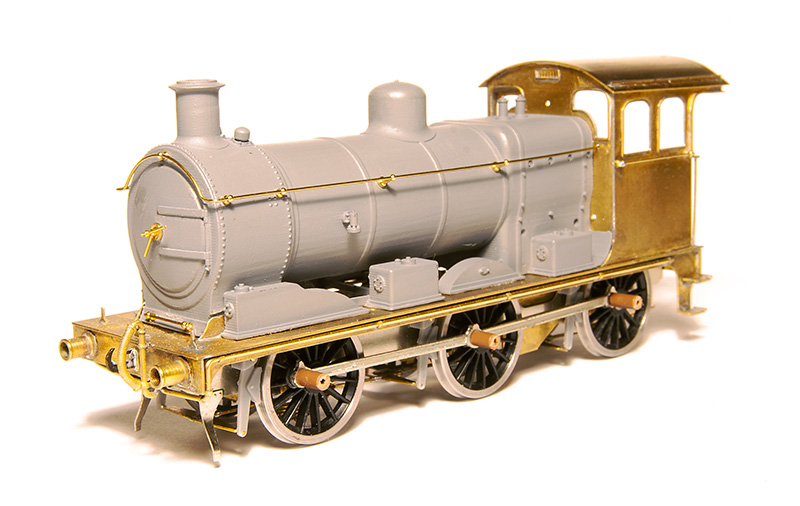 Pretty much everything above the footplate and forward of the cab is catered for by a 3D print. Here I’ve made a start on the basic detailing
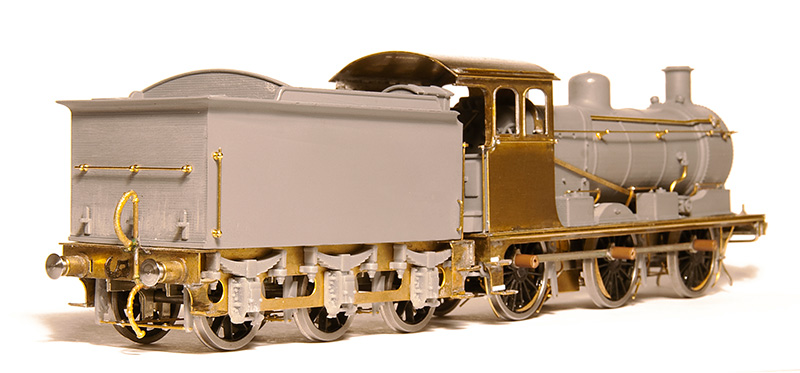
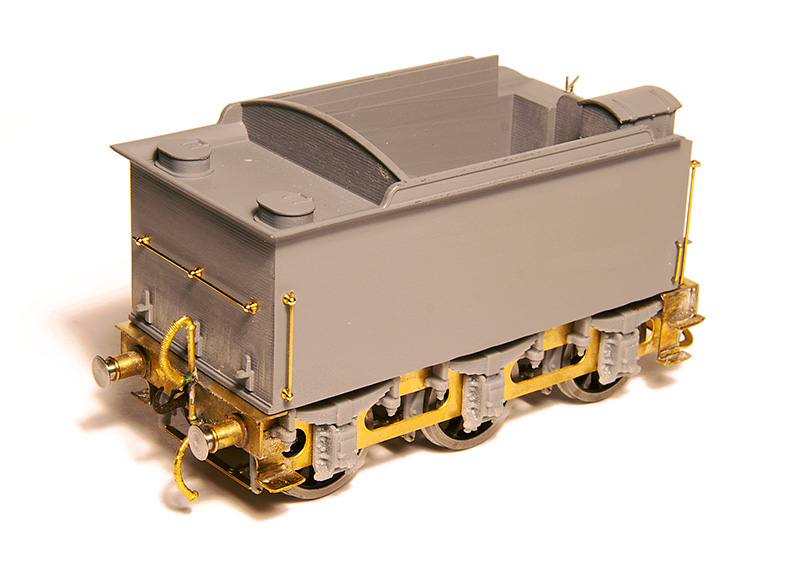 The tender body, like the loco, is a 3D print.
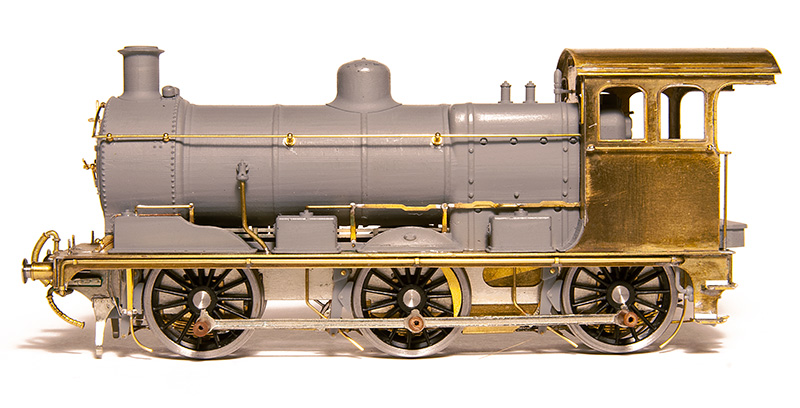
The detailed up chassis
The finished loco – More pictures below. This has been a pleasure to put together.

shuffling and testing.
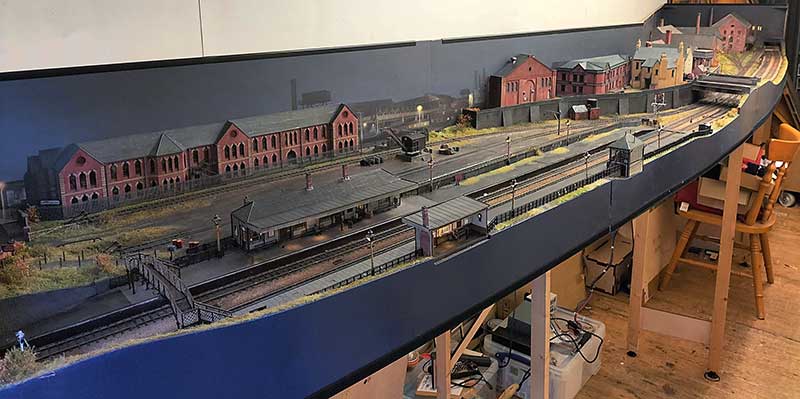
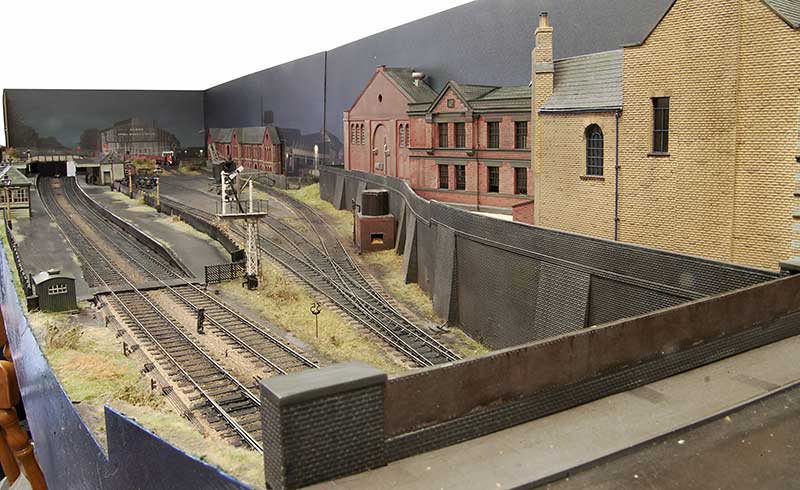
A bit of re-jigging of the shed means I have been able to put all of the scenic boards for Brettell Road up together. Its 5 months since the Cradley show – Time flies doesn’t it?
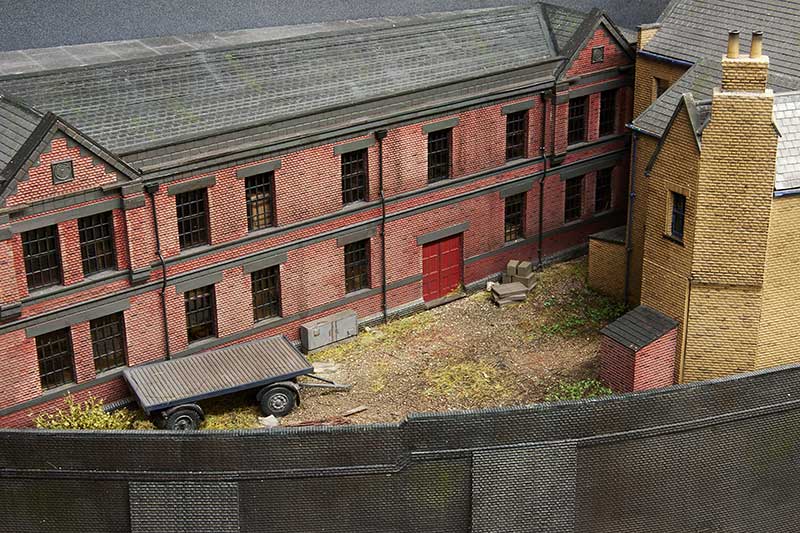
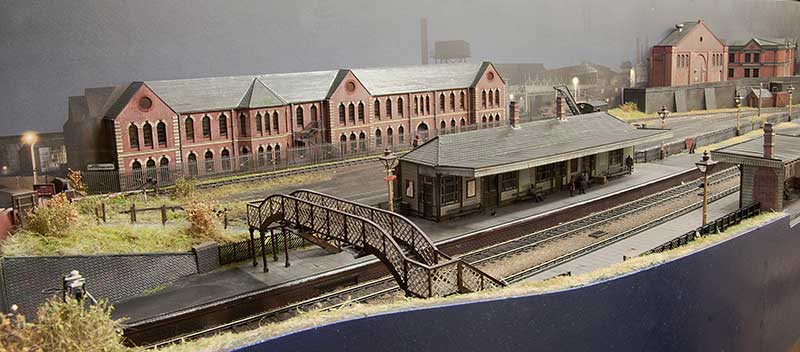
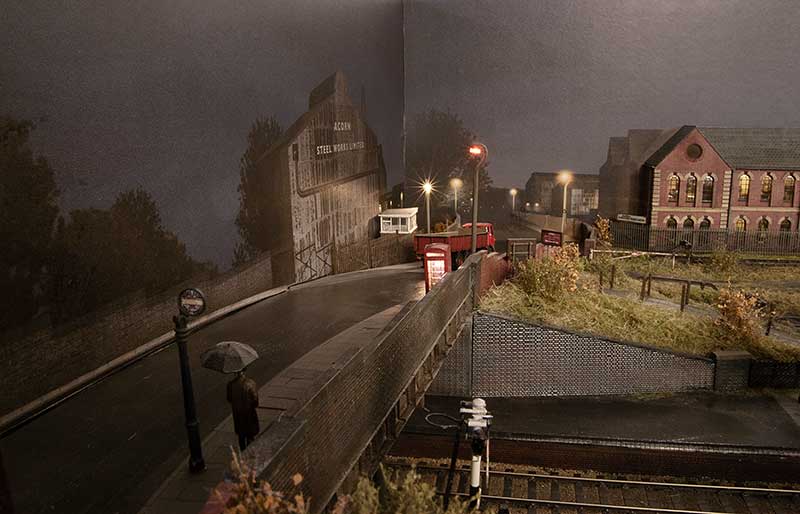
Theres a few things to fix after the show. A couple of the points needed a check over as they weren’t totally reliable. I also found 2 dead sections that hadn’t shown up during the show so I fixed those too. 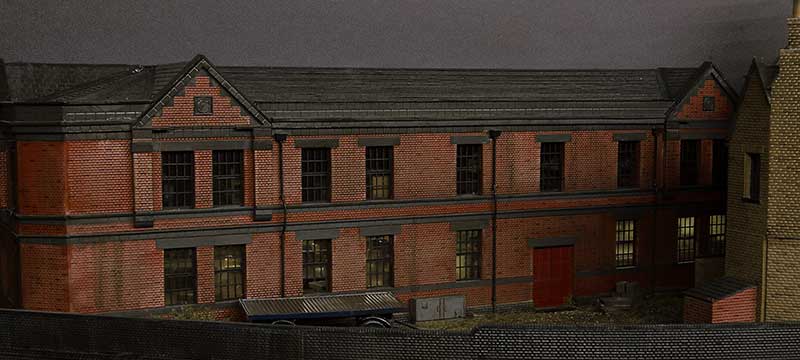 The lights on the upper floor of this building failed before the show but after the building had been planted onto the layout. It was too close to the show to fix it before so this is something to look at now I have time. I also want to add a few yard lights and sort out the telegraph poles on the layout because as they stand now they don’t make a huge amount of sense.
The other thing to fix was the route setting on the main lines. Signalling purists are advised to look away now! Before the track and signals were all operated separately via the throttles with only the yard set up as a route. (My Digitrax system allows me to program routes into it.) So thats been changed for operator convenience so that throwing a signal sets the route as well. I know the route should be set then the signal pulled rather than this way round. You can set the signals to danger on their own but in case you forget the routes will set all the other signals to danger for you anyway. I hoping this will be pretty simple to use.
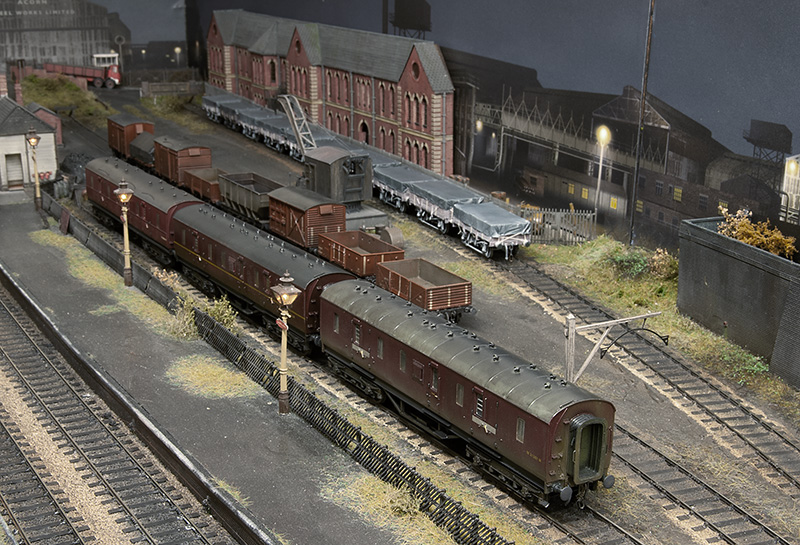 Since the show I have a small stockpile of new rolling stock to be tested. The rule is all stock must go everywhere without falling off, even though in this image only the middle road of wagons will go into the yard at shows. Of this little lot only 4 wagons were rejected and returned to ‘works’ for some fettling. These 4 have now been passed too.
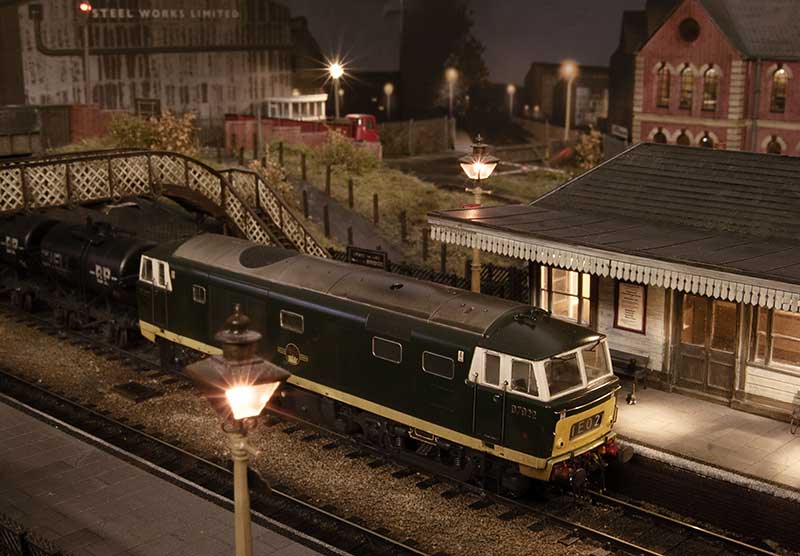
Below, just some more traditional layout style pictures. 
Some lorries for a trio of layouts.
A small selection of Lorries have recently been completed. Starting with…
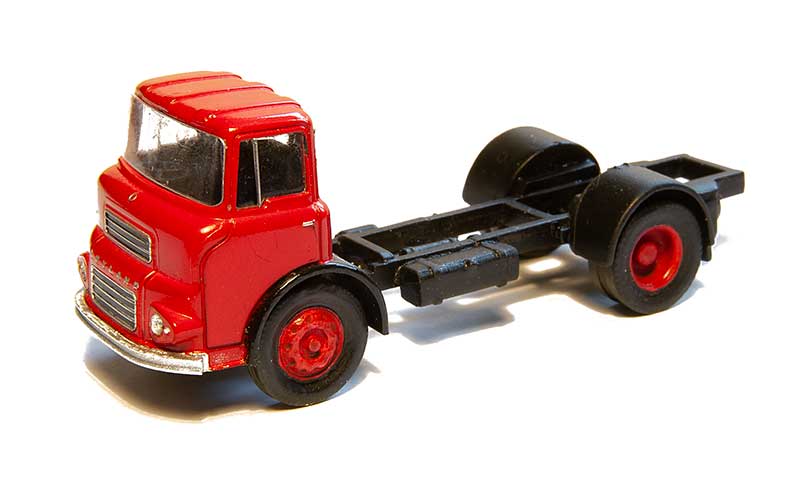 A leyland LAD cab and chassis, destined for a wagon load on Brettel Road. The cab is Base toys with some minor tweaks and windows added to the rear. I was aiming for a new vehicle being delivered and wanted an open chassis. The source for this was a cheap Langley Models kit for a Guy Otter/ The chassis was shortened and wheels are from RTI.
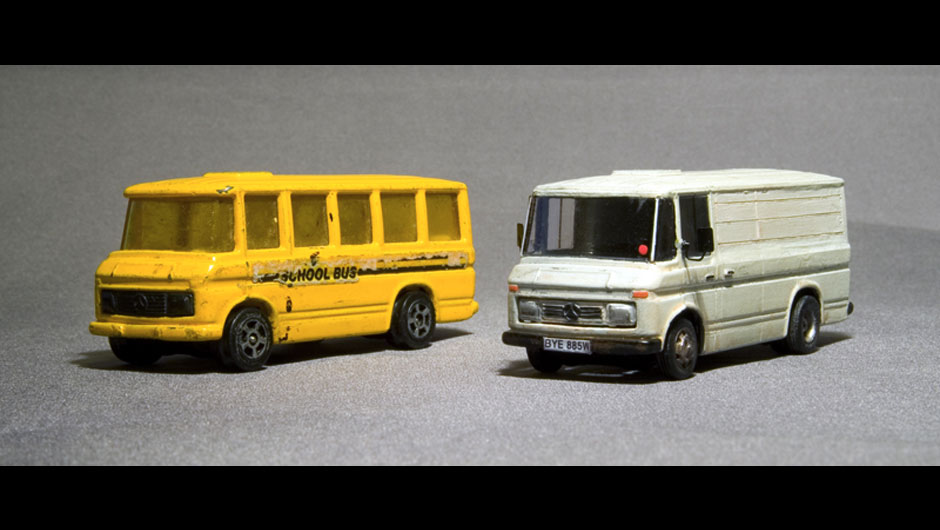
Some of you may remember this. A Mercedes 407 van from the Corgi School bus. Ive carried the unmolested one around for a while now from when I did a short stint on demos on modelling road vehicles. A picture of one of these in the form of a low sided light lorry appeared on Western Thunder so I decided to do something with it
 The Body is from the previously mentioned Langley kit mated to a Base Toys chassis and more RTI wheels. I need a spot of work with a sheet of sandpaper on a flat surface to get it to sit properly. This will be a reasonably old vehicle on New Street.
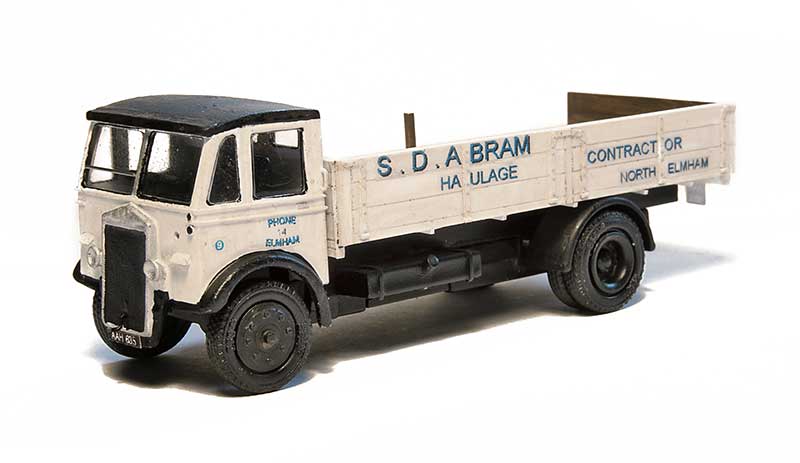
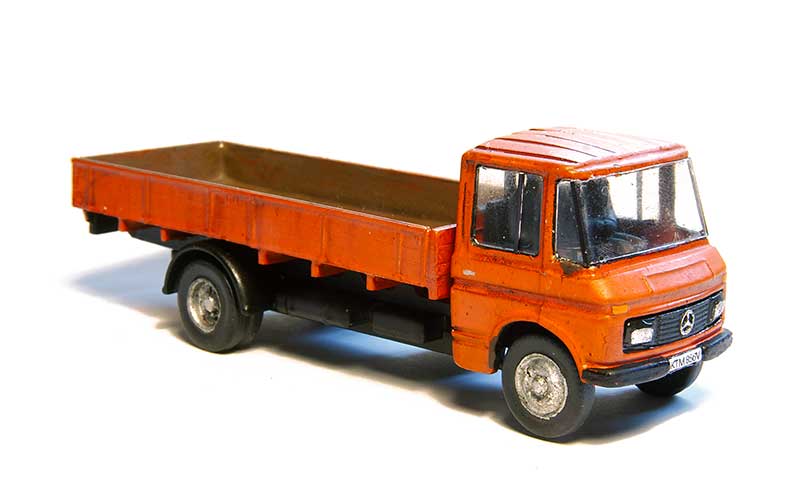
Next up over to Norfolk and a couple of Lorries for North Elmham. Tim provided a few images of vehicles that could be found lurking around the dairy so I set to work. The first is an Albion something or other (I don’t know – I just copied what I saw) using a modified Base Toys cab with a scratchbuilt dropside body. The transfers are home brewed on decal paper.
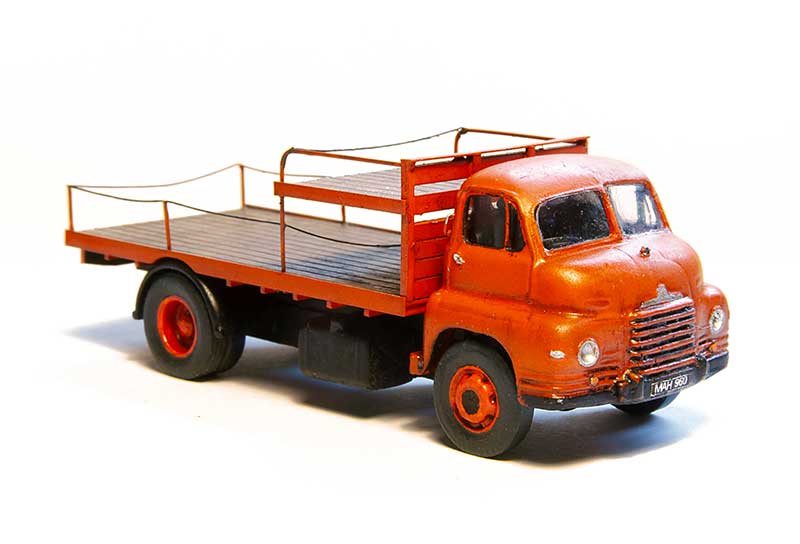
A Bedford S type from an RTI cab and wheels again with a scratchbuild body. I’ll leave the many milk churns these 2 will need up to Tim and John.
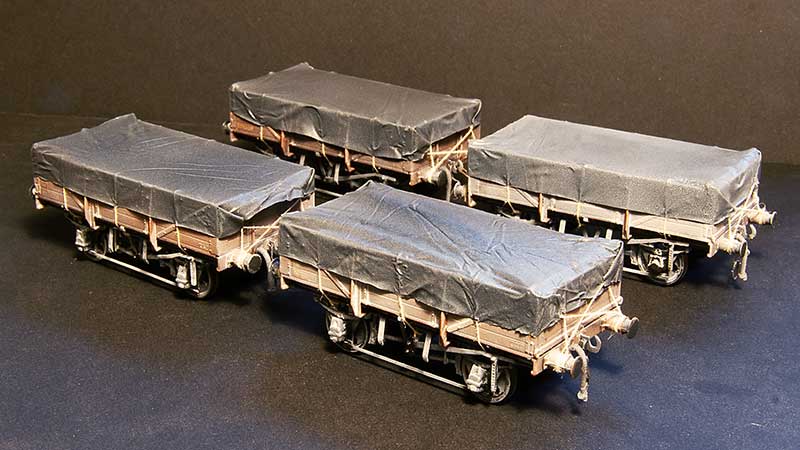
Clay and sheets
One working that passed through the real Brettell Lane and kind of fascinated me was the St Blazey to Etruria china clay working. This service ran for years and was somewhat erratic in the paths it took. Usually going via Worcester, Stourbrige then Dudley before heading off to Bescot. Or it could go right at Stourbridge via Old Hill and (I think) Soho Junction. These routes avoided the Lickey but I’ve seen pictures of it going that way too in later years. When I was at University in Stoke it would often turn up at lunch time behind a pair of class 37s although it did switch to a class 60 in the time I was there.
So to have a clay train on Brettell road makes sense as a through service. I like the classic diagram 1/051 clay opens with their sort of cute, baby open wagon look about them. A little bit of rewriting of history is needed though as they tended to stay in Cornwall and not venture out to the Midlands. Brettell Road is set before the introduction of the clayliner service so my justification is that BR was trialing things out to see how they would work and thats good enough for me.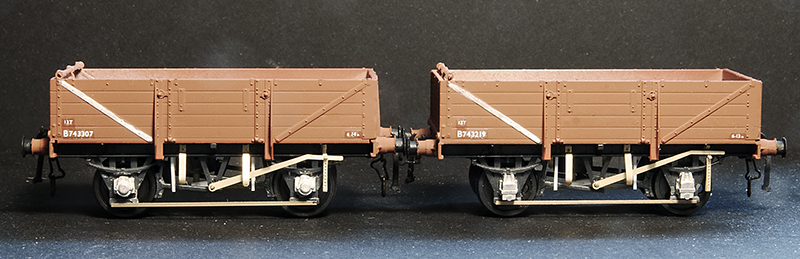
Ratio make a nice little kit for these and I was fortunate to find someone selling a box of 7 on Ebay for what basically worked out as a fiver each. The bodies go together well with a little bit of modification to make the ends fit. The kit features a somewhat crude attempt at a roller bearing and the brake levers are quite poor. It also includes cast buffers that aren’t all that great. So the bearings were replaced with MJT ones although my research showed oil axleboxes to be more common anyway. Brake levers are from the Mainly Trains etch, door bangers from Rumney models and buffers from Lanarkshire models. I did one as a test then built the other 6 as a batch.
Before I move onto the sheets a bit about the weathering. I followed my usual approach of a wash of dark grime followed by a spray of AK interactive dark mud. This was then all sealed with Klear before AK interactive white ink was used (in various levels of dilution) to give an overall effect of clay staining. You don’t want a fully weathered wagon at this stage, try to think of it as you are aiming for about half the effect you ultimately want.
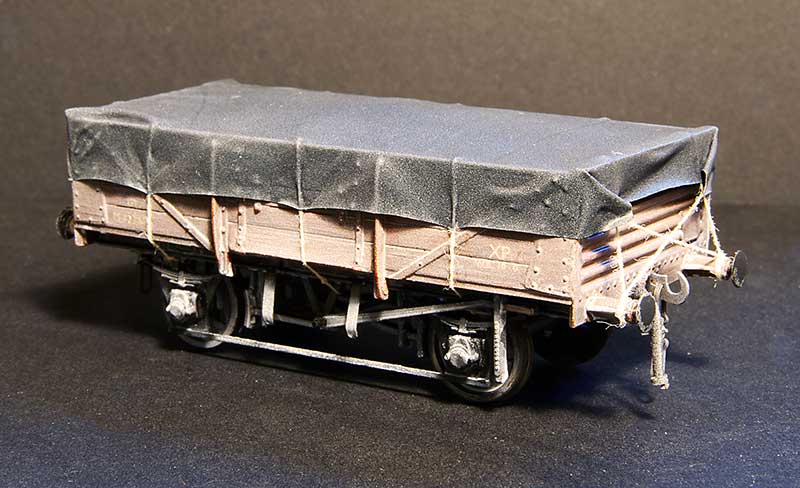
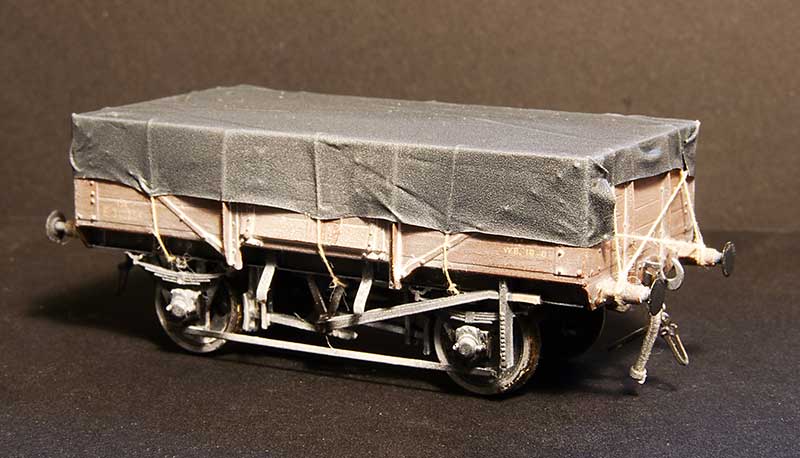
Previously when I have done wagon sheets I make the sheet up with the ropes attached to it and then attach it to the wagon. This is a bit of a faff and sometimes the glue holding the rope to the sheet can give an odd effect so I approached this a bit differently. Roping of wagon sheets is a whole topic on its own and I will leave that too someone who has properly studied the subject but I just looked at pictures and coped what I saw. So the first stage is to attach the ropes (cotton) to the wagon – Tying it on at the visible ends and gluing to the wagon top with Loctite
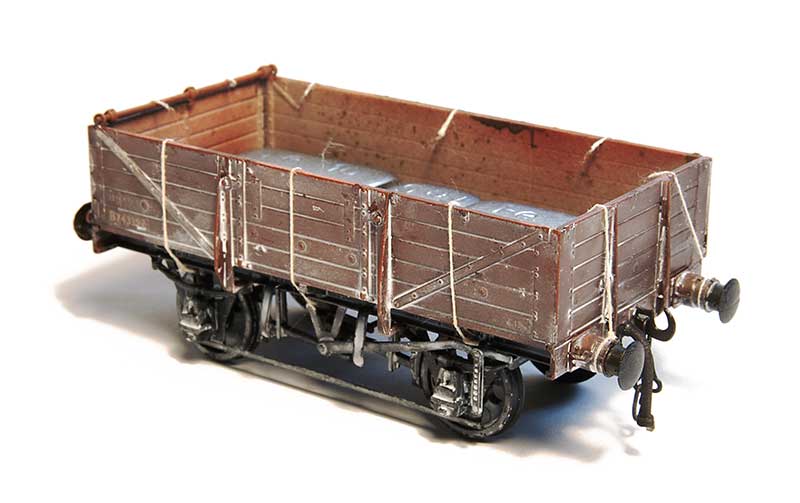 This was then tided up by first sealing the knots with Zap Pink superglue. Theres no huge reason to trim the ropes inside the wagon but it pays to just keep things neat so they don’t get in the way later.

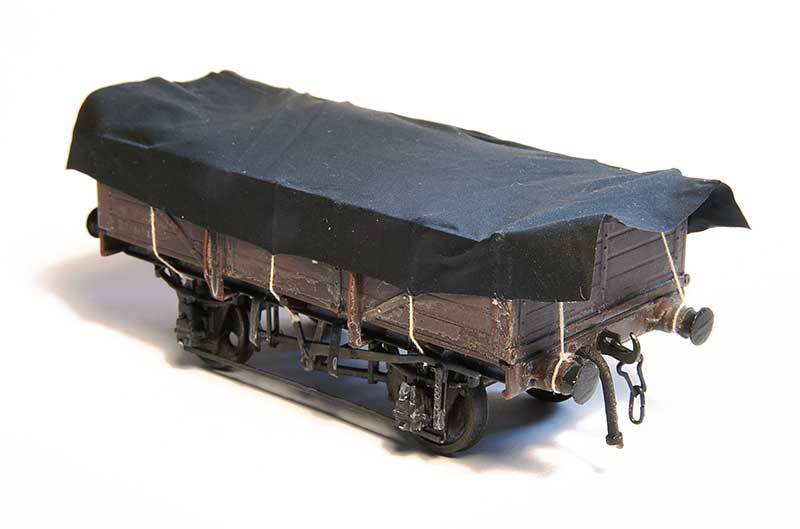
As mentioned before the sheet is made from black latex gloves (actually nitrile) and mine are a brand called Supertouch. They are a bit awkward to cut as the material tends to snag on the scalpel blade even if the blade is brand new. A method I found to work best is to stretch the glove over a bit of cardboard, make a template and to cut it using the handle end of the blade not the pointy end, pushing the scalpel away from you to cut. I don’t know why this makes a difference but it does! As i’ve mentioned in the past the material is black on the outside and a dark grey on the inside. I use the black side as its depicting wet conditions but the grey is good for a nice sunny day layout.
The sheet is then positioned in place, not forgetting to add weight inside the wagon and bulking it up with a bit of tissue first before gluing to the wagon tops in 6 places, about where the ropes are. Use Loctite and start in the middle (it sets very quickly) and remember to pull it taught as you glue the outer sides. This is one of those things were you probably need a bit of variation but you don’t want to force it. I find if I try to be as neat as I can, I’m not all that neat really and I get the variation by default.
Next stage is to glue the sides of the sheet to the ropes, again with loctite and again puling the sheet taught. I found holding it in place for 10 seconds was all you need. It pays to glue the sheet the side of the wagon at the ends at this stage
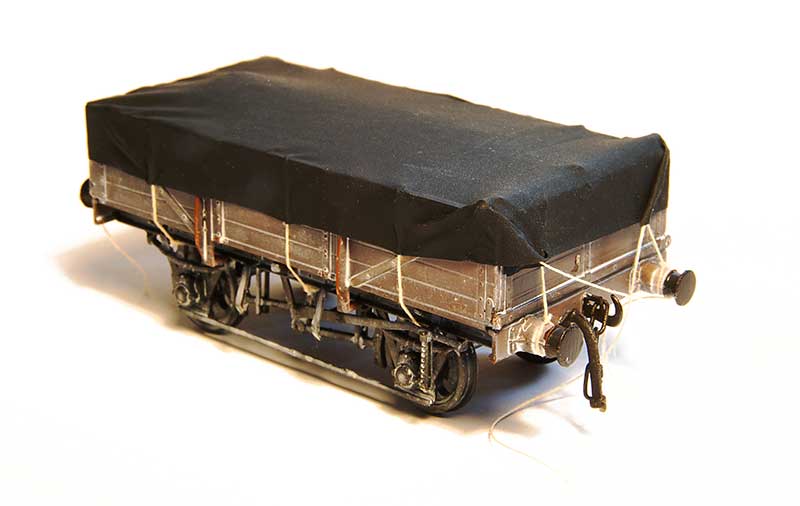
On to the ends. Another drop of super glue on the top and the sheet can be glued in place. The corners can be folded and secured in place and the last set of ropes glued into the sheet itself. 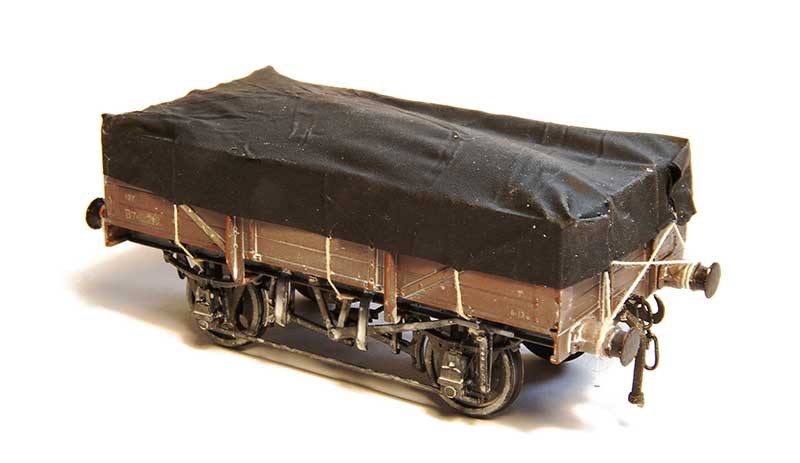
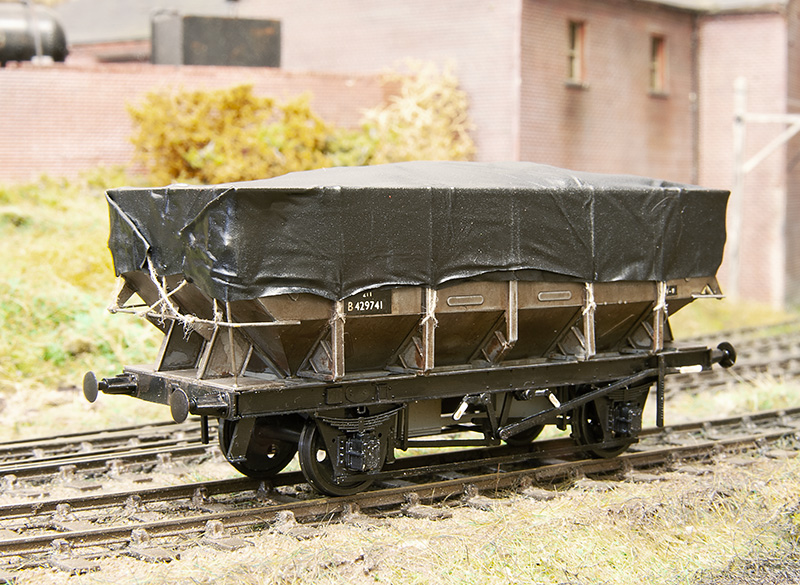
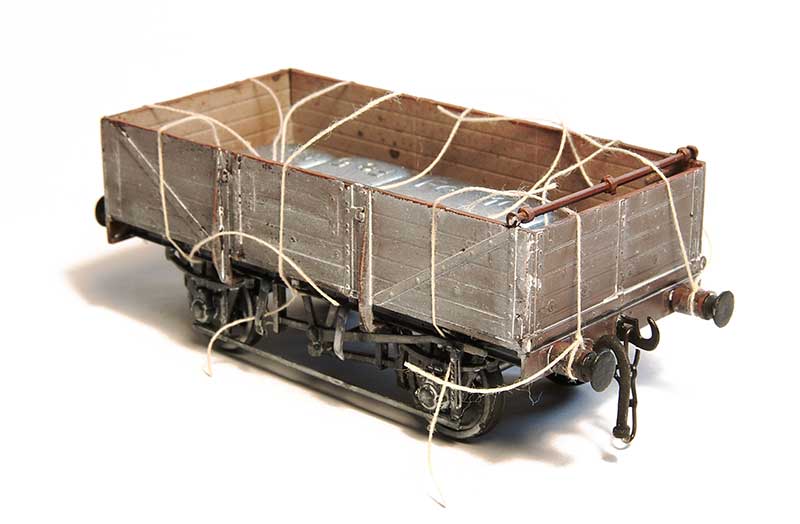
The last ropes tied into place and tidied up.
The final weathering, back to the white ink (sprayed this time) with some additional grease stains on the underframe.
 To break up the rake a bit I added a few 10ft wheelbase opens too. These are actually way more typical of the actual wagons used in the clayliners. The ex LMS Diagram 2150 I’ve featured before a few posts ago.
Likewise the ex LNE diagram 210 (although not this specific model)
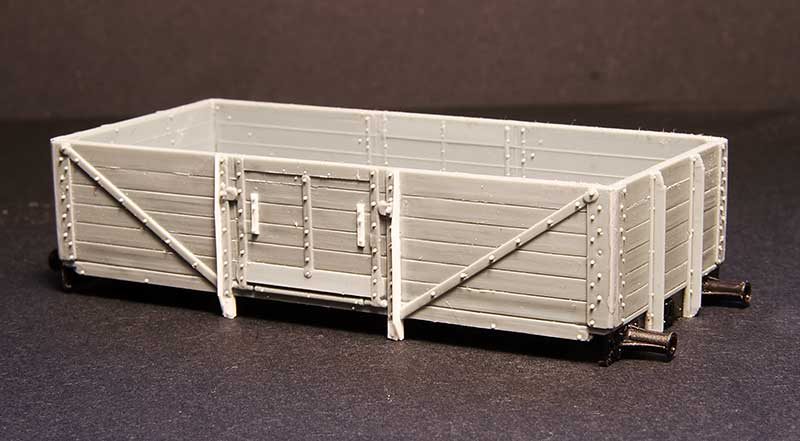
A new wagon type for me is the ex LNE diagram 185. This was constructed from the body of the Cambrian kit C81 for the LNER 12ton 6 plank Open Wagon, With a Parkside 10ft underframe. Theres a few tweaks needed to the body as can be seen and theres an additional top support across the top of the door which is worth adding assuming you aren’t going to cover it over with a sheet that is!
Just need an enterprising transfer manufacturer to produce some sheet markings now.
More shockingly mundane stuff
As a follow on to the last post – more every-day wagons have rolled off the workbench. This time it’s a quartet of shock wagons.
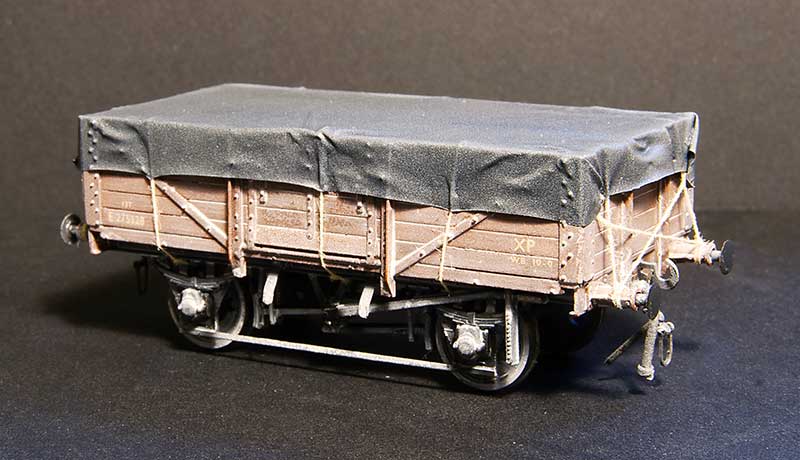
Starting with the basics – Diagram 1/040 shock open from the Parkside kit. Built pretty much as supplied with the addition of a Rumney Models tarpaulin bar and a sheet from my now standard black latex glove.
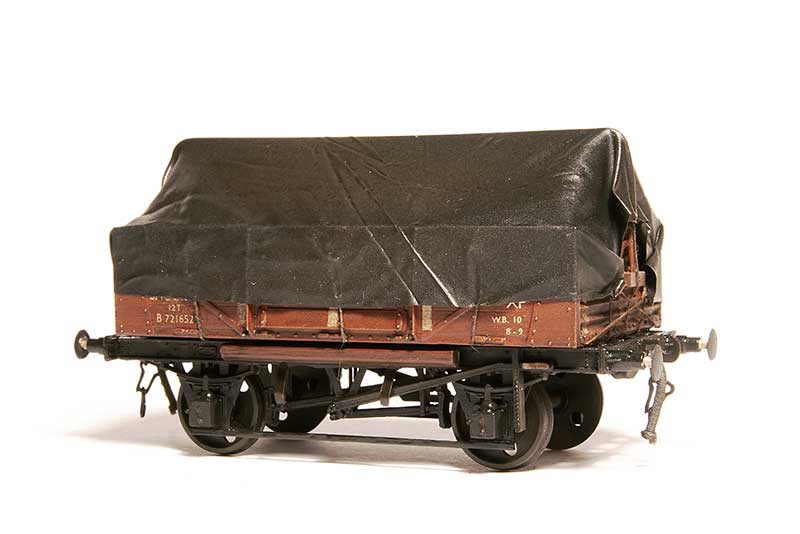
Next ex LMS diagram 1983 from the same kit as above with the additional top lip on the ends and buffers from Lanarkshire models. You cant see it in the pic but I replaced the floor with scribed lead sheet.
EDIT – More info has come to light on these wagons and this one is wrong – see https://p4newstreet.com/back-to-wagons-and-a-correction/
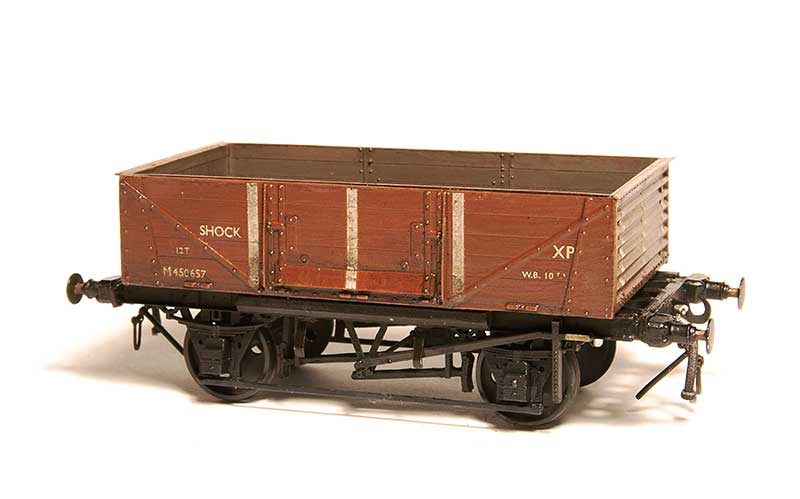
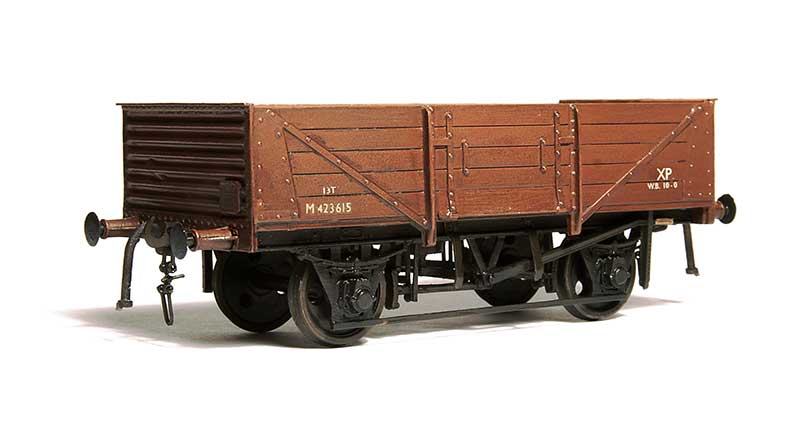
A smidge more involved is this Diagram 1/038 shock open from the parkside kit for the standard (not shock) wagon. I shortened the sides by cutting sections out next to the middle section and mounted them on a new floor as the prototype wagons had a visible lip around the bottom.
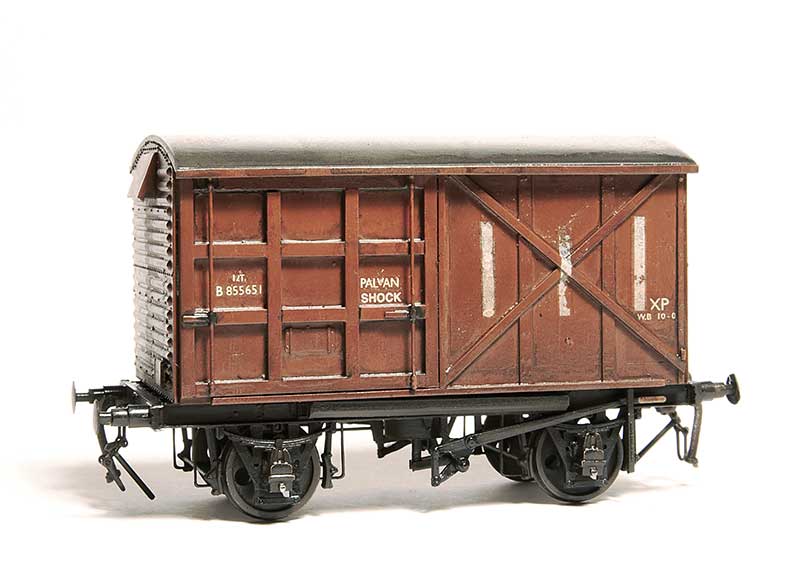
Finally a diagram 1/219 shock palvan. A bit more involved again as I could use spare ends and a roof from Parkside standard 12t vans but the sides needed to be made from scratch. The chassis is the Red Panda kit.
Just some mundane stuff.
Just one of those every day, run of the mill style posts this time but with a few little tweaks to appease the wagon buffs.
Starting with the Parkside kit for the LNER 21t riveted coal hopper. Built pretty much as instructed but I did change the side stanchion plates for 10 thou plasticard as the ones in the kit were a bit chunky.
 The spare brakes that came with the above kit were used to correct the brakes on my prototype 24.5t hopper I’ve featured before.
The humble D2150 13t open from the Parkside kit. The only real visual difference between these and the BR build is the small lip on the ends. A bit of 10×20 thou mictrostrip sorted that.
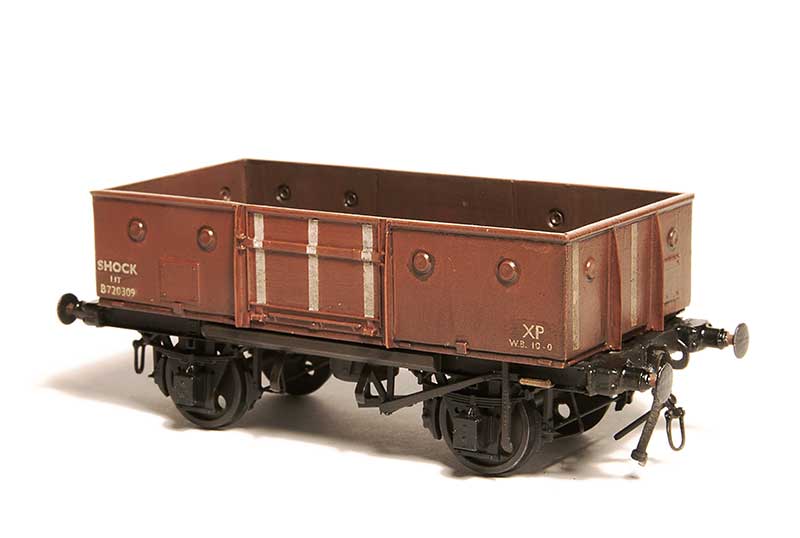
Ex LNER Diagram 210 adapted from the parkside kit for the Dia 1/120 wagon. The side stanchion were slightly reshaped as were the buffer beams while the chassis was replaced with spares from my scrap box.
Another bog standard affair, the D2039 ex LMS 12t van. This one was built from the Ratio kit with the addiction of the Rumney Models LMS van detailing etch (B105). It features the 3 part end for a super subtle bit of variety.
Finally something a little more involved. Before and after of the sides for a D2103 12t van using the parkside fruit van as a start point. The ends were scratchbuilt.
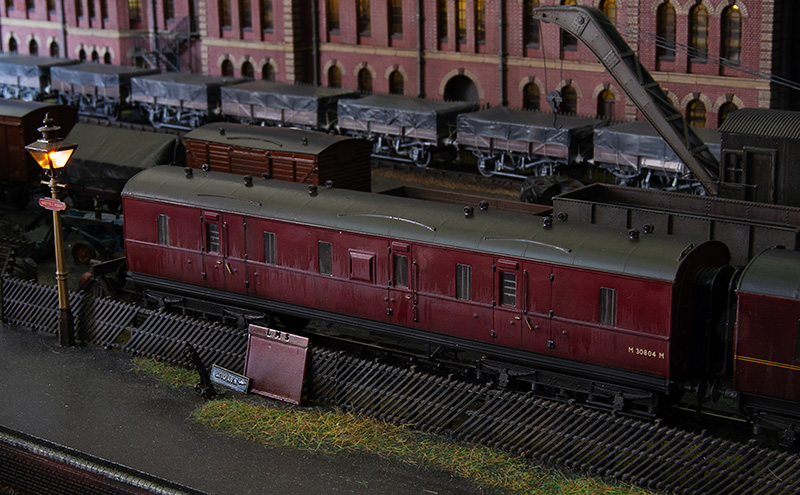
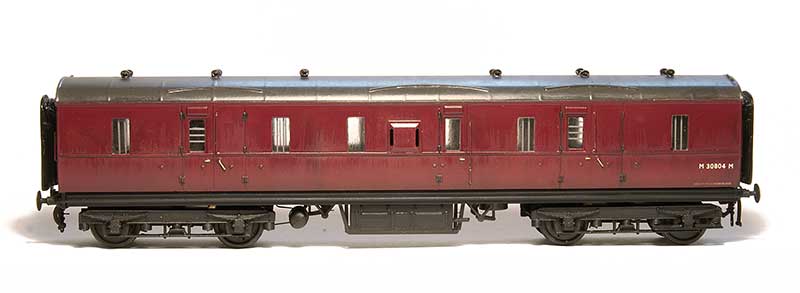
The good old Mainline LMS BG
The subject this time is this…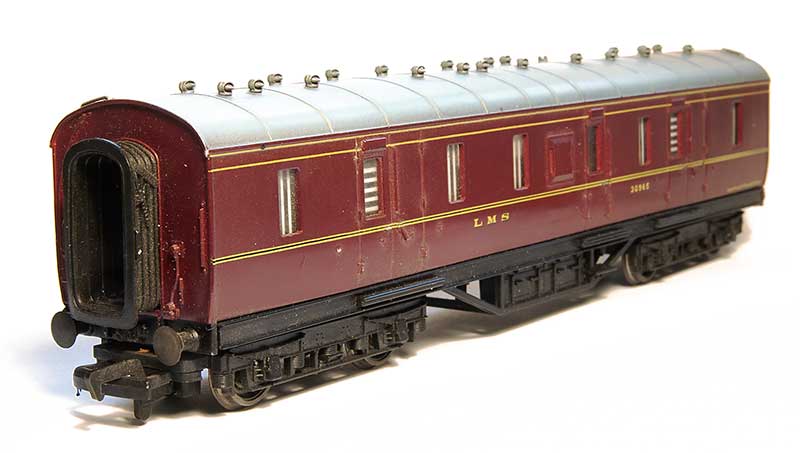
… the good old Mainline LMS BG. A great model for its time but not without room for a little bit of TLC. There is an error here that once you see it you cant un-see and that is that the underframe is too wide by 2mm. Ive talked in the past about looking at dimensional errors as a percentage. 2mm off over the width of a coach is a much larger percentage than 2mm over its length but theres an additional factor in play here and that is relationships. If the whole model was 2mm to wide you might (but probably wouldn’t) get away with it but when only part of it is, it just looks weird. Let’s be realistic here we are talking about 1mm per side but that 1mm means the edges of the solebar framing sticks out from the bottom of the body rather than tucking under it. Also the footsteps don’t line up properly but thats a minor thing.
So the options then. You could just replace the underframe with a Comet one but at the time they were out of stock and the trussing is a flat etch so no real improvement over the one already there. Or you could slice 2mm out of the centre of the floor and glue it back together. The issue with this is I don’t think the trussing itself is over width. To me the simplest solution was to make a new floor from plasticard (29.5mm x 196mm) and transplant the trussing from the mainline model. The new solebars are 4mm channel from evergreen.
 So heres the model had already done on its new underframe. The bogies are Brassmasters with the original sideframes attached. Buffers have been replaced with more accurate ones from Lanarkshire models.
 As is usually the way for me I got a little carried away. Why build one new floor when you can build several? Theres a few subtle differences here such as the roof vents and footsteps.
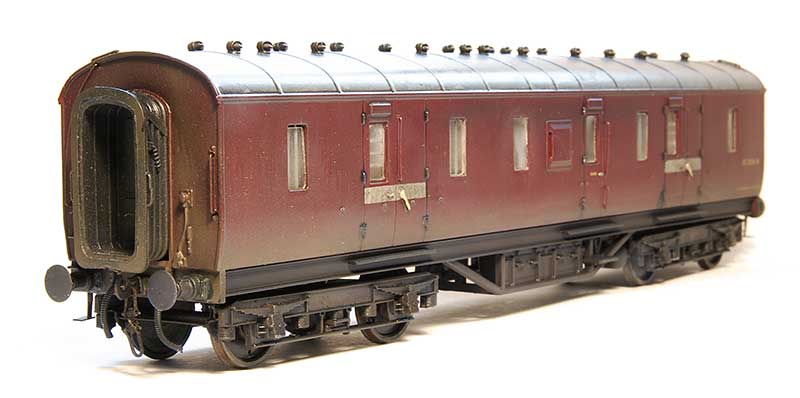
As with any grouping of things there tends to be one member thats a little bit weirder than the others and this is it. The diagram 1715 version. OK it looks kind of the same but the qay it was build was quite different and actually much more like the much later BR Mk2 in that the body was where all the strength is and it didn’t need a traditional underframe. The solebars themselves are also different in that the outer face is solid. Other variations are the positioning of the roof vents, bodyside beading (which comes in a whole load of variations on these coaches anyway), the extra rain strips and the full length footboards
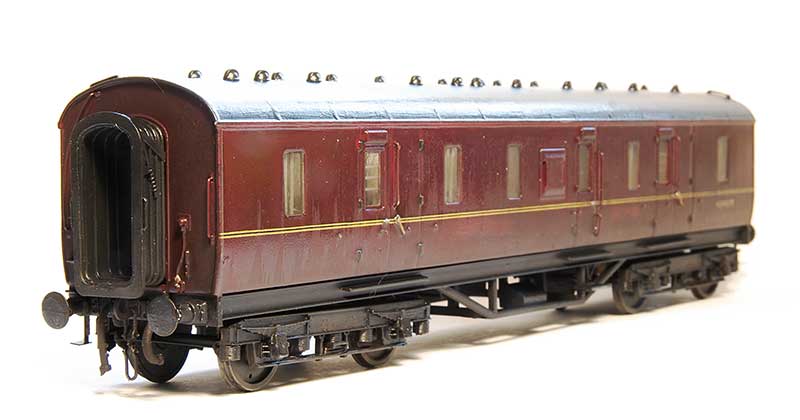
 This is the more normal side. Note the dynamo is at the opposite end to the more standard versions.
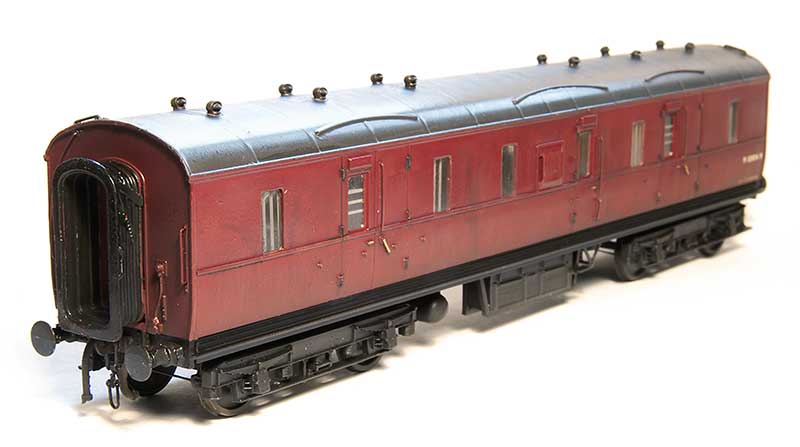
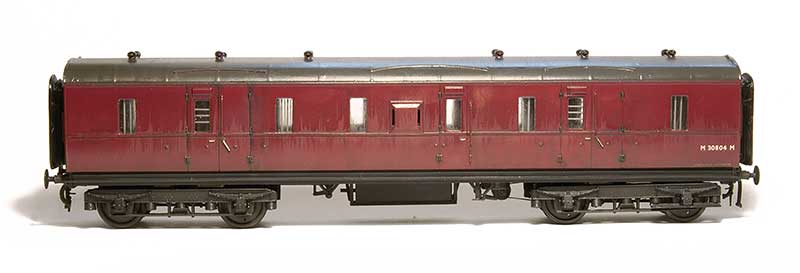 The other side is decidedly more odd with basically next to nothing there. It almost looks like the model hasn’t been finished. Note also the steps on the bogie.
Just a quick note to thank Mark Tatlow and Graham Speechley for their help locating images of the diagram 1715 version.
Weatherill Loader
While at Scaleforum with Cades Green it was mentioned that Iain had a Lesney Weatherill Loader that he intended to do something with for the layout. Given my fascination with doing stuff with things from the toy-box this was pretty much an irresistible project to have a look at.
Weatherill Hydraulic
Weatherill were not a company I was aware of before now. F. E. Weatherill Limited was founded the late 1940s in North London before moving to Welwyn Garden City in the mid 50’s. Mr F.E. Weatherill was formerly of another similar company Chaseside. Their machines were generally built around Ford components but later moved to Perkins and later still Leyland Engines. Chaseside used cable operation and F.E. Weatherill had tried to get Chaseside to look at the Hydraulic route for their machines but Chaseside weren’t interested. The lineage from cable operation to hydraulic was somewhat apparent in the layout of the earlier Weatherill machines.
By the late 70s Weatherill were struggling, They could not match the prices of machines imported from Scandinavia, Japan and the USA. They met with the UK government to ask for protection of UK manufacturers but that plea fell on deaf ears. They downsized and closed the Welwyn Garden City factory, moving to Tottenham where the plan was to focus on smaller high lift two-wheel drive rigid loaders but they couldn’t carve out a market for these and in the mid ’80s the firm closed down.
Lesney
It seems strange then that Lesney would be all that interested in producing toys of Weatherill loaders but they produced 3 in total. A big factor in this could be that the Weatherill Factory and the Lesney factory were next door to each other! Of the 3 toys produced 2 were the same 2H loader. The difference being that the first was to 1:75 scale (the yellow one), and the second (the orange one) was larger, no doubt to fit the standard sized box. The third toy was a later design and part of the larger ‘Superkings’ range.
The Model
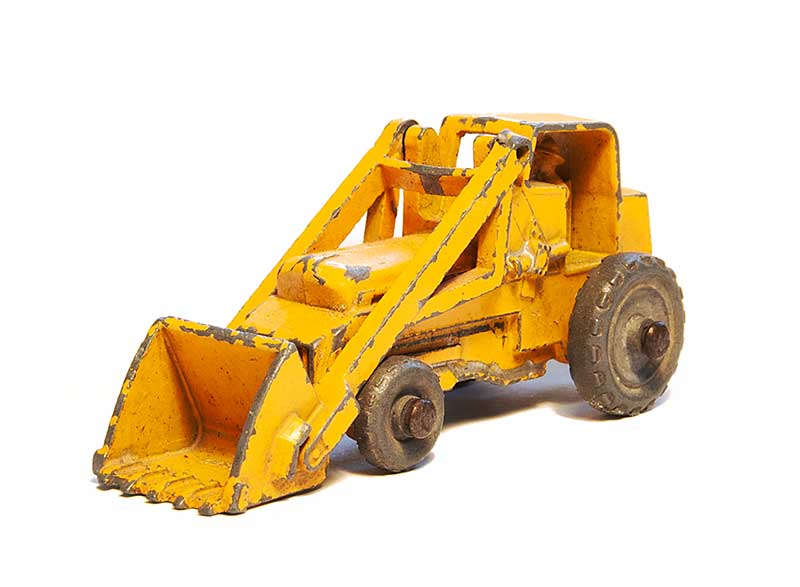 I’ve bashed quite a lot of toys into something a little more accurate over the years but I admit I had to look quite hard to see the potential in this one. In the end only the main body was usable with the cab and the diecast driver being cut away. It was painted in something that resisted all efforts to remove it including dunking it in cellulose thinners overnight!
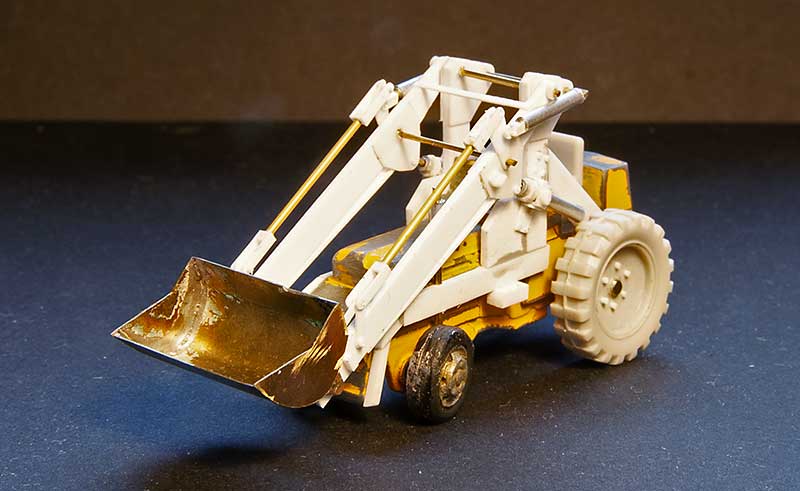 So out with the microstrip mainly. The driving wheels were from a JCB kit and the front wheels from my box of things that might be useful one day, Paragon models I think. The shovel was knocked up from bits of brass using photos as a guide.
  The finished result.
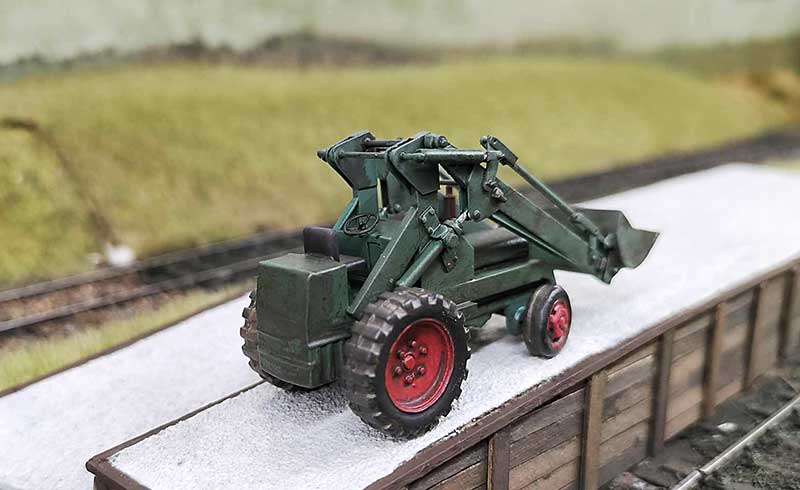 In its new home on Cades Green. It seemed quite popular with the Kids at the Uckfield Show this weekend.
A bit random this one.
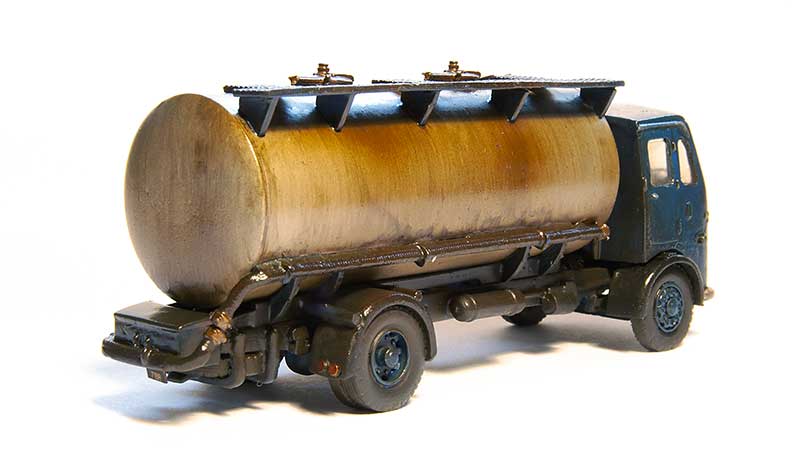
While the somewhat uninteresting work behind the scenes for taking Brettell Road out was going on I did distract myself from it with a few road vehicles to maintain a semblance of sanity.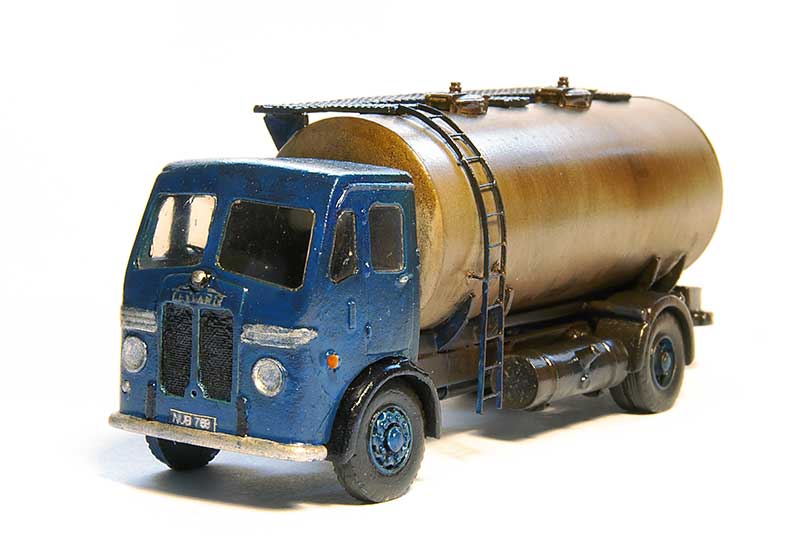 The Leyland Beaver milk tank I’ve featured before in an unfinished state. It had kind of stalled for a while but now I have finished it off. This is a Langley Models kit.
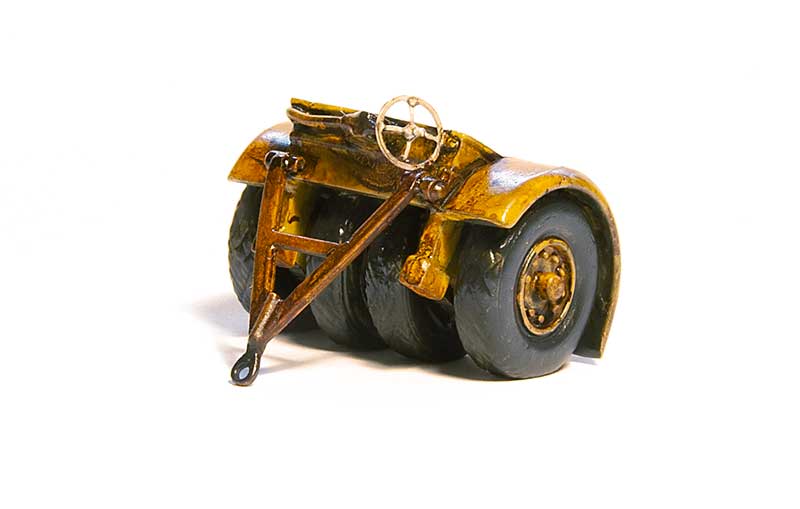 On the subject of Langley models I picked up this 4 wheel dolly from ebay for next to nothing. Thinking it looked like the sort of thing that could be found lying around at a steelworks, I though it would make a nice bit of background clutter.
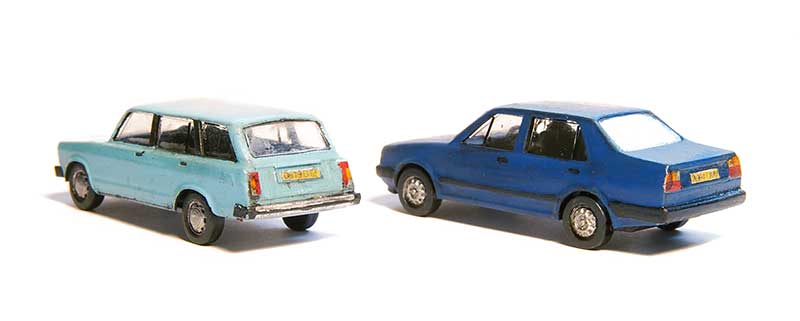
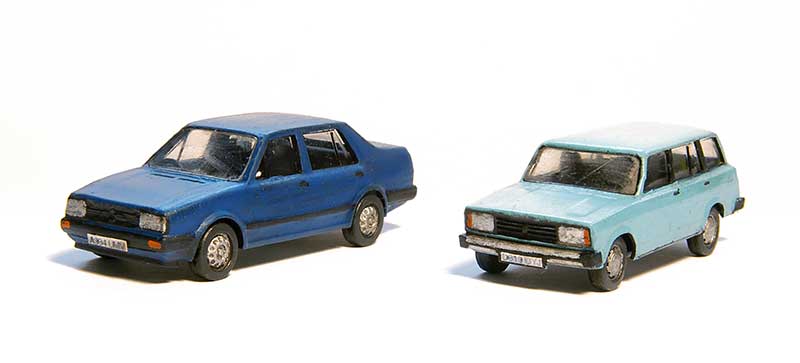 On to New Street – These 2 are 3d printed kits from CMAC Models. On the left a VW and on the right a Lada Riva Estate. Nice kits, I recommend them.
Ive recently managed to get myself involved in one of Iain Rice’s old layouts, Cades Green. The layout has been rescued by the Norfolk area group of the Scalefour society and turned from a home layout into an exhibit-able one. Its first show in its revised form was at Scaleforum back in September. One thing that stood out to me were the road vehicles, not only was there a bus on a bridge but they were tipped straight from a box! I guess Iain never managed to get round to them?
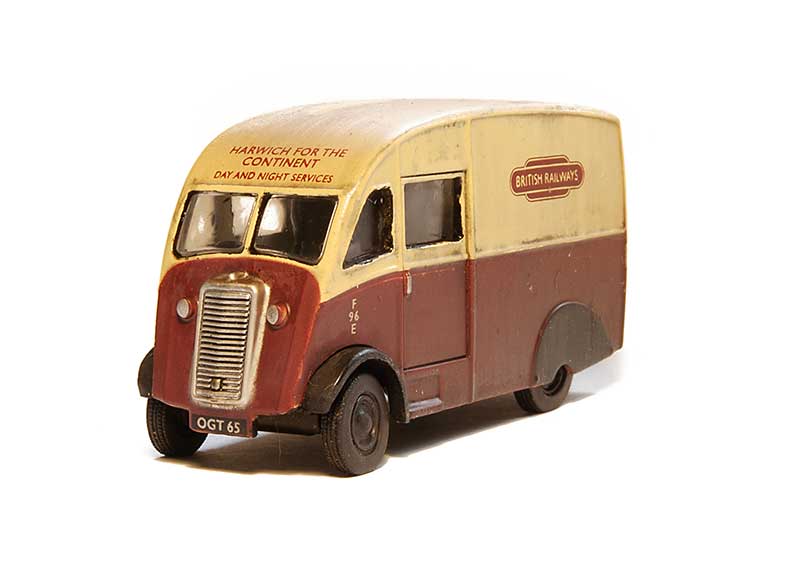 Given that they were straight from a box, and Iain hadn’t done anything to them, there weren’t any real qualms in me taking them away to have a fiddle. Its not like I would be messing with Iains work after all. The above is an Oxford Diecast Commer van given the basic treatment of darkening the window frames and a bit of weathering. I changed the tyres as the originals went all sticky. Ive had this happen before and it seems completely random as to why it does. Any ideas?
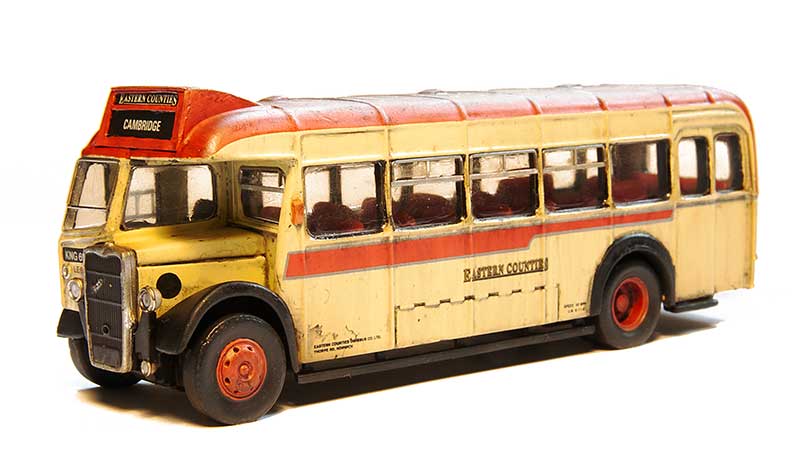
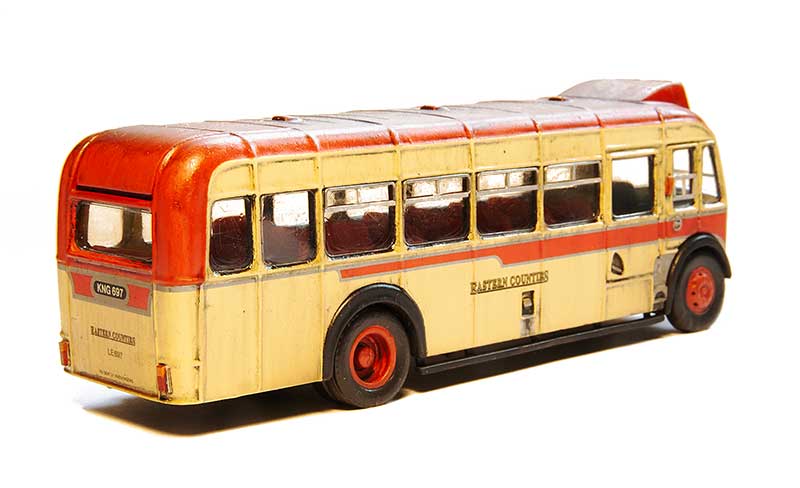
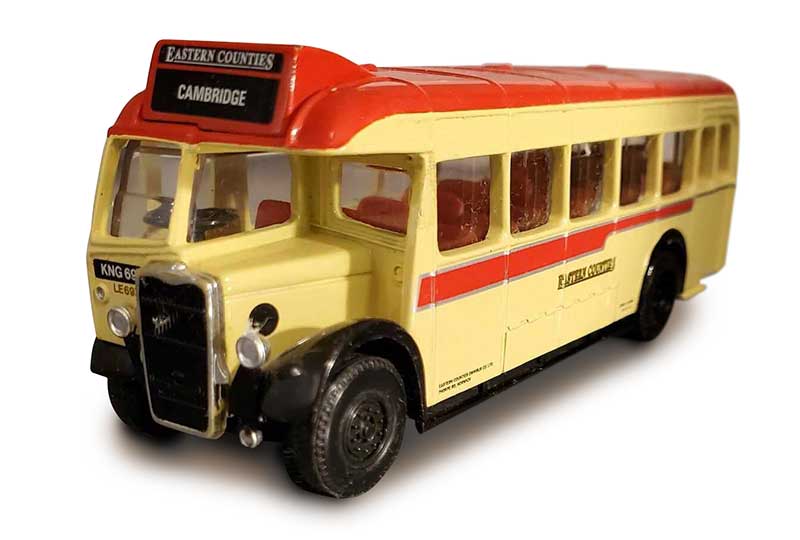 Next up the offending bus on a bridge – Original Omnibus Bristol L5. There was a bit more to do to this one. The glazing was just too far recessed for the black edge trick to work on its own, so that would all need to be redone. The wheels where a nice rendition of the type found on a Routemaster but not right for an L5 . There were no indicators or tail lights and the destination box was nothing more that printed on. Results are below.
Links
CMAC Models (Ive linked to their Ebay page as they seem to have more stuff on there than their website)
Back to business as usual
So back to business as usual then.
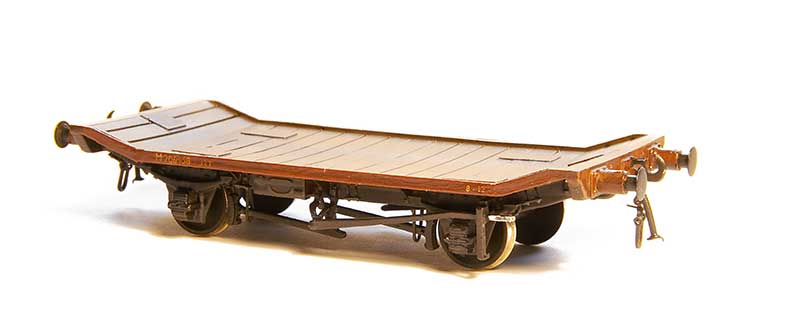
This is an ex LMS 12 ton traction truck which has recently been released by 247 Developments. The kit is a 3d print which is supplied as a body with solebars, W irons, brake gear and white metal buffers. The body was a little bit distorted (kinda like a spoon shape) but popping it in very hot water and weighting it while it cooled seemed to take most of the distortion out. The back of the frames needed thinning for p4 wheels to fit (I believe the kit has been changed to rectify this now). I replaced the sides with microstrip as they were a little uneven and added the safety loops and tie down shackles that were missing from the print. The supplied buffers were a little odd so these are Accurascale ones. Just need to do a load for it now.
 On Brettell Road I have mostly used cast white metal vacuum pipes. Generally these have been fine but I have had some of the bufferbeam mounted ones break as they are slightly vulnerable. David Roome has now produced some 3d printed ones that are rubbery and a lot less susceptible to knocks. Im not replacing them on all of my wagons just as and when a white metal one gets broken.
Links
Cradley Show – Epilogue
My friend Tim has put together a short video of the layout from Saturday. It was late ish in the day and being in front of a window the layout was back lit so didn’t really get the full effect I was after. (Note to exhibitions managers – I actually want the dark bit of the hall no one else does!!) However it does show up the wet effects quite nicely. I need to be a little more fastidious with the dusting in the future.
Cradley Show 2023
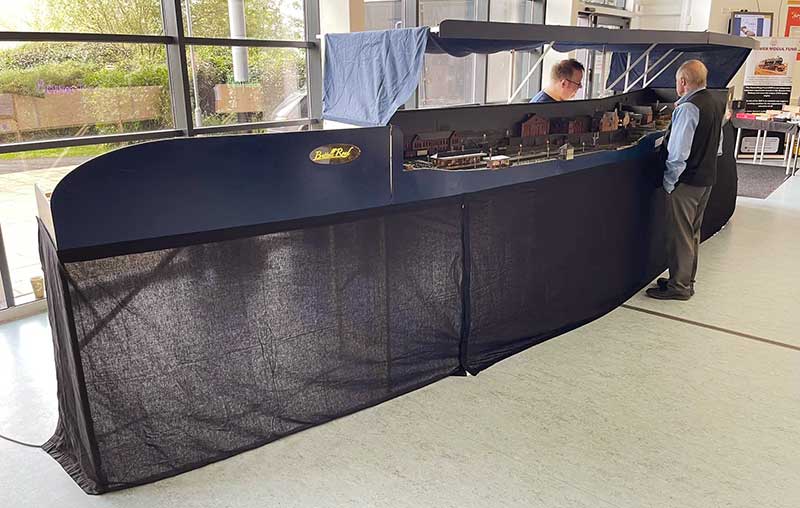
Yesterday Brettell Road made its return to the exhibition scene in its extended form. The show went very well I thought and we all enjoyed ourselves. Theres a snagging list for me to work through, of course, but nothing major. The layout seemed very well received and we were honoured to be awarded the Frank Collins Award for best layout in show as voted for by the Cradley Heath MRC committee. Somewhat poignant for me as Frank had assisted me with info for the model of the Round Oak admin building before he passed away. I like to think he would have approved of my efforts. The kids seemed to enjoy themselves looking for the cats on the layout and and the strategically hidden lego Batman that the club provided.
Quick thanks to my operating team and the members of the CHMRC for their efforts.
(Pic ©Tim Horn)
Cradley Heath Exhibition
 In just under a months time Brettell Road will make its return to the exhibition world with a local visit to the Cradley Heath Exhibition. Hope to see some of you there.
On the subject of shows I’ve updated the show page which can be found here.
Test prints
Progress on the Princess Coronation build continues with some test 3d prints for some of the details. These are only testing out ideas at this stage.
Above we see the bogie bearing pads and bracket, cylinder fronts, Ejector and brakes.
I admit that i had quite a wow! moment when I first saw the ejector. We are exploring the idea of 3d prints for the brake shoes as it allows you to position them closer to the wheels without risking a short. Where the front one squeezes in between the front driving wheel and the rear bogie wheel seems particularly advantageous.
 Pony truck axlebox and springs along with some of the under cab pipework. One of the small AWS cylinders can be seen on the footplate
More AWS bits – this time on the firemans side. The roof is still a loose fit at this stage.
State of play so far.
Finishing touches
With a little over a month to go before Brettell Road is back on the road*, I’ve been finishing a few things off.
 The last backscene is now in place so the road in the middle of the layout now gives the impression it goes somewhere. The Leyland Steer seems to have lost its licence plate somewhere.
 The little back yard on board 2 is done – I wanted a used but not particularly looked after feel.
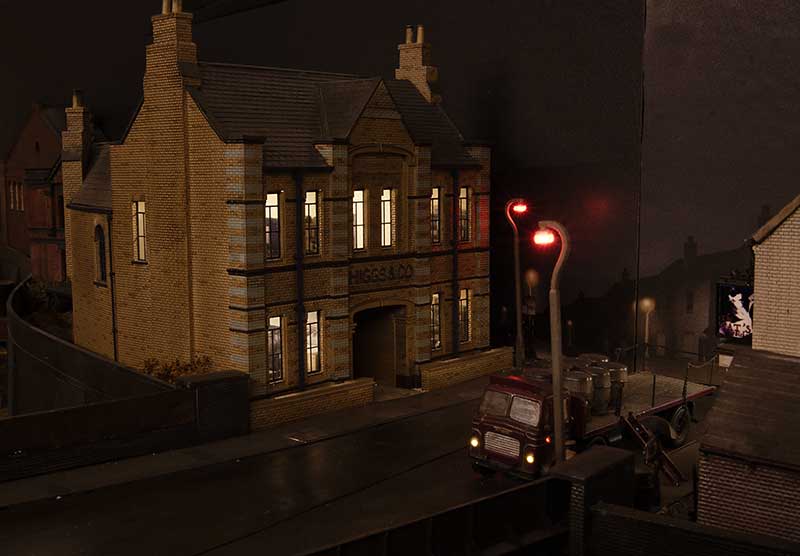 I realised I’ve not actually taken any images of this building in its finished state before now.
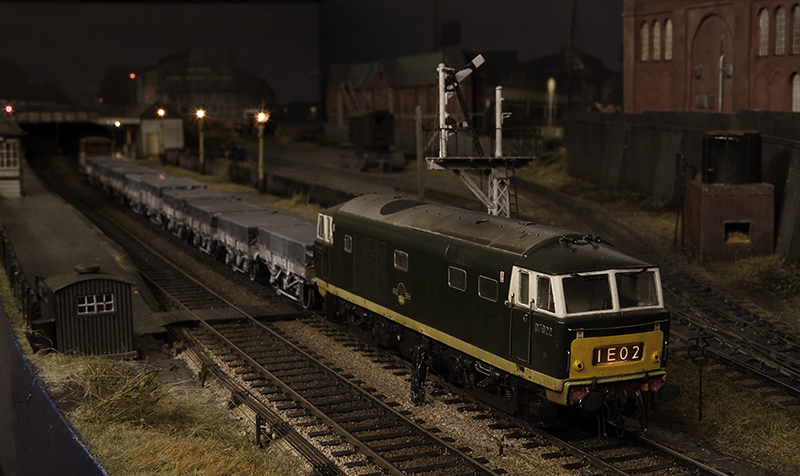
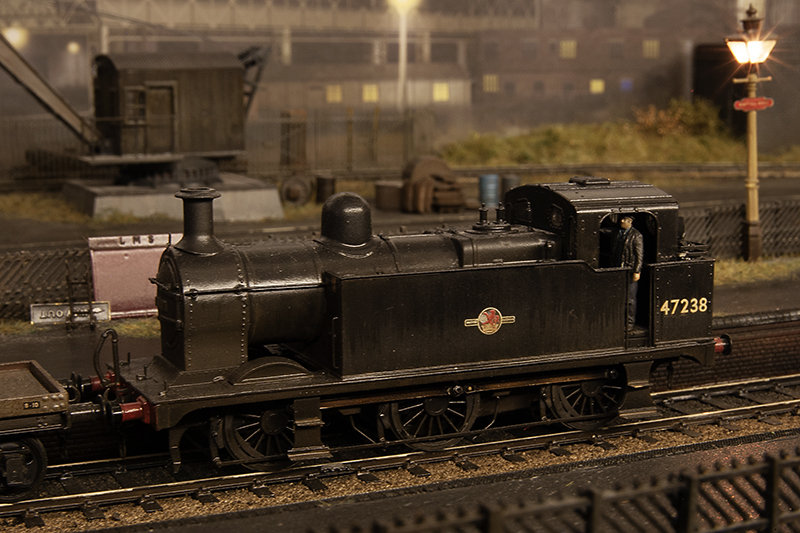
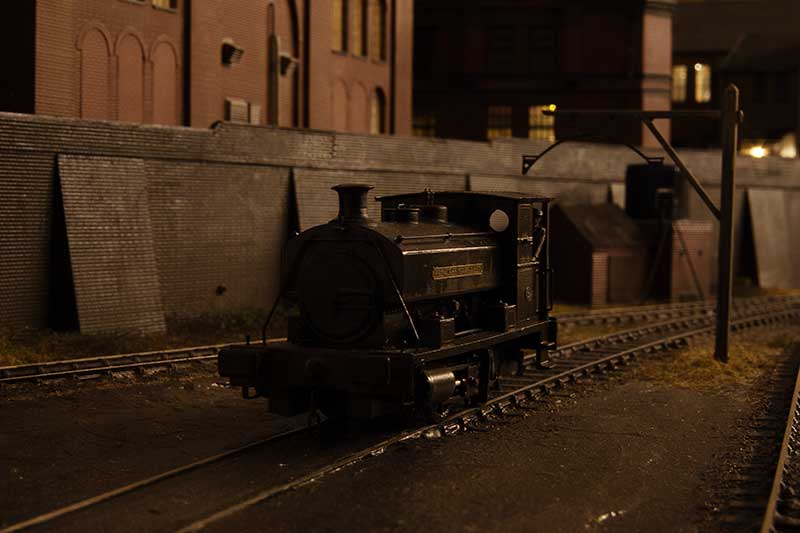 Princess Margaret heads back to the Wallows for the evening.
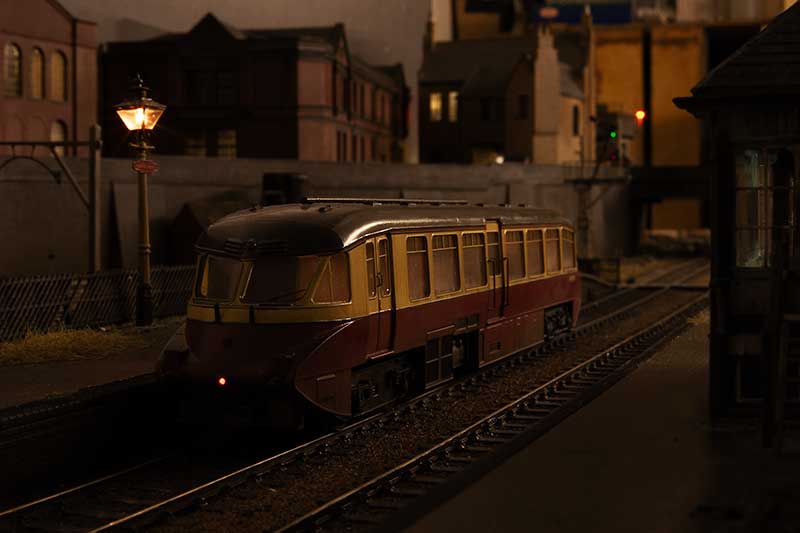 GWR railcar catches the last of the sun as it heads off to Dudley.
* The show is a local one on the 7th October. Click here for more info.
Back scenes done (well most of them anyway)
 My Back scenes have been printed onto self adhesive vinyl and most of them mounted to the boards. Just the last one still to do. I used a local company who kindly did a couple of test prints so i could tweak the colours. Anyone local to Stourbridge area who are after something similar I can highly recommend them – SAC Graphics
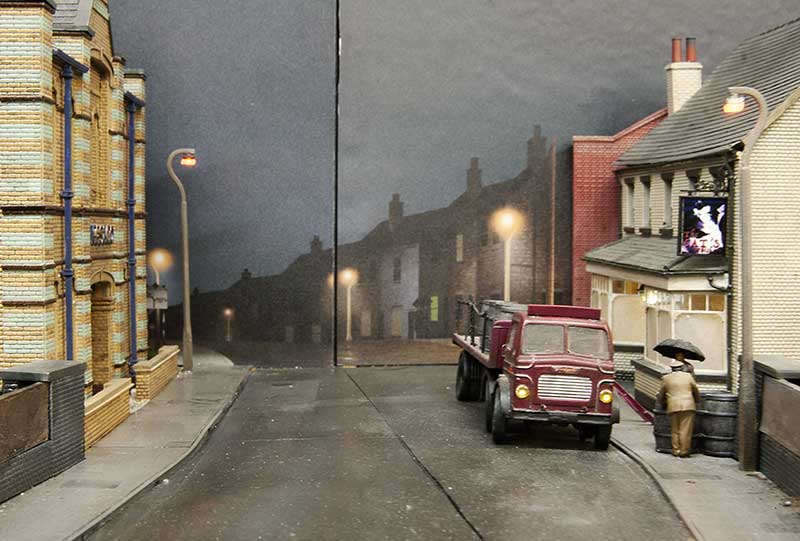
Below is how it looks in something close to the intended light.
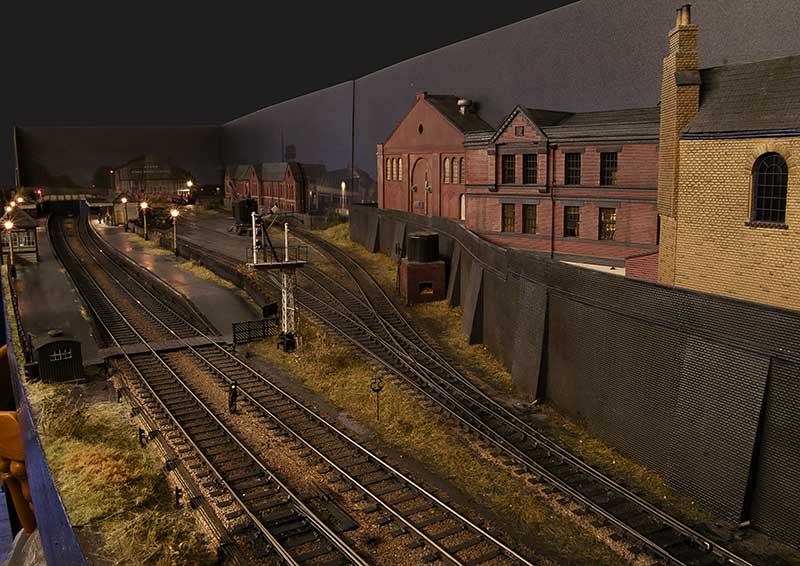
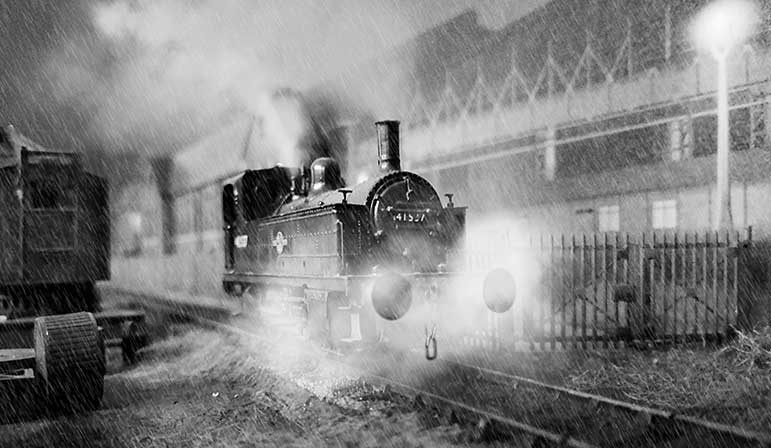
Haven’t done a bit of photoshopery for a while but i found a pic of a Deeley tank in a cloud of steam and thought I’d emulate it
simply back
Today, 21st June 2023 marks a small but significant date in the life of Brettell Road, in that it’s exactly 2 years since Tim and I first cut wood for the 2 new baseboards. I think it fair to say that a reasonable amount of modelling water has flowed under that particular bridge since that day and I’m now drawing in to the layouts final destination somewhat.
Drawing being the word as the big thing thats always been missing from any pictures of the new boards is the backscene. Long time readers may recall that this is an area of the layout that I have revisited on more than one occasion and, with every intention of this being the last time, I find myself deciding to get this particular subject closed off once and for all.
The method
The method I use is like modelling but in a 2 dimensional world rather than 3. Starting with drawing up the basic structure in much the same way as I do the modelled buildings.
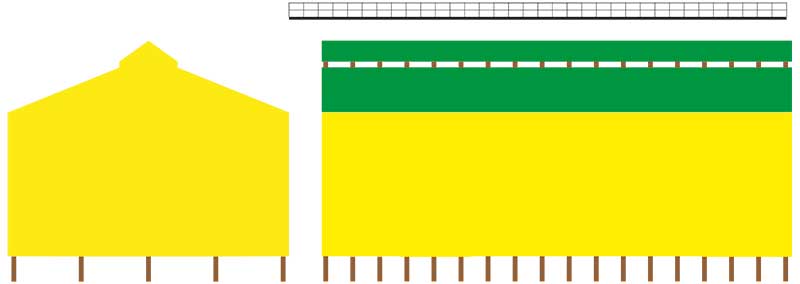 Above is the basic drawing of a typical industrial shed. Think of it like a kit of parts. This is done in Adobe Illustrator and the rather bright colours are simply so that they are easily selectable at the next stage.
 Which is to transfer the basic drawing to Photoshop where Scalescenes textures are overlaid and the bits ‘assembled’ into something resembling a basic 3d building. You will note theres no shading and no perspective yet.
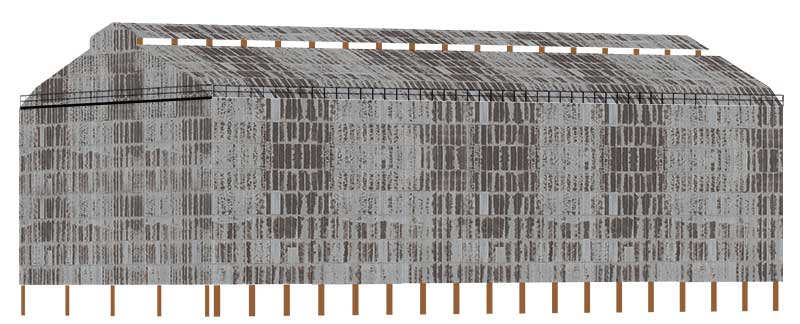
  A different building showing some shading and some perspective. The image is still made up of separate parts in a folder so that I can fine tune it once applied to the finished backscene.
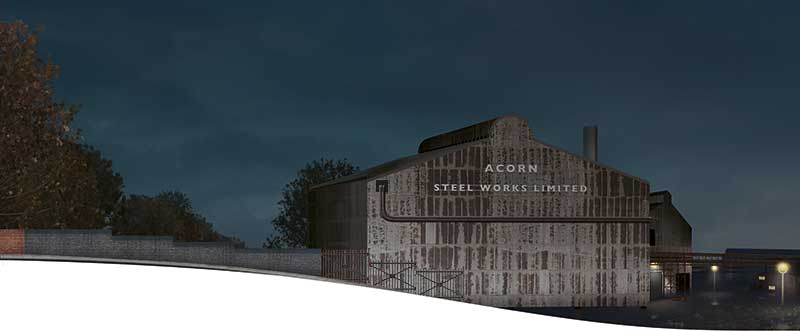 Of which this is the end board for the left of the layout. Some consideration, such as the metal fence, needs to be made for elements of the layout that will cross from the 3d world to the 2d one. The line the railway takes, under the bridge on the left is hinted at by the arrangement of the trees.
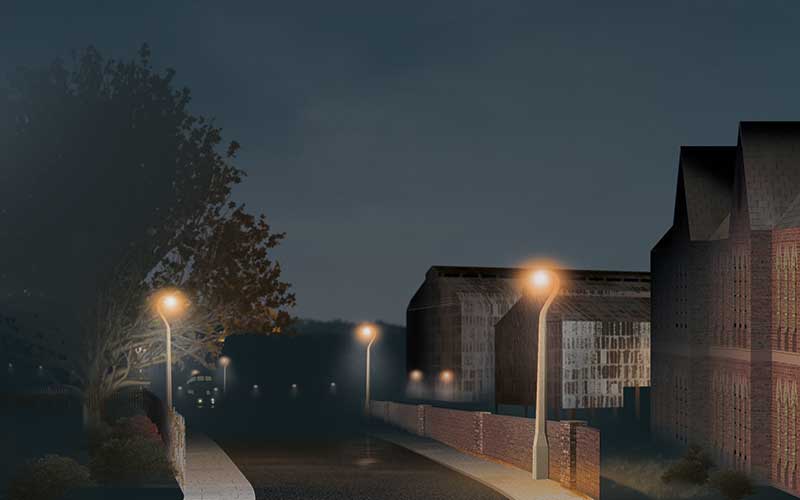 This is the view of the bottom of the hill on the left. Again the wall and the building on the right of the image are intended to match up with the 3d model.
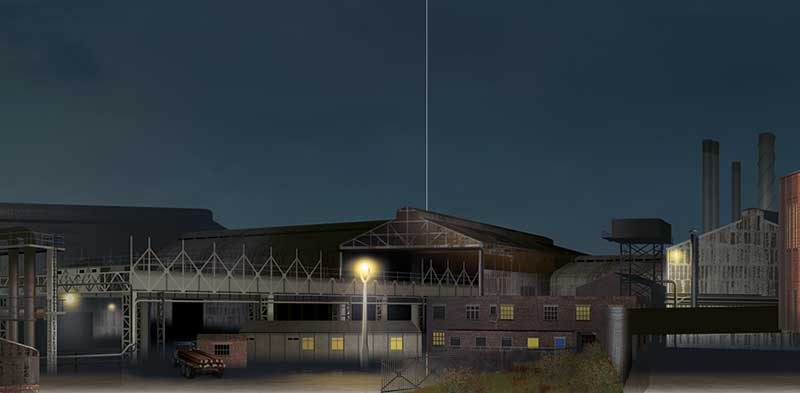 And finally the middle bit of the 2 new boards. Based on images of the real Round Oak. Of course the point of all this is that its there but not really all that noticeable at the same time.
Revised fiddleyard
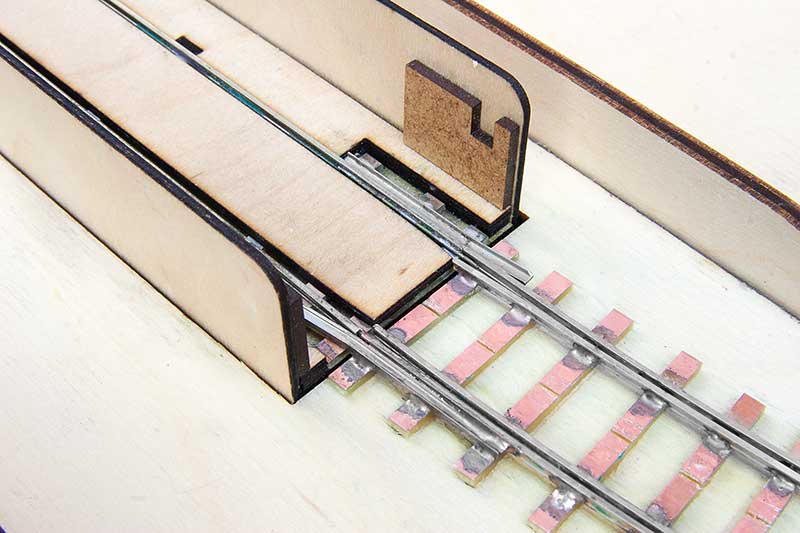
 Ive mentioned before that enlarging Brettell Road would mean I need to build new fiddleyards. The reason for this is the way the cassette system worked was to have a recess in the board which given that the layout is now 2 tracks meant the old ones couldn’t really be made to fit. I also took the opportunity to make some improvements and the result can be seen above.
The boards are 6 inches longer and this time I’ve included a little barrier on the near side edge to stop anything falling off It never did but it was something that bothered me.  View from the front. I decided that the Round Oak industrials running on the mainline was a no-no, so now they will appear from the right of the layout behind the warehouse. As the mainline drops away this means that i needed a different level for this bit.
With the cassettes I have also made some improvements. The originals use 9mm ply which as it was unsupported did bend somewhat. I now have 3 sizes instead of the original 2. A short one for locos, A medium one for units and a long one for coaches/wagons. I have made the long and loco ones reversible but I only expect to reverse some of the locos.
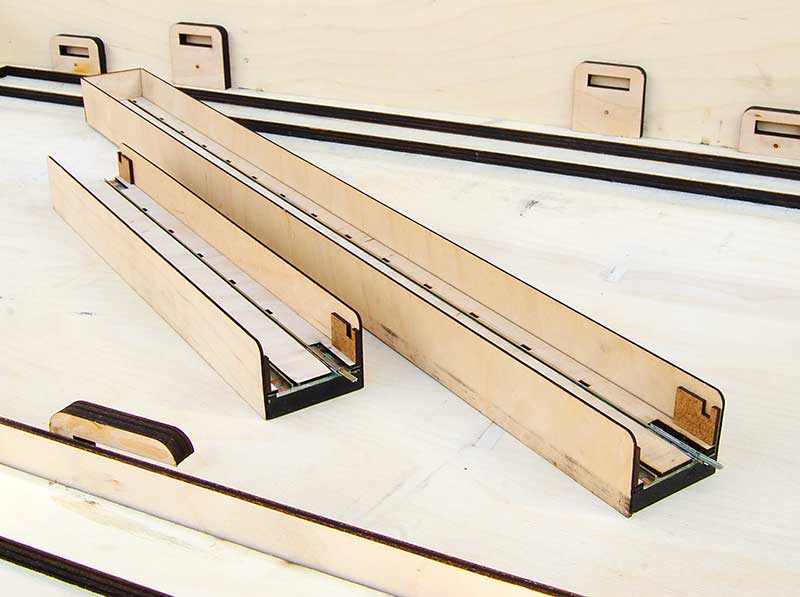 Pictured are the loco and unit versions. The base is 9mm MDF this time.
 The little bits on the inner ends are for rudimentary buffer stops. This stops the trains running off the end but also adds a little security when lifting the cassettes so that nothing rolls off.
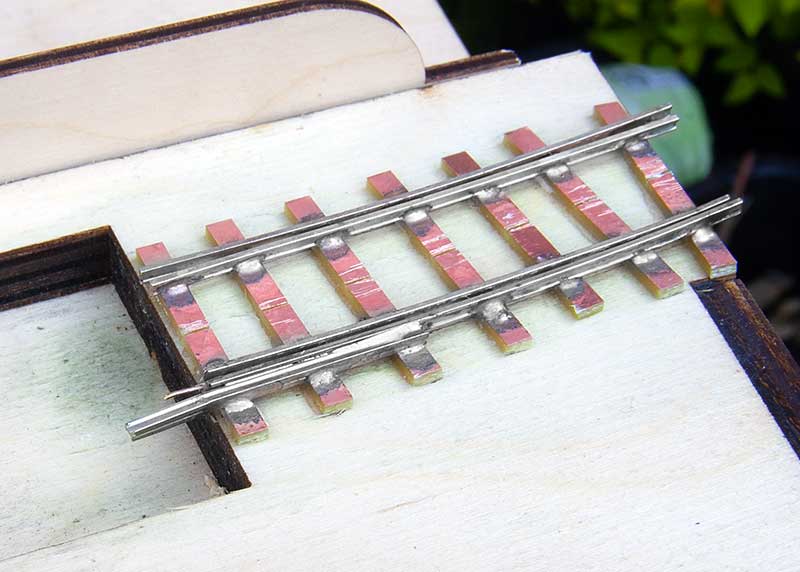 The way they connect is a tweak on my original design of using a bit of flat bottom rail on its side – positioned in the web of the running rail for alignment and electrical connection. Originally these were both sides and the rails on the cassettes were angled outwards a little for a good fit. Making the loco cassettes reversible main this wouldn’t work and so a small bit of 0.6 straight wire is soldered to the inside of the web to help with alignment.
You may be wondering what the little blocks are for in the first 2 pictures.
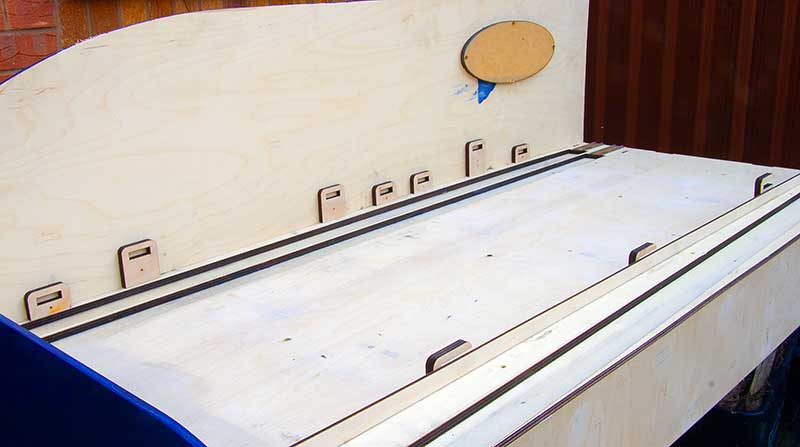
 Taking a hint from Amlwch (a layout i used to help out with) I decided to make the storage of the cassettes integrated with the fiddleyards. This one will store the locos and units, the other one the long cassettes. Most of the braces slot in place meaning I can lock in place 8 unit cassettes with just 3 bolts and 16 loco cassettes with just 2. The less time spent faffing about at an exhibition the better!
Thanks as always to Tim for allowing me to hijack his laser cutters.
31st March 2023 – A very interesting day.
The 31st of March 2023 turned out to be a very interesting day.
The initial minor disappointment of George, The Stourbridge Junction station cat, being unaccessible for some fuss (he was perched on a filing cabinet at the back of the ticket office having a wash) was quickly tempered by this turning up!
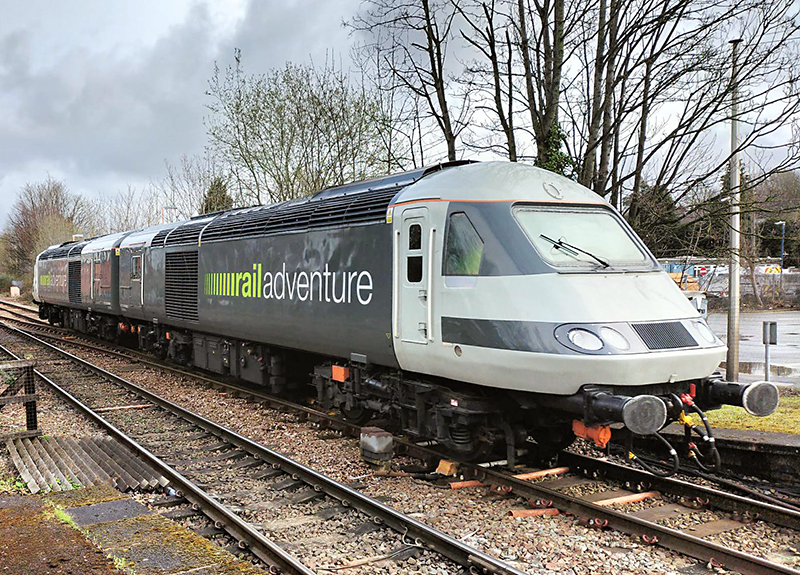
This wasn’t what I was out for mind you. The main event was a tour of New Street’s signal box which you may know has recently been decommissioned. Network Rail ran a ballot for people to have a look round and having been unsuccessful with that my visit was saved by my friend Tom who had a spare ticket.
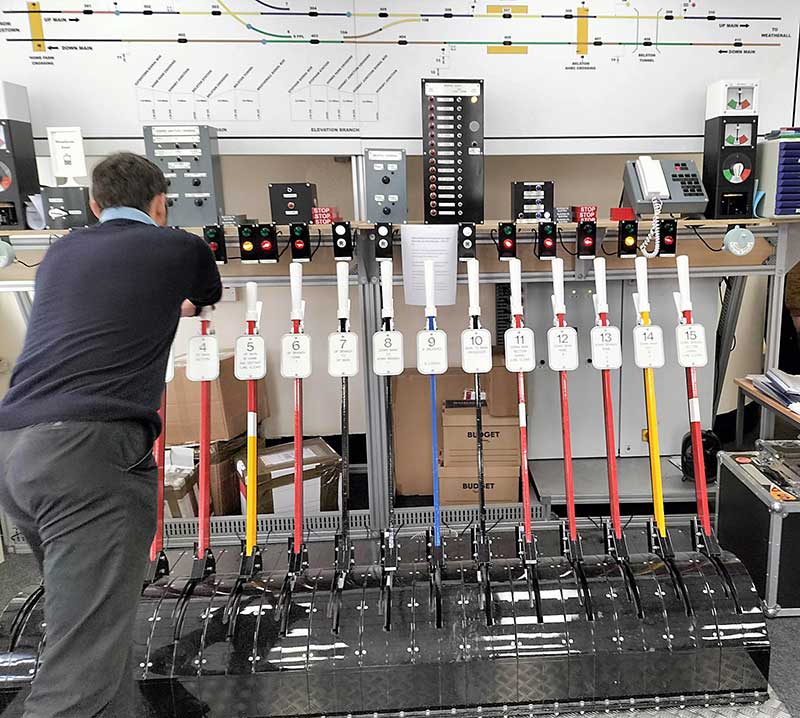 I wasn’t expecting to find a lever frame but there is one. Its located on the third floor which is used for training.
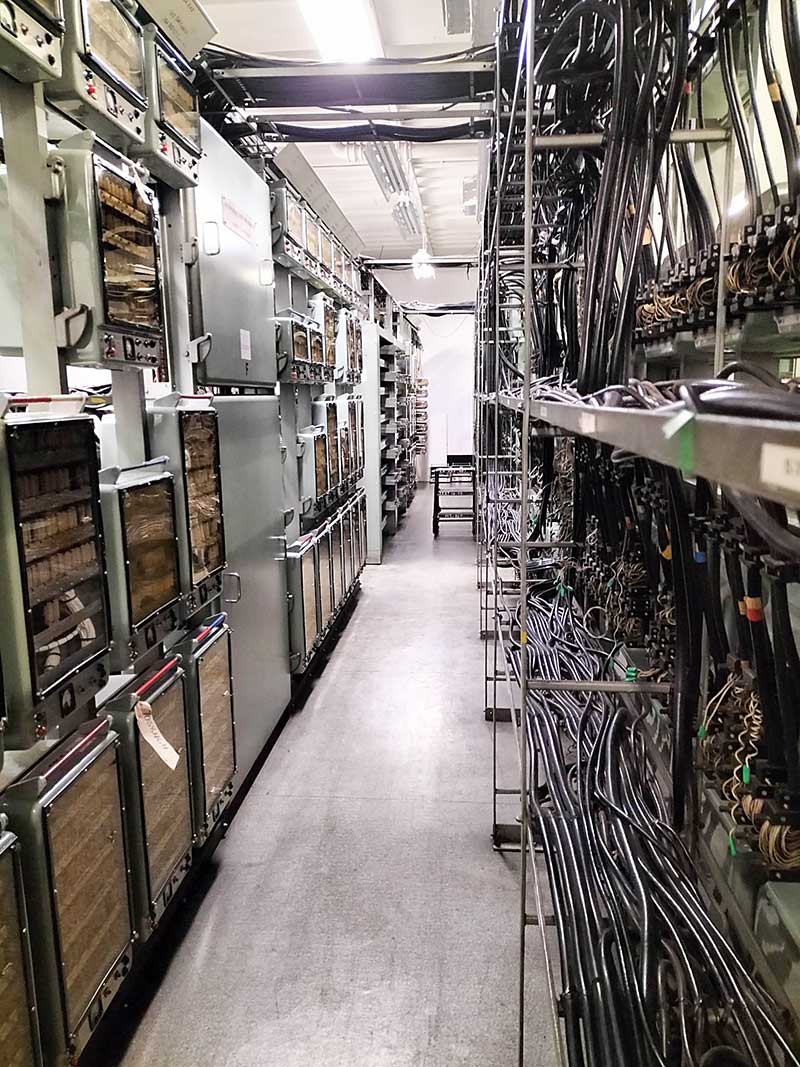 The fourth floor is a gigantic relay room. It still had that lovely electrical machines smell.
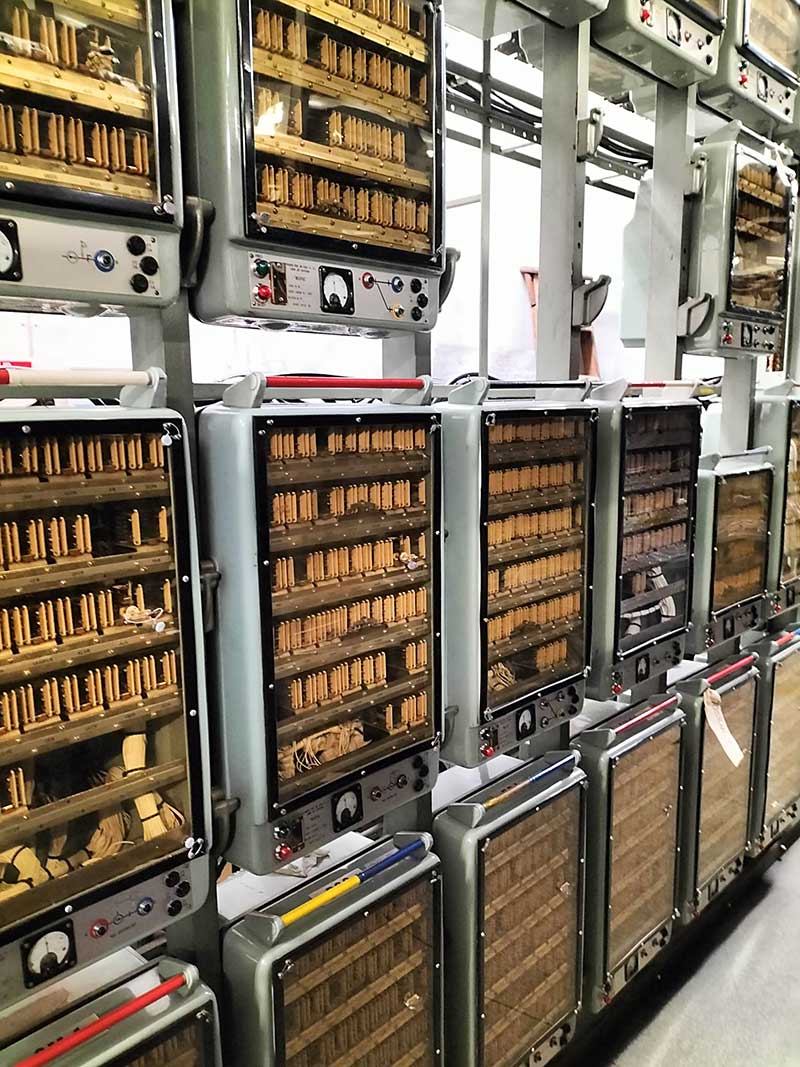 These are called K packs and each one controls 1 thing outside in the station. Theres no plug in a laptop and diagnose a problem with these things. If something goes wrong an engineer would need to use their knowledge of which pack is causing the problem, lift it out and use and the paper schematics that are kept on the same floor to fix it. All under the pressure of something on the station being shut down and the general (organised) chaos that would ensue. We were told that some of these pack have never been touched since the day they were installed. About 60 years of reliable service!
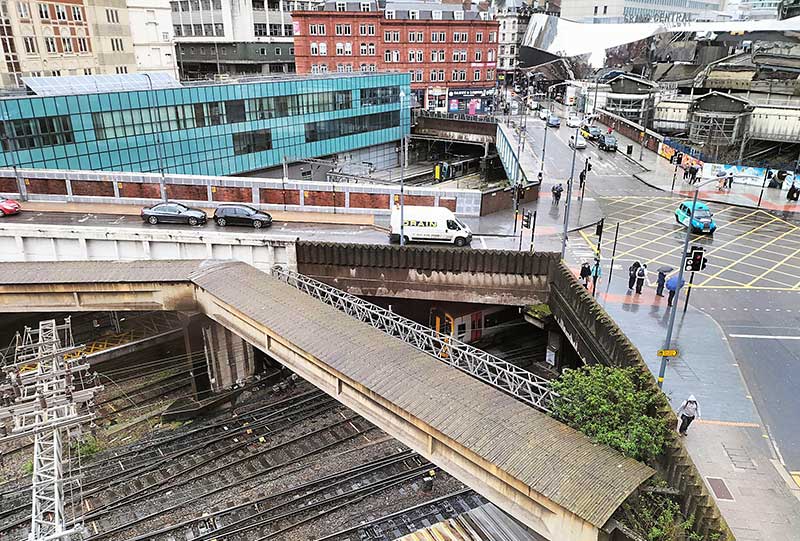 The view from the fifth (top) floor window. The Building directly ahead is about the only thing thats unchanged since my version of New Street set in the late 80’s. The blue building stands where the original lamp block stood and is still called that.
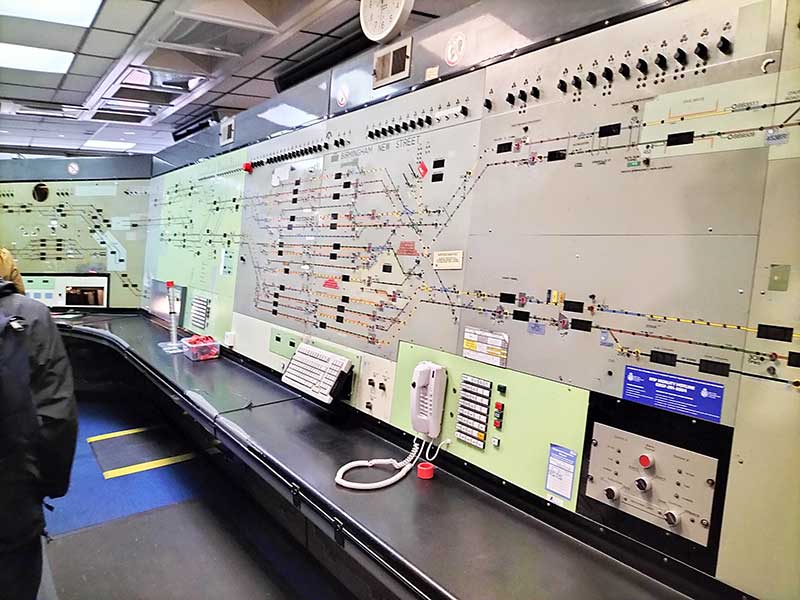 Finally the panel. Who knows how many millions of movements were controlled by this in its lifetime? All the platforms are bi-directional and all worked via permissive block working. Everything being safety netted by the relay room downstairs. We were told it would take a signaller 6 months to become proficient in using the panel although there was one guy who learnt it in 8 weeks.
It genuinely is mind blowing! Thanks to the Network Rail Staff who looked after us all.
Heavyweights done
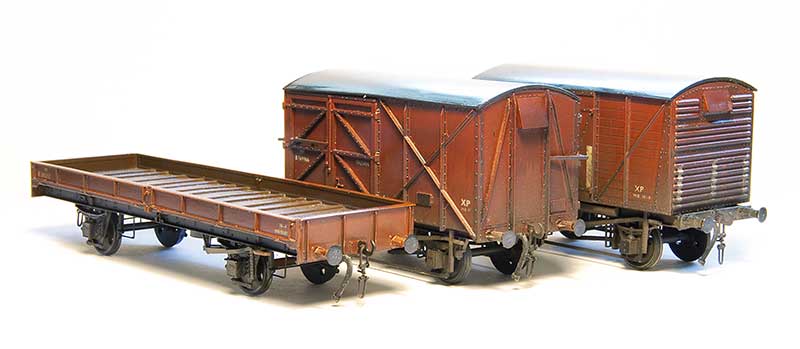
Just a super short post this time. The wagons featured last time are done and can be released into the wild.
Is it just me or do metal kits always just seem a bit ‘meh’ once they are painted?
A couple of WIP heavyweights and breaking the golden rule.
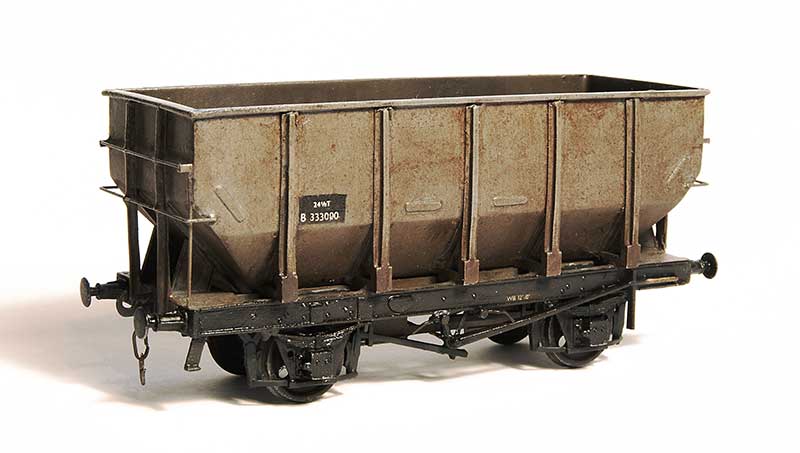
When my friend Tom kindly gave me the Ks kit for the Coral glass wagon (featured earlier) he also gave me another Ks kit for the 24.5t coal hopper. Further investigation showed that this was a kit that was based on the prototype B333000 which was not really like the production ones in that the ends were different. I suppose back in the day this was your only option however now you can buy 24.5t hoppers ready to run this strange little oddity might have a little value as something different from what everyone else is doing.
B333000 was one of 2 prototypes and was built at Shildon. The other B333001 was built at Ashford and it seems to heave been this latter example that influenced the production run. I believe B333000 was later used for experimentation of the automated doors used for MGR trains but photos of it are rare as hens teeth. Simon Bendall kindly supplied the only picture I had to work from.
So, breaking a golden rule I have had to make educated guesses about some of the details of this wagon. The underframe in Simons picture is very dark and looked to have been modified in some way. It was claimed the Shildon design was basically a taller 21 ton hopper and the lack of outer discharge doors kind of backs that up. So getting hold of a parkside 21t kit to use as a guide I set to work.
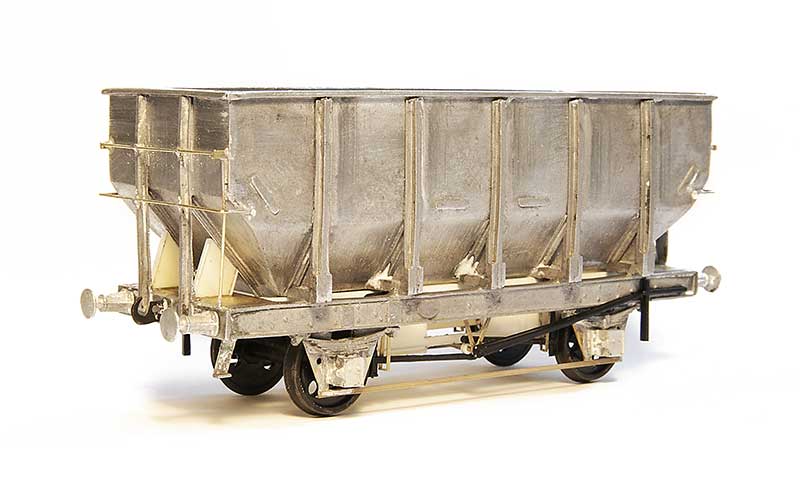
The hopper had some chunky mouldings on the inside of the corners that gave quite a positive location. But as I wanted it to be empty they had to go. I replaced the W Irons with Bill Bedford sprung ones (from my nearly depleted stocks) and Wizard model axle boxes. These were soldered in place as supplied and when I was happy everything was square the centre of the w irons was cut away to give an open floor. The end platforms were replaced with a bit of brass as the moulded ones sat on top of the solebars and were too thick. The kit had no hopper doors so these were made from plasticard using a parkside 21t hopper kit as a guide.
The finished wagon (well almost finished – I haven’t added the door mechanism handles yet) is a bit of a heavyweight in that its 78 grammes. About 50% more than my usual target of 50g.
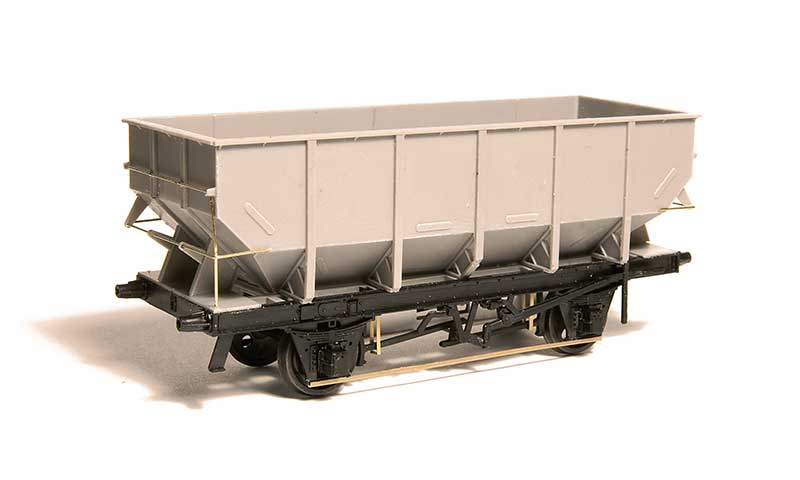
The parkside kit built up. This is the opposite of the Ks kit as while i added some lead overlays to the inside lower hopper its a tad light at only 38g.
Moving away from hoppers I’ve also finished of the construction phase of this…
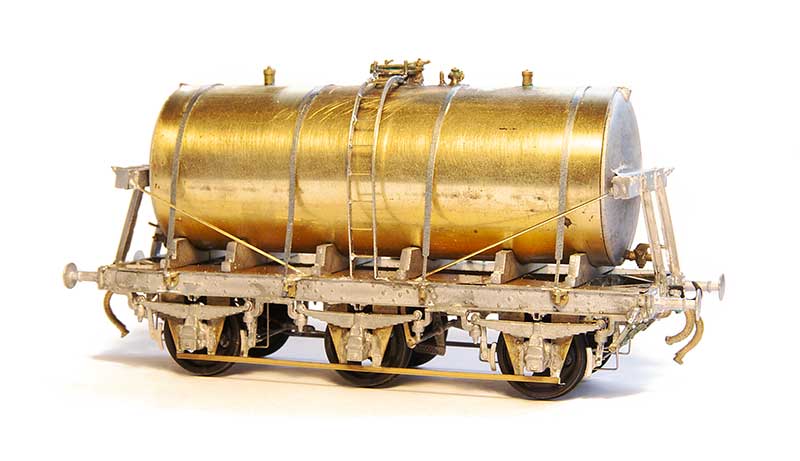
A David Geen milk tank which I was told by the man himself when I brought it was the last one! This uses a Rumney models chassis and has, to be honest, been a bit of slow burner. Its one of those kits that I just seemed to struggle to get any enthusiasm for but I’m pleased with it now it’s done. I thought the hopper was heavy but this weighs in at 88 grammes!
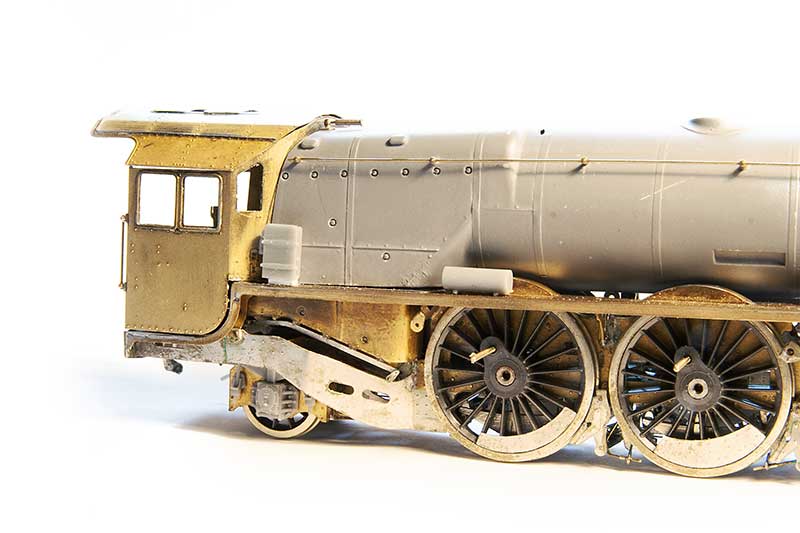
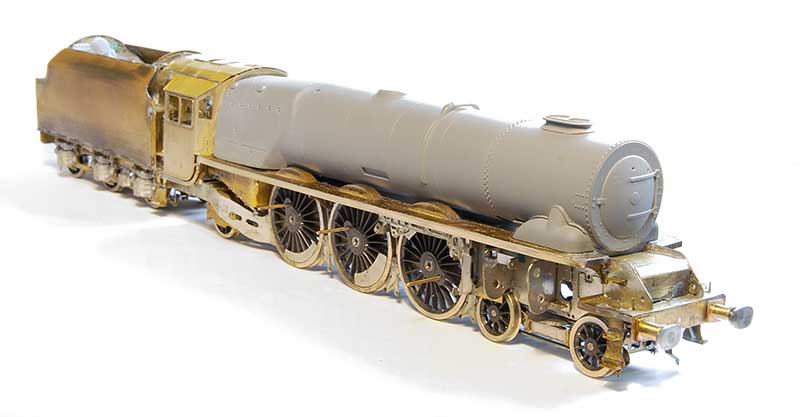
Project Coronation – Body details
 Just a little update this time – Been fitting some of the details to the body. Bogie wheels are temporary as I was doing a little testing (read that as shuffling it around on Brettell Road). I never realised how big these actually are. Right on the limit of the loading gauge!
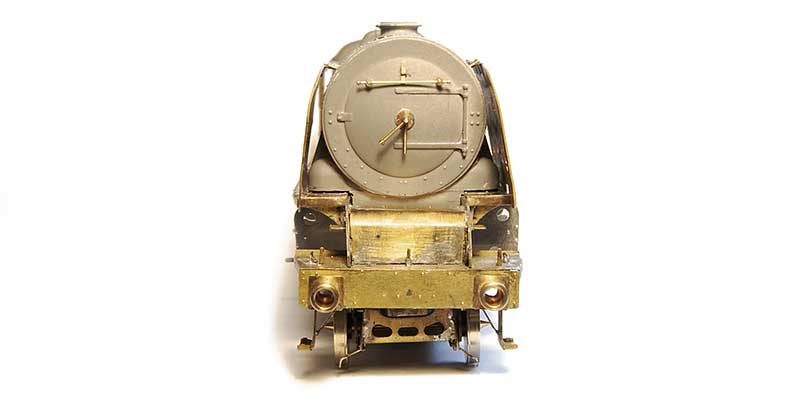
Head on view

Left hand side. – In addition to the body details Ive also added the sandpipes and springs. The latter in both senses as I’ve fitted the main functional springs to the model as well as the cosmetic ones behind the wheels
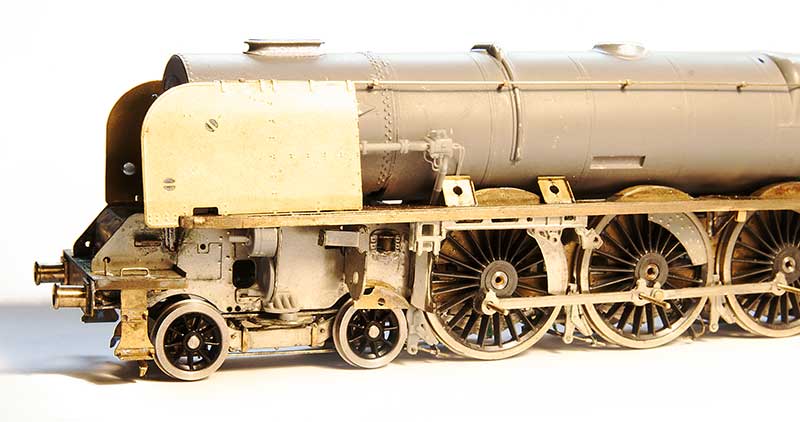
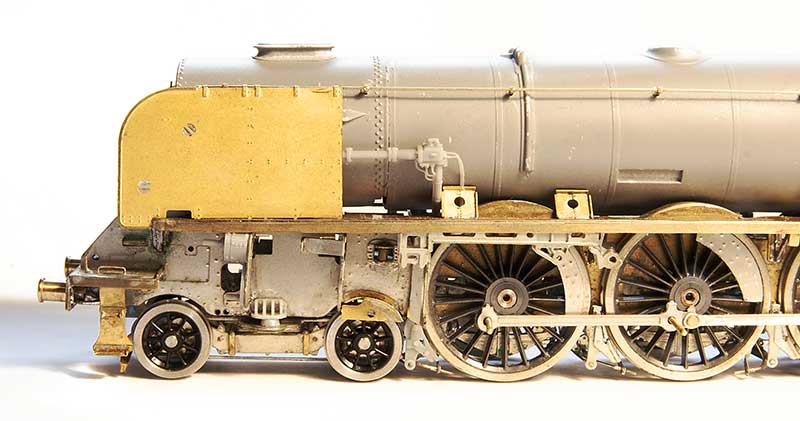
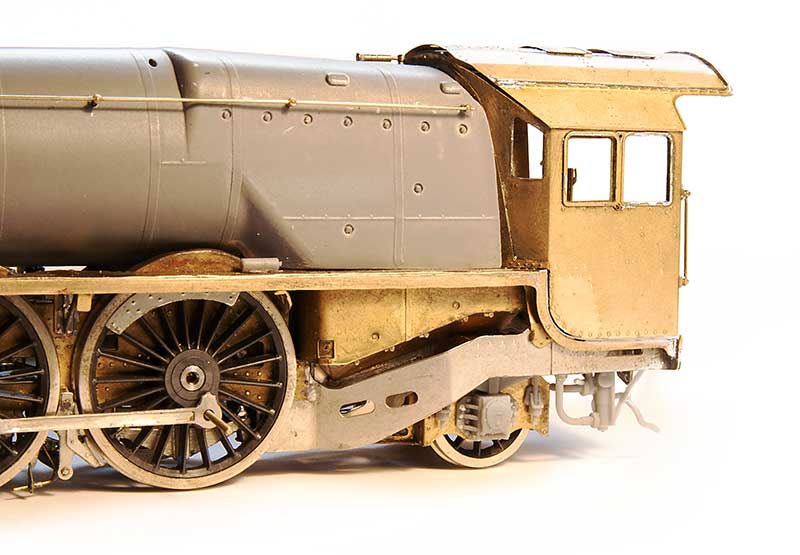
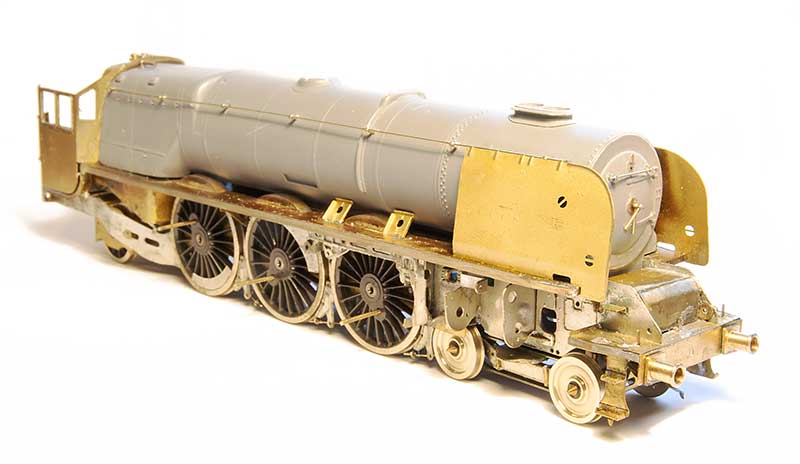
Duchess update – Starting to look like a loco now.
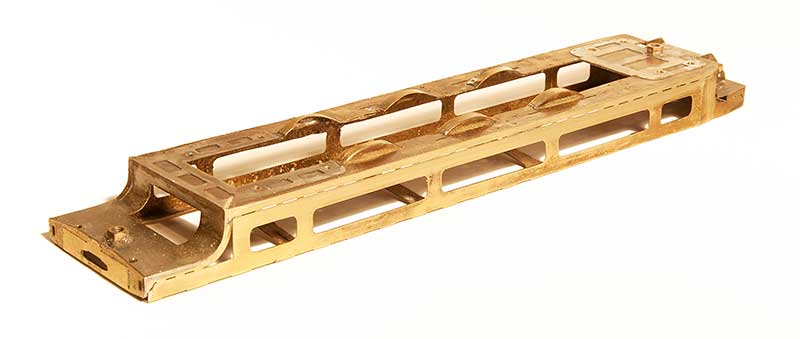
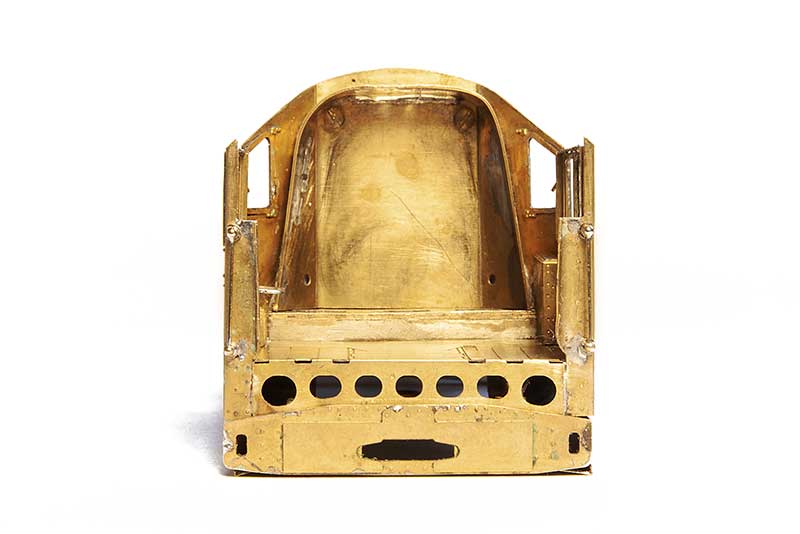
Footplate with mounting bolts and Splashers in place and tided up ready for separating from the jig.
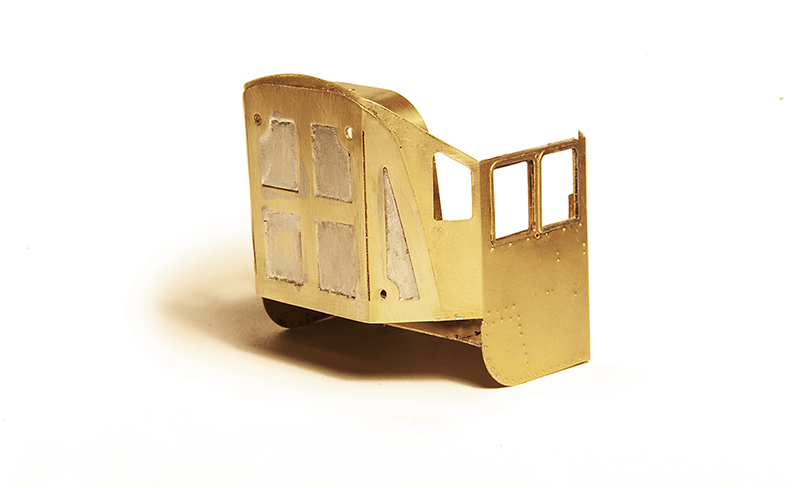 But before I can do that need to fit the cab, firebox, boiler and smoke box so that theres something to give it a degree of rigidity. This is the basic cab assembly.
 And inside mounted to the footplate. The seats are posable!
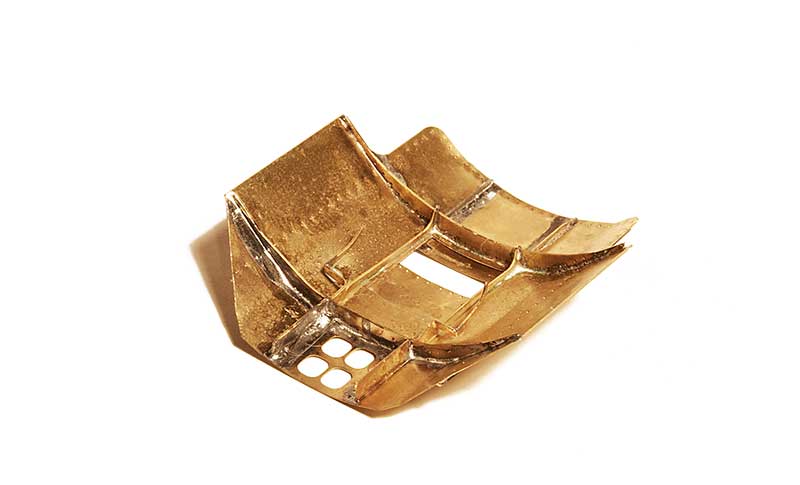
The cab roof. This builds up on its own mini jig too.
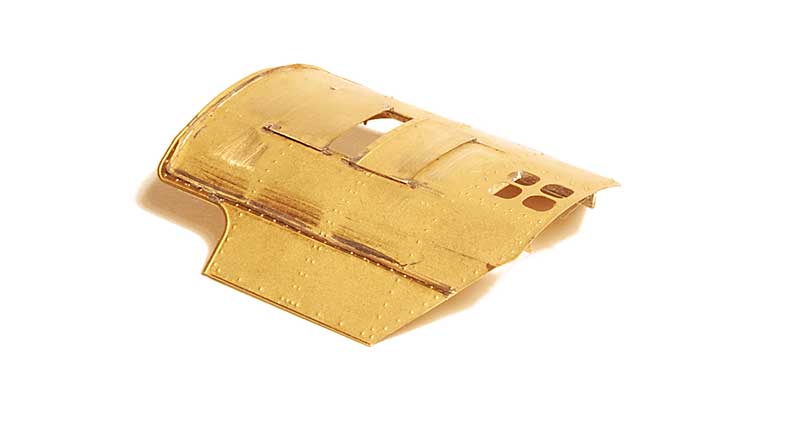
Underside from the front end.
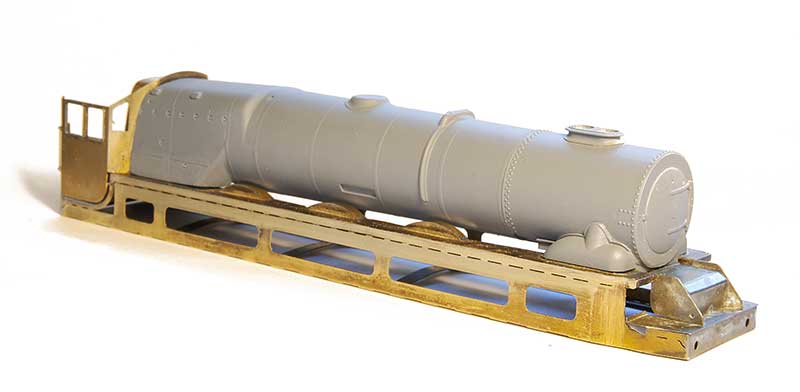
The main super structure comes in 3 parts cast in resin. The firebox and boiler. The smokebox saddle and the smoke box. There are 3 types. A round single chimney. The flattened top double chimney from the ex streamlined locos and a round double chimney as seen here.
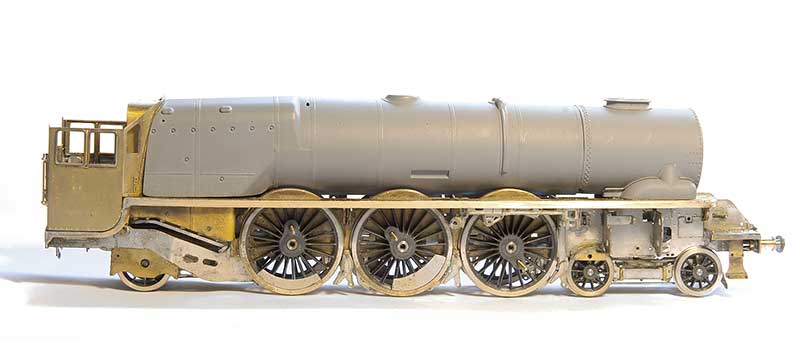
The body removed from the jig, tidied up and fitted to the chassis.
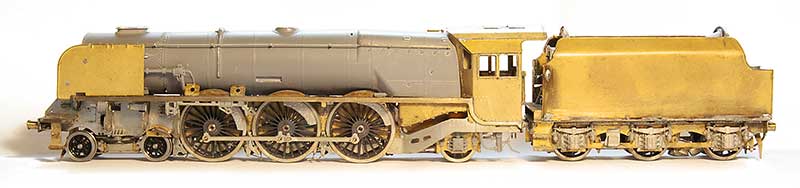
 Finally – I couldn’t resist!