Some lorries for a trio of layouts.
A small selection of Lorries have recently been completed. Starting with…
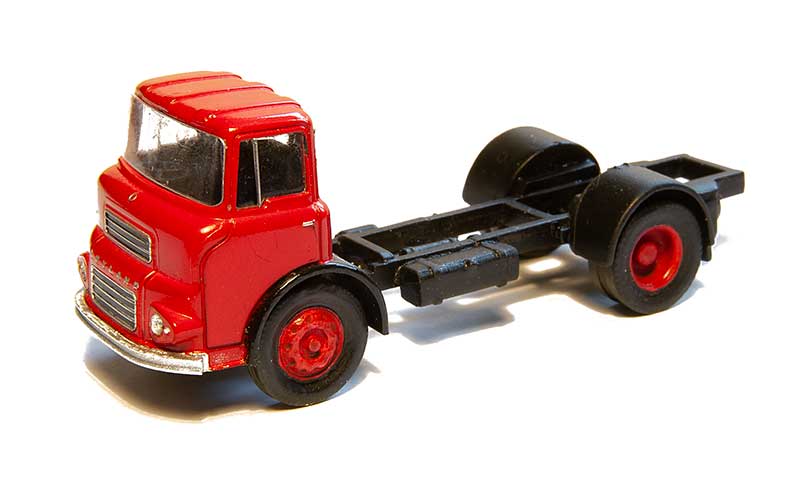 A leyland LAD cab and chassis, destined for a wagon load on Brettel Road. The cab is Base toys with some minor tweaks and windows added to the rear. I was aiming for a new vehicle being delivered and wanted an open chassis. The source for this was a cheap Langley Models kit for a Guy Otter/ The chassis was shortened and wheels are from RTI.
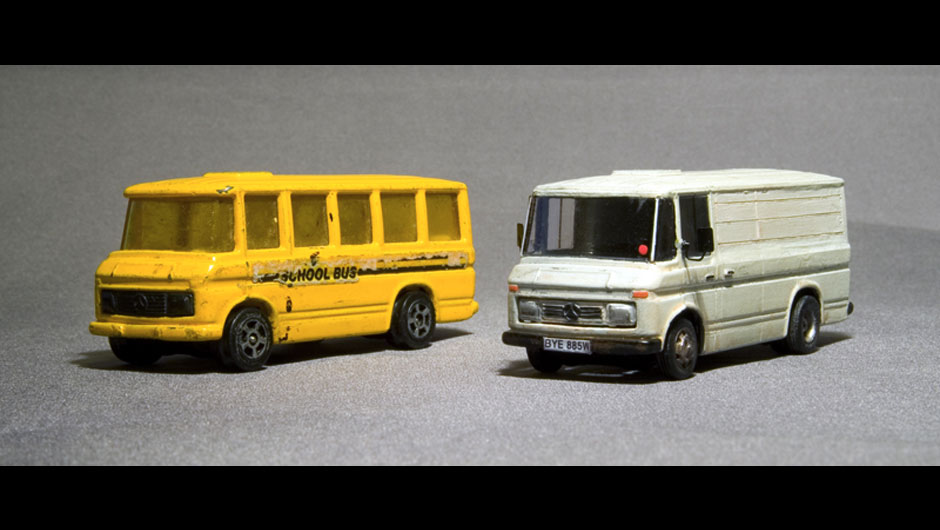
Some of you may remember this. A Mercedes 407 van from the Corgi School bus. Ive carried the unmolested one around for a while now from when I did a short stint on demos on modelling road vehicles. A picture of one of these in the form of a low sided light lorry appeared on Western Thunder so I decided to do something with it
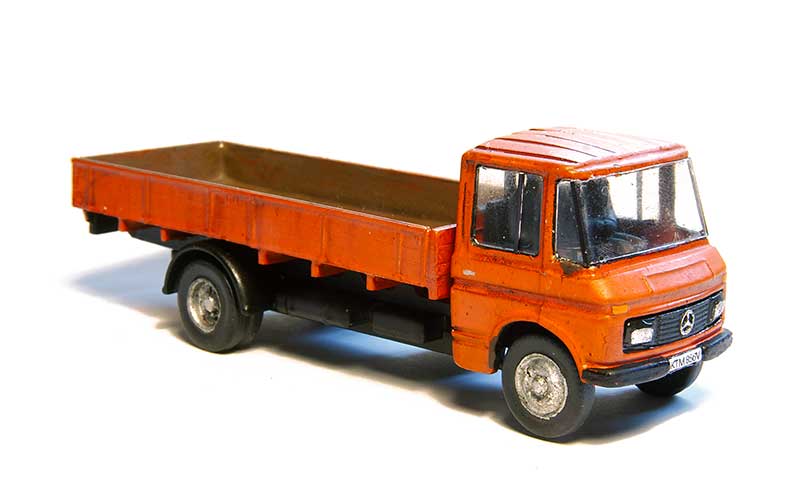 The Body is from the previously mentioned Langley kit mated to a Base Toys chassis and more RTI wheels. I need a spot of work with a sheet of sandpaper on a flat surface to get it to sit properly. This will be a reasonably old vehicle on New Street.
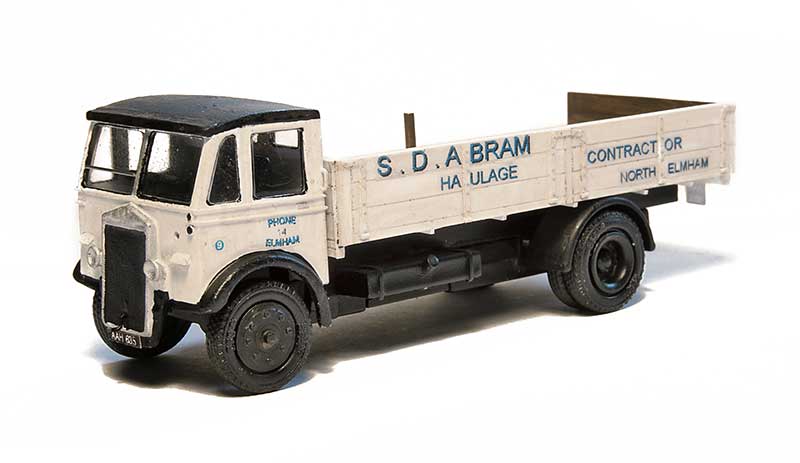
Next up over to Norfolk and a couple of Lorries for North Elmham. Tim provided a few images of vehicles that could be found lurking around the dairy so I set to work. The first is an Albion something or other (I don’t know – I just copied what I saw) using a modified Base Toys cab with a scratchbuilt dropside body. The transfers are home brewed on decal paper.
A Bedford S type from an RTI cab and wheels again with a scratchbuild body. I’ll leave the many milk churns these 2 will need up to Tim and John.
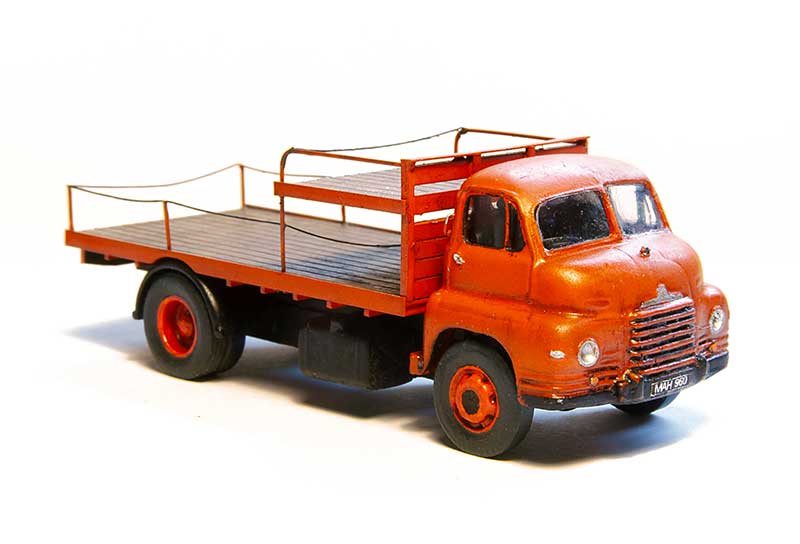
Another wagon diverson
Breaking away from the current building works for a moment a little wagon based diversion. As per normal mundane stuff with a few little bits of tweaking that most people will likely never notice.
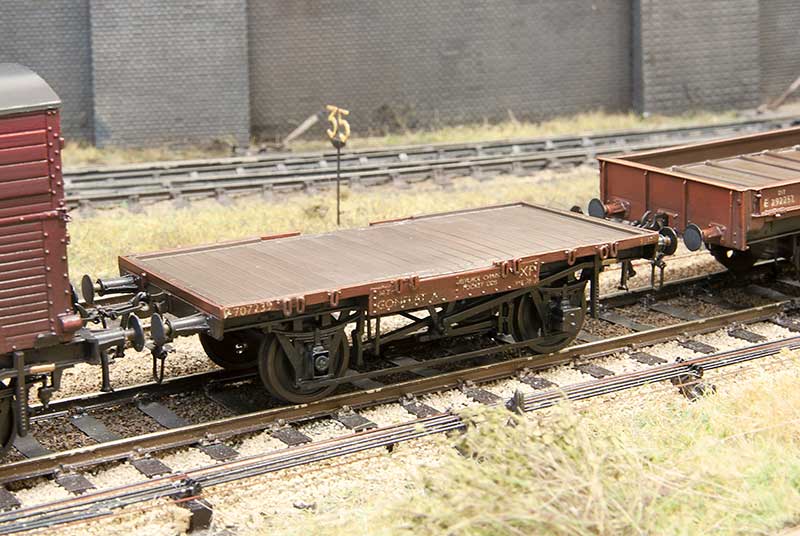 Conflat A from the Parkside kit. As per the last time I built some of these I beefed up the links a bit as I thought they were far too subtle. I fancied an empty one for a change and also added a missing (yeah sounds a bit weird that doesn’t it?) axlebox cover.
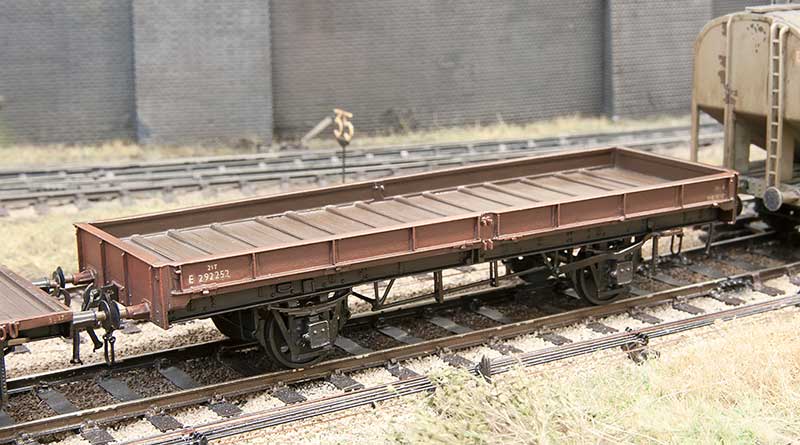
 Next up an LMS diagram 1838 container flat. Built from the parkside fitted LMS chassis kit with extra bits and bobs.
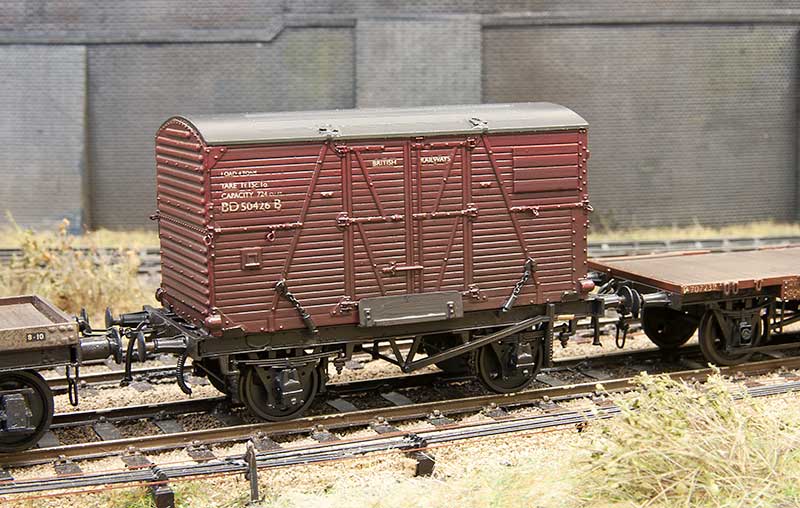
Finally an eastern region plate. When i did my fish van a few posts ago someone on the clearing house facebook group (highly recommended if you are on facebook and like wagon building) pondered if the chassis could be used to do an eastern region plate. Personally i thought it easier to go with the supplied chassis and replace the brake gear. Another Parkside kit.
The Bachmann Compound – part 1
I found a relatively cheap Bachmann Compound recently and thoughts have turned to what to do with it.
Lets start with a little disclaimer. Alan Gibson supplies a set of wheels to convert this loco to P4 and I would have every confidence that just swapping the wheels would get a p4 steam loco up and running pretty quickly. After all a 4-4-0 has got to be about the best case scenario you could really ask for. I didn’t try it myself but we’ve had a wheel swapped GWR Grange (I think) running on Moor Street for years now.
Being relative new to RTR steam locos, this is actually my first RTR tender loco I’ve had since i was a kid, there’s always 2 areas that stand out to me as looking a little weak on pretty much all RTR steam locos. No, not the wheels although big, in your face, wheels do perhaps yield the greatest benefit of swapping to p4 visually. The areas I am talking about are bogies and tenders. More specifically in the case of the latter, tender underframes. They just always seem so, for want of a better description, flat!
The bogie

So to the bogie. There was nothing about the supplied RTR one that i wanted to keep so its a straight swap with a Comet example. As supplied they can be built with central springing for side control but no springing on the axles. Setting some simple springs up however couldn’t be easier.
The loco chassis

To the loco. I decided I wanted to use some of the Comet chassis bits but not exactly as intended. So the first process was deciding what of the RTR offering I wanted to keep and what I wanted to replace.
I wanted to use the sideframes in a sort of Brassmasters easychas inspired way and keep the original Bachmann drive. Initially I thought the crosshead was just an RTR bodge but they do actually look like that. So that and the cylinders were keepers. I also liked the brake gear so that stayed.
The Comet chassis is not designed for this model and is too long. The wheelbase between the driving wheels and hence the coupling rods are also too long. Comet do specify this is the case on their website. The Bachmann frames are actually the right width at the front of the loco but narrow from the cylinders back to accommodate the 00 wheels. The cylinders look, from underneath that they might fit on little pegs coming down from the footplate. They don’t, they slot sideways into the chassis. Its best to pop them off and keep them safe.
I decided to split the chassis behind the forward step to loose some of its extra length. The front part being a relatively easy fit. The rear part needed some trial and error to cut away little sections to get it to fit. The Bachmann model is driven on the front driver ( it looks like the chassis was designed for gears but to both axles but it doesn’t have them), so the Comet chassis was carefully titivated so that the rear axles position matched. I wasn’t too worried about the front driver as I has decided to keep it rigid.
By leaving the RTR style bearings off the rear driving axle you get a little room for vertical movement. A Brassmasters sprung bearing was modified with a bit of tube (the Bachmann and hence Alan Gibson axles are an odd size). The frames were glued in place using 60 thou plasticard to space them out to something more prototypical. The springs are part of the RTR keeper plate so they are too to far back but I decided to leave them as is.
The brake gear needs a bit of modification to fit over the new frames and it was here that I hit a little unexpected snag. Bachmann use bigger wheels than scale. I wonder if this is because its a development of the national railway museum model which being an earlier example had bigger wheels? Anyway the effect of this is the brake gear sits too low and would likely hit the rails when crossing pointwork. The solution is to take a mm out of the top of the keeper plate so that everything moves up a little.
Valve gear
Lets be honest RTR valve gear is generally a bit weird. Its often both too big and to thin at the same time. The Bachmann coupling rods are about scale height (ignoring the bosses which are huge!!) but being only 1 piece of metal aren’t thick enough. So these were discarded and the Comet ones used in their place. Suitability shortened by 2mm.
The connecting rods as supplied are quite good though. Much more meaty and they feature the big square bosses that the Comet ones don’t, so hybrid valve gear it is then! The Bachmann crank pins are 2mm wide (really!) so a bit of tube was soldered in to make them fit the Gibson crank pins. While I was at it I made another 2 collars for the trailing driver a the coupling rods on a compound are outside of the connecting rods.
On to the tender
Body great but underframe – ugh!

Luckily Lanarkshire models do a replacement chassis kit for a Fowler tender. This was assembled as per the instructions. For the outer frames I was kindly supplied a spare etch by Brassmasters and mated this with some Comet springs and axleboxes. I decided to keep the Bachmann steps as they are moulded as part of the tender body.

As is often the case with this sort of stuff, the most pleasing view is the one you wont ever see!


My Leyland and post post.
With apologies to those coming here to see trains road vehicles are still drawing my attention. This time let’s start with some Leyland products.

The Leyland roadrunner (1984 version). A combination of cab and wheels from Road transport images, chassis from the Atlas stobart ford cargo and a body from scratch.

Next up a terrier in post office colours. Although a 70s design these seemed to last quite late. Again RTI cab and wheels, base toys this time for the chassis and the body from scratch.

The tail lift is an approximation from a photo I found years ago and kept in my ‘that might be handy one day’ folder.

Sticking with the post office. I did this Roadtrain cab years ago and never got around to the trailer. the source is the Atlas curtain sided one I used last time for my Link51 lorry. This time with the sides replaced and modification to the leading end. It was a faff to cut the old sides away so I would just scratchbuild the box next time…

… which is what i did for this smaller version. Again the tractor unit was finished off years ago although I have recently replaced the wheels with RTI ones.

Overall I have put together quite a fleet of Royal Mail vehicles now.
Next time…

More Atlas Stobart vehicles are lined up for the chop at Jim’s Dodgy Car and lorry dealership. ‘lovely little runners, one careful owner, service history? Yeah I’ll just write one up for you!!’
A couple of AEC products.
A very brief history
AEC (or Associated Equipment Company) was a fairly early producer of vehicles being founded in 1912 and lasting up until 1979. Initially focusing on buses their first prototype commercial vehicle was based on a bus chassis but with the outbreak of the first world war they were ideally placed to produce lorries for the army. After the war lorry production continued right up until the companies last days.
In world war 2 they produced something like 10,000 vehicles for the war effort and readers familiar with Airfix kits have likely come across the Matador model at some point. the company acquired a fair few other companies during its time with Crossley Motors, Park Royal and Thornycroft being just a few of them. They were taken over themselves in 1962 by Leyland Motors.
Leyland fitted their own ‘Ergomatic’ cabs to the AEC line of lorries but they retained the AEC branding. So Ercomatic is a type rather than a model covering Madator, Matador, Mercury etc (the lorry models always began with the letter M).
The Models

So the victims both picked up cheaply from ebay. On the left Atlas editions and on the right from EFE. Both are similar in a way. Both have nicely done cabs with rather rudimentary bodies and slightly odd looking wheels. The proportions of the Stobart example look a little odd as well.

Having looked at pictures of the real things I decided to shorten the chassis and tipper body. The ribs were beefed up a little and a new hood fabricated from plasticard. The hydraulic ram came from my spares box.

The livery was stripped form the cab (as its all metal nail varnish remover is ideal for this and the wheels replaced with some from RTI. Below shows the model after painting and weathering.


The body on the Mammoth was metal and to be honest im not sure what its supposed to represent. I think its some sort of pressed steel effort but I binned it and made up a new body to represent a planked body instead. The strapping is from the mainly trains etch.

I decided to keep the livery on the cab this time and just gently sanded the sign writing off. Wheels again are from RTI. The usual matt varnish and light weathering finish it off.

Local Flavour
This post can best be described as a taste of local flavour if not the full meal itself.

Anyone familiar with railways in the Stourbridge area will be aware of the Parry People Movers that operate between Stourbridge Junction and Stourbridge Town. Little 4 wheeled railbuses that spend their days shuffling along the UK’s shortest passenger branch line. The line itself is still jointed track meaning the ride is somewhat best described as lively! While famous now for these little vehicles Stourbridge didn’t really embrace the railbus idea the first time around, The line begin operated by autotrains and GWR design railcars at the time railbuses were being tried elsewhere.

However as Brettell Road is a loose interpretation I have gotten hold of a Heljan one as a nod to the little people movers. This was always going to be a nice to have rather than a need so having kept my eye on eBay for a cheap one, just on the off chance, this AC version popped up as a non runner with a dodgy motor for less than half the price the runners were going for.

The motor was replaced with a small Mashima I already had. One of the drive shafts was bent out of shape too but as these little models are very heavy for their size I binned that and now its just powered on one axle. For what it needs to do that seems absolutely fine.

I’ve fitted a Zimo MX634D decoder in the space in the roof linked to a TCS KA2 stay alive hidden behind the door and weathered it, The wheels are Branchlines 3ft using the original gears and bushes. You do need to grind a little bit of the chassis away to get them to fit. A couple of passengers and its good to go.


Same idea – different generations!

Another bit of local flavour. The yard crane at the real Brettell Lane was a bit of a chunky affair. In line with my upcoming demo at Scaleforum on making the most out of older models, I’ve come up with this representation using the Airfix dockside crane as a start point. The jib is scratchbuilt from plasticard. I’ve only seen a few distant pictures of the real thing so this is very much a loose interpretation.
Hornby Hacks 2 – The NBL class 21, part 2

My class 21 project is now finished. Above is a before and after comparison. Not a lot more to add really so here are a selection of images.


A hopper hat-trick.
 3 hoppers via 3 different routes. On the left a coke hopper from the old Three Aitch kit. I’ve already done one of these and this follows the same pattern of using Bill Bedford W irons.
In the center also a kit but a brass one from Dave Bradwell for the BR 13 ton hopper. A fun if not sometimes tricky kit to build. Dave Bradwell kits
On the right a mackerel ballast hopper converted from a Hornby trout, again with Bill Bedford w irons. I make no claims for the idea behind this as I first saw it on Kier Hardy’s EM 70s website. Click here
Hornby hacks 1 part 2 (and a few wagons)
My class 25/0 is now done. Here are some pictures. 

 I don’t normally like a pre-weathering shot as its not finished yet. But some people do. Below some now customary moody shots.

 (well you kind of expected the last one didn’t you?)
Wagon News
As I mentioned in one of the post scaleforum posts I found i had more wagons than really necessary. So im planing to just finish off those in the to do pile and try to resist adding any more.  Nearest is a diagram 2049 wooden ended open with steel reinforcement. this uses the Parkside sides and underframe with a Rumney Models kit for the ends. Behind is another standard 20 ton brakevan, this time from Bachmann.
Hornby hacks 1 part 1
I currently have 3 projects lined up that involve taking a razor saw to old Hornby models. This is the first one and to be fair there’s a lot more Bachmann in it than Hornby (but that wouldnt fit the title as well!).
Class 25/0
This has been on my to do list for years. When we used to help my friend David exhibit Amlwch we had all of the main variations of class 24 and 25 except for the 25/0. But then David sold the layout and it just went in to the abandoned project pile. With class 25’s being one of my favourite classes it made sense to resurrect the project for Brettell road so… …following the same pattern as my late body style class 25s this is a hybrid of Hornby cabs on a Bachmann body. The Bachmann model having the correct raised bodyside grills for a 25/0 but the wrong cab roof shape while the Hornby cabs having the right shaped windows (more of that in a moment) and the headcode boxes. As I am doing an original condition loco with valances the effect of chopping up the underframe as I did on my other 25s isn’t so much of a win but I did rearrange the bits of underframe you could see to better match my prototype. The original 25/0’s had no steam heating so there is no water tank.
The beading on the roof was redone in the correct place and the panel Bachmann missed off was added. These panels seemed to vary a lot. The grill is from Shawplan. Moving on to the cabs the comment of the windows being correct isn’t strictly accurate. The important thing is that the top of them is right but the center window is too small and the main windows, although right for a later 25 are too big for a 25/0. The side window is also a bit high and a bit too far forward. Filing and microstrip sorted them out. I re-used the bottom section of the Bachmann cab and cut the buffer beams off and mounted them to the body.  After a blast of primer to check that the joins were good I set to work adding in panel lines, the tail lights, cab front handrails and the row of rivets around the base of the base of the cab (archers transfers). The cab vents and exhaust are from the Brassmasters etch. Next stage will be paint.
Haven’t had a loads of finished things post for a while.
So lets start with a buildings and a request, When I posted the image of the pub at night I was asked for a picture of the area in the light so here it is This also shows the water tower I was working on too, speaking of which…
 Remember the lower part of the Hornby water tower I was fiddling with and how I didn’t worry too much about details? This is the reason why – you can just about see it, if you know where to look!
  Moving on to some wagons. This is the Chivers kit for a Dia1674 LMS Bolster wagon. A nice simple kit to build although given the long wheelbase I did opt for Bill Bedford springing.
 This was supposed to be a quick win. I liked the local livery and thought that it would break up the sea of grey and bauxite wagons. Its a Bachmann product but an older one that was stretched to fit their 10ft wheelbase steel chassis. Some careful cutting in 4 places lost some of the extra length and while it is still too long it does now fit the longer Cambrian wooden chassis.
  I’ve finished off the vans I was working on too. Not a lot more to add about them really but here’s the pictures. LMS 6 wheel fish van – Chivers Kit.
 LMS GUV
  Palethorpes 6 wheel van
 And the larger bogie version – Transfers are from Cambridge custom transfers. Sheet BL153 covers the 6 wheel vans while sheet BL154 covers the bogie vans.
Finally aside from the crew and some coal (plus a slight warping of the footplate) the 94xx tank is done too. Here’s a few images.


