Looking East
Ive seen this picture pop up a couple of times on facebook groups, which depicts the daily Wolverhampton to Great Malvern pigeon train at Brierley Hill. Theres a couple of things I like, the Eastern Region BG and the big loco on a single van. Given that Brettell Road is set in the late 50s I am aware that I don’t have any BR steam locos, more on this aspect in a future post.
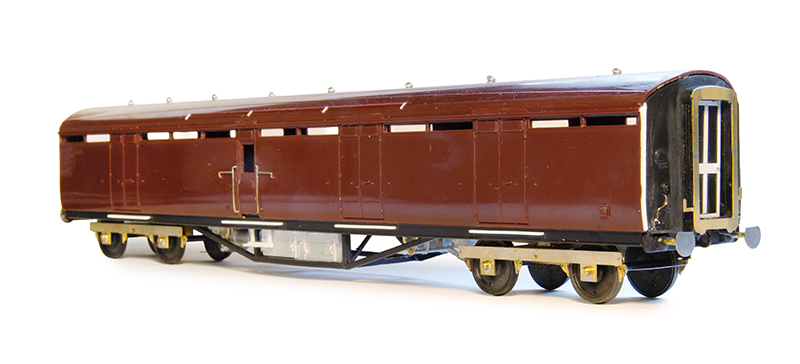
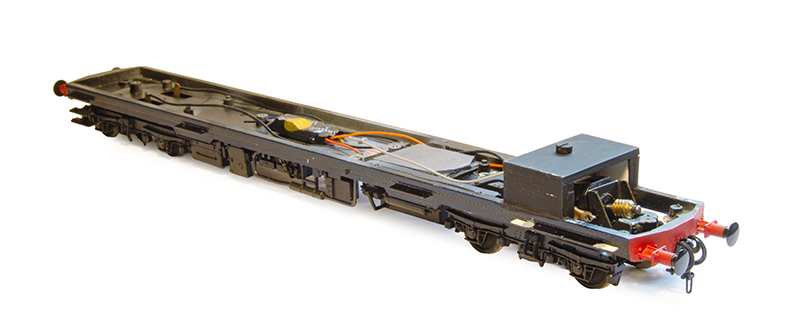
The picture features a Gresley BG but having done a little research it appears that the Hornby one, although nice on first inspection has some issues with the shape. So I went with an old Bachmann Thompson version instead. These also have issues with the shape as the roof had a bit of harsh angle on the sides but thats a relatively easy fix with a file. Underframe details are from MJT, bogies Brassmasters 8ft versions and the gangways are from Wizard models. The buffers are MJT as well being cut down 18 inch heads mounted on bit of tube to thicken up and lengthen the shanks. The cosmetic bogie sides (which I was waiting on when I took this image are again from MJT. The Bachmann ones seem a bit of a weird wheelbase for some reason.
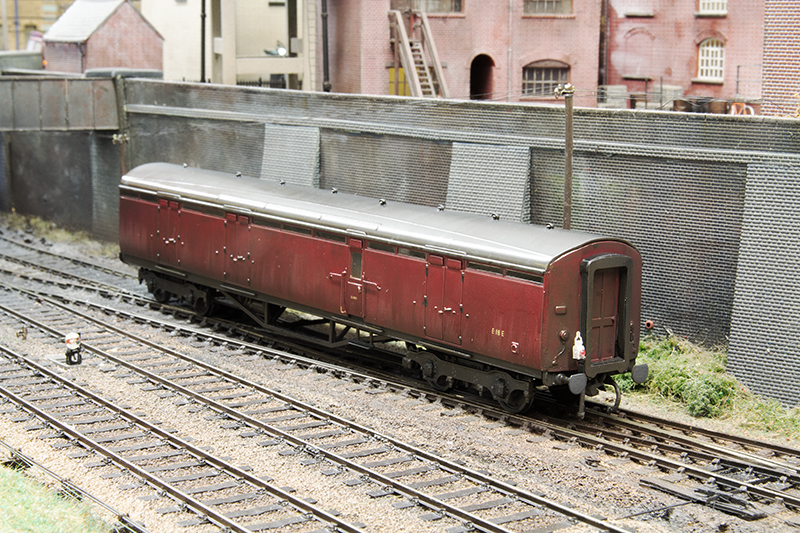 Another slight advantage of doing this coach is I can substitute it for a Midland BG on my milk train and make it a little more eastern region for when I get to play with North Elmham.
 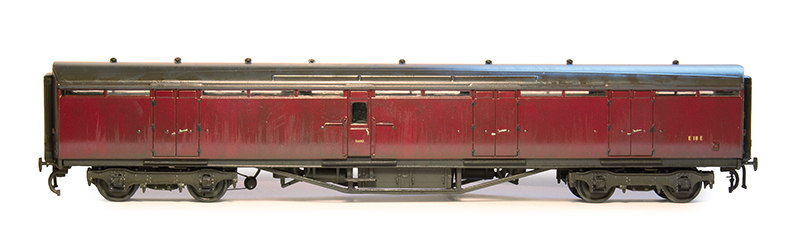 Eagle eyed readers might spot the screw coupling on the one end. These coaches didn’t have them but anyone who has tried to couple a loco coupling to a coach with gangways at an exhibition will tell you that it’s nigh on impossible so in this case it’s a necessary compromise.
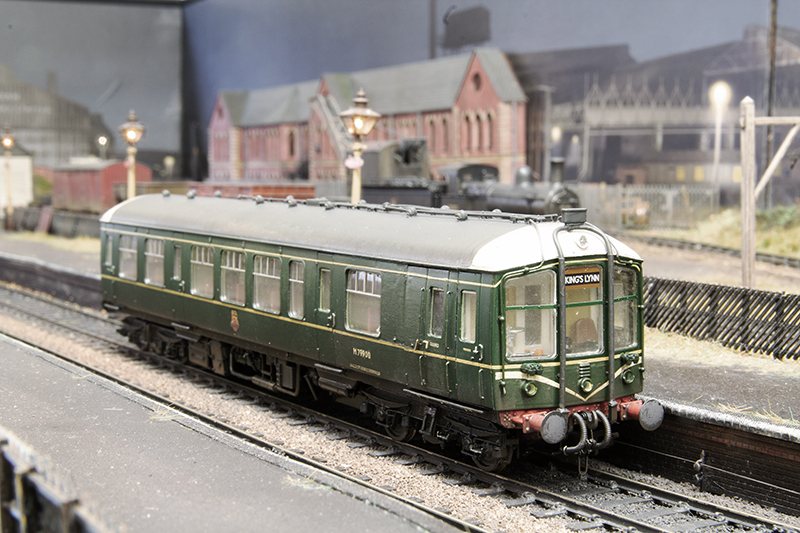
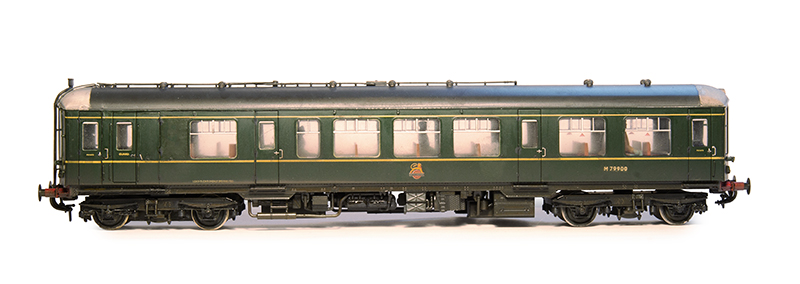
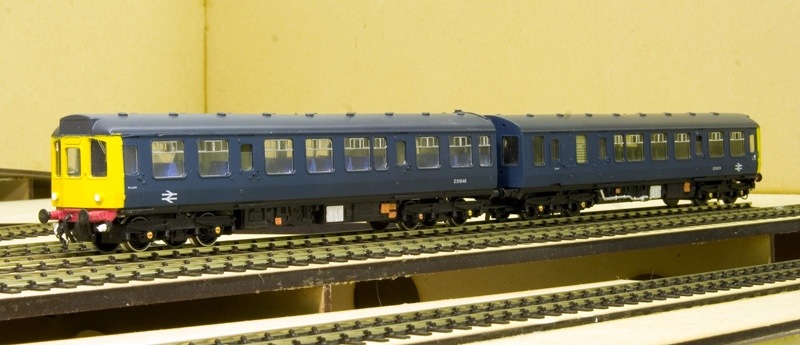
 Speaking of North Elmham Tim mentioned that he liked the idea of a single car Derby lightweight. So given he knows I quite enjoy chopping DMUS about and having been suppled with a Bachmann 2 car set Ive come up with this. I wanted to avoid repainting it and found where i did need to revisit the green, Pheonix Precision BR logo green (post 1954) is an exact match.
 The Bachmann drive arrangement is pretty big and chunky on these. In a regular Derby lightweight you can sort of get away with it as it only really protruded as far as the last passenger door. On the single car with its extra window it would be way to obvious so a Hight Level Kits Lo-rider power bogie has been used instead. As North Elmham is set in the daytime Tim didn’t need the lighting so that was all removed.
 You can see from tis image why the original drive arrangement had to go. I used a slightly lighter underframe colour that usual as North Elmham isn’t set in the rain.
Finishing touches
With a little over a month to go before Brettell Road is back on the road*, I’ve been finishing a few things off.
 The last backscene is now in place so the road in the middle of the layout now gives the impression it goes somewhere. The Leyland Steer seems to have lost its licence plate somewhere.
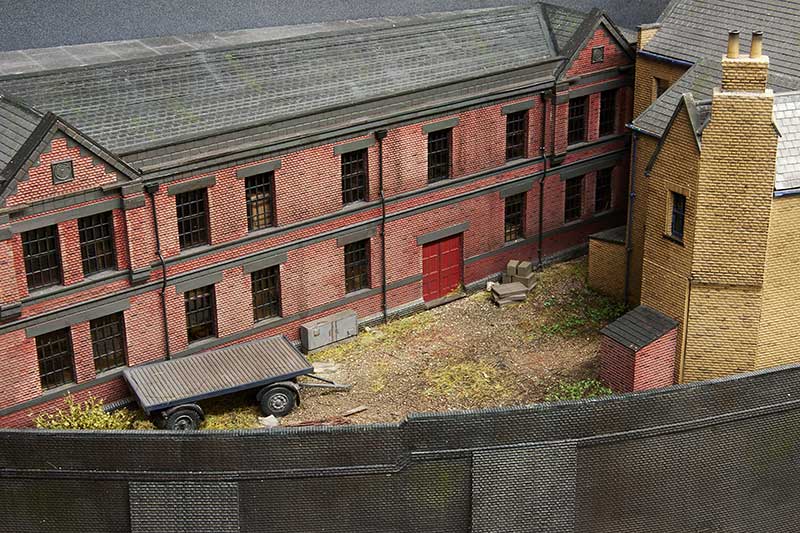 The little back yard on board 2 is done – I wanted a used but not particularly looked after feel.
 I realised I’ve not actually taken any images of this building in its finished state before now.
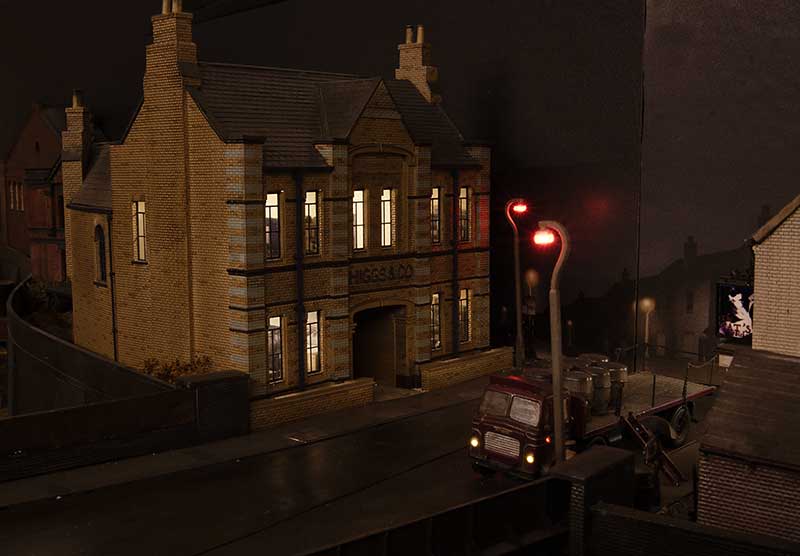
 Princess Margaret heads back to the Wallows for the evening.
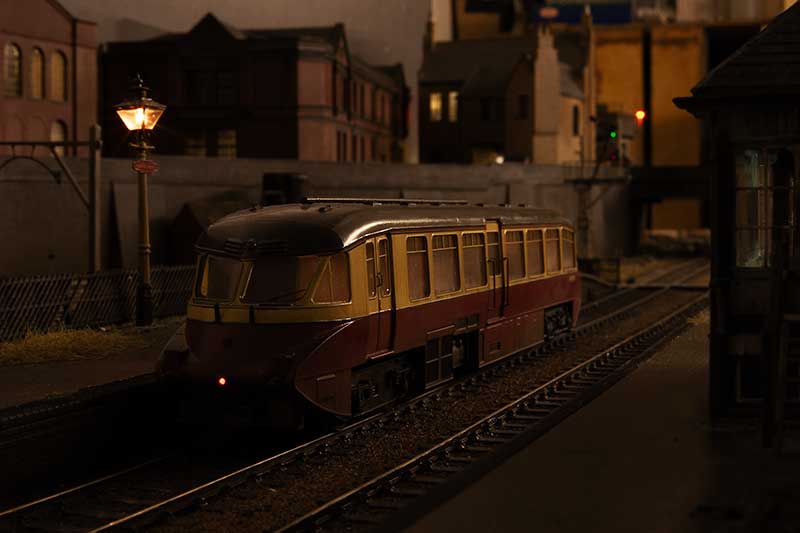 GWR railcar catches the last of the sun as it heads off to Dudley.
* The show is a local one on the 7th October. Click here for more info.
Tired of tiles!
After working my way through a lot of laser cut strips of tiles I can call my building(s) project effectively done. 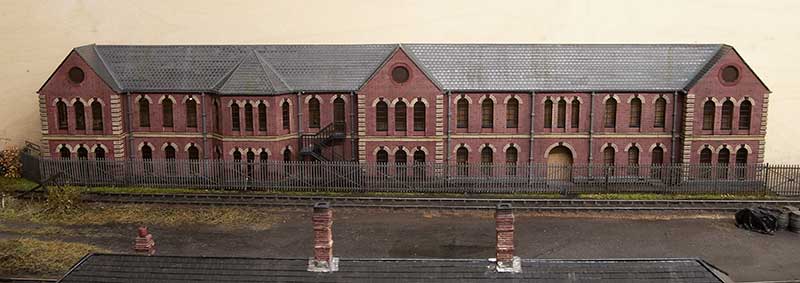 There are several schools of thought when it comes to what to do with low relief buildings. The easiest is to keep them parallel to the backscene however if you don’t (as I haven’t) then the roof can actually become a little bit of a problem area. Theres 2 main ways to address this, Keep the pitch of the roof the same and cut the top at an angle. Or keep the top parallel to the rest of the building and adjust the pitch. My personal opinion is that the latter is the better option. The pitch on my acorn building is significantly different from the left end to the right end. One advantage of using tile strips over embossed plasticard is you can adjust the rows to compensate for this and hopefully no one will notice what trickery you’ve been up to!
 The same applies to this building although it’s not quite as dramatic.
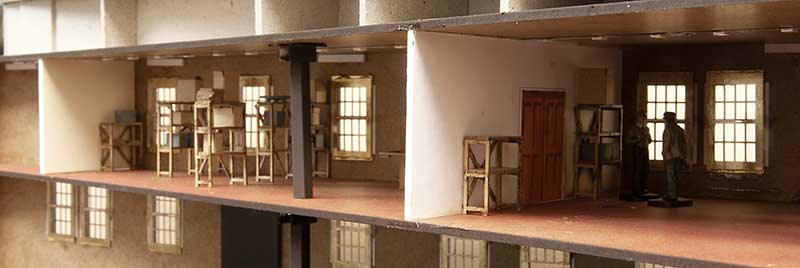 The thing with lighting buildings is they look a bit weird if they are just empty boxes. I don’t feel you need to model everything inside though, just enough clutter to give a hint of something inside. The shelving and cardboard boxes are from scale model scenery. I have found its something people at shows to look for and I think is nice to have some little ‘treasures’ that people can discover for themselves.
  The Higgs and Co. building also has some ‘officey’ clutter. In the late 50s offices seemed to be laid out more like a school classroom than the more ergonomic arrangement we see now.
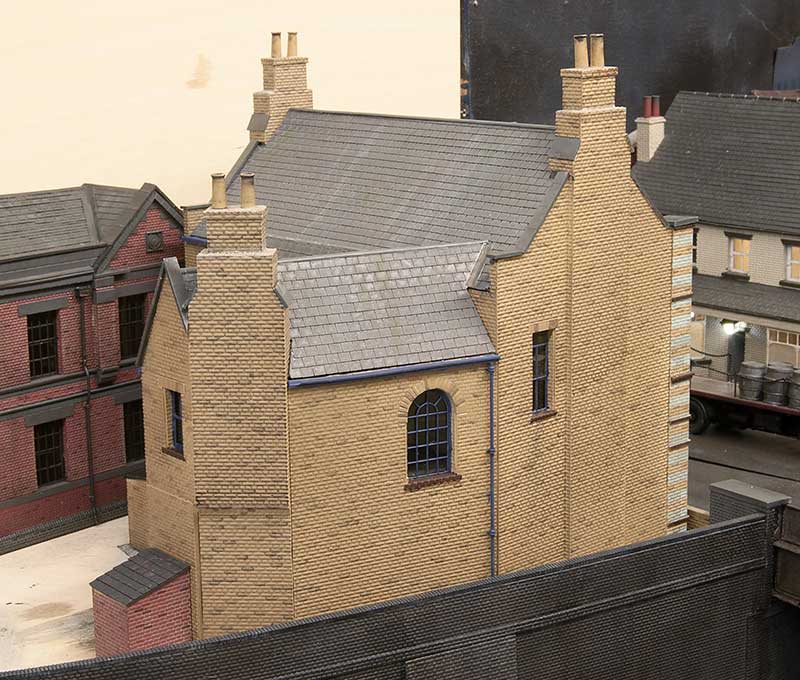 The roof of the rear of the Higgs building has some weird shapes that were a bit of a faff to work out if I’m honest.
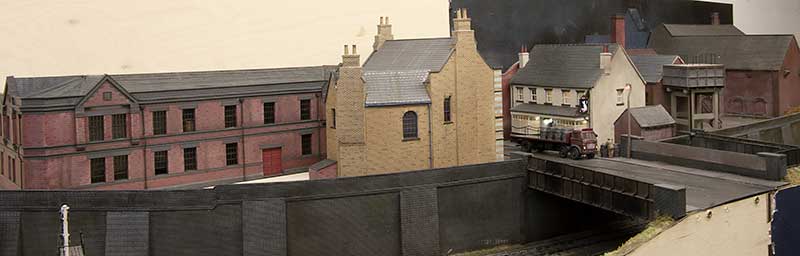 I do feel that the middle of the layout has a suitable black country-ish feel to it now.
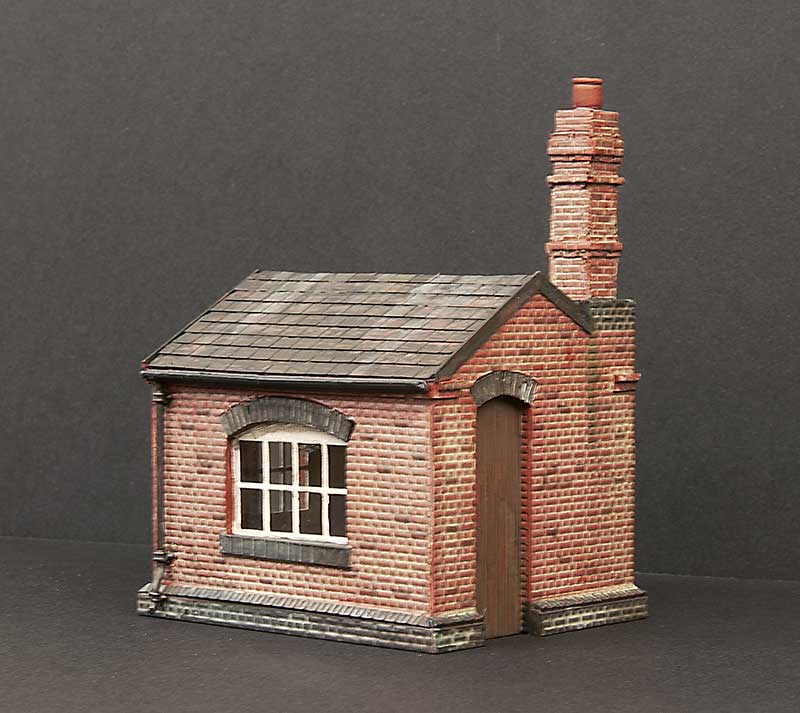 One little building I bunged together is this little weighbridge that will sit behind the main station building. Its based on the one at Wombourne (See here) and I was initially attracted to its over the top chimney and the way its just stuck in a corner. I did have to reel my enthusiasm in a little as the chimney at Wombourne matches the station so to model it exactly as it was when the ones on my station don’t look anything like, would have been a little weird.
Below a few pictures, I feel the last one really captures the feel I want for the layout.
Just the simple things.
Sometimes it pays to drop back a gear and just do a few simple things that are not too taxing. Things like a few simple wagon kits or just some pictures.  And what could be more simple than the good old Airfix mineral wagon kit? This ones been converted to a diagram 102 variant and weathered with gouache and a hint of AK interactive weathering pencils for the rust.
  Next up a mix and match of parkside bits to produce a Hybar. The rail itself is a neat little etched kit from Rumney Models.
Below a few pictures.


DMU project – Done!
One of the things that struck me as a bit weird with the pics of the class 103 underframes I showed last time was that the bogies seemed to be too far inboard from the ends. The class 103 (and class 110 for that matter) have bogies centres of 40 feet but Hornby have them set closer to 38 feet. This is not something I’ve ever seen mentioned before with regards to the Hornby 110. On the trailer and the none powered end of the DMBS, because i had used Brassmasters bogies it was simply a case of moving the bogies out. Originally the mounting plate sat neatly inside the moulding (although raised by some 100thou evergreen strip. Now they sit outside of the moulding by 20thou as can just be seen in the picture. At the powered ens U opened out the floor at the inner end and simply bent the forward clip of the bogie to push everything back (the sideframes aren’t the best fit to the power bogie and were way to stiff before anyway!).
The bogies have been backdated with bits of wire and microstrip.  Happier now. With that, some paint, the seating modified and some LEDs, aside from some windscreen wipers I can call these done.
Class 103
 The roof vents were kindly printed for my by my friend John Chivers and I extend my thanks.


Class 129


And finally both units together. 
The last few DMU’s – Part 2
Attention has moved the the under frames of my DMU project. As I mentioned when building my class 114 the easy option for the 103 would be to stick with the 110 under frames and I would expect most people wouldn’t notice. However as per my 114 project that wont really do.
 The DMBS. Its easier to start with a center car chassis than a power car as when you cut off the Hornby details it gives you a flat floor to work on rather than just a hole. The battery boxes are from Replica and most of the other (black) bits are spares from a Heljan class 128. The white bits are scratchbuilt and the buffers are from Lanarkshire models. The heating ducts on a class 103 are quite distinctive as is the way the exhausts are routed past the inner bogie.
 The DTCL I must add a note of thanks to Eddie Knorn for his assistance in helping me work out were the bits all go.
 For the class 129 the obvious thing to do would be to mount the body on a Bachmann class 105 chassis. However the class 129 chassis is a bit different to a normal cravens unit and shares some parts with a class 108, especially the distinctive battery boxes. So most of these one came from a Bachmann 108 with again some scratchbuilt parts Buffers and their stools again come from Lanarkshire models.
With all these there is still a little more to do before paint, namely bogie steps, air horns and lamp irons.
The last few DMUs
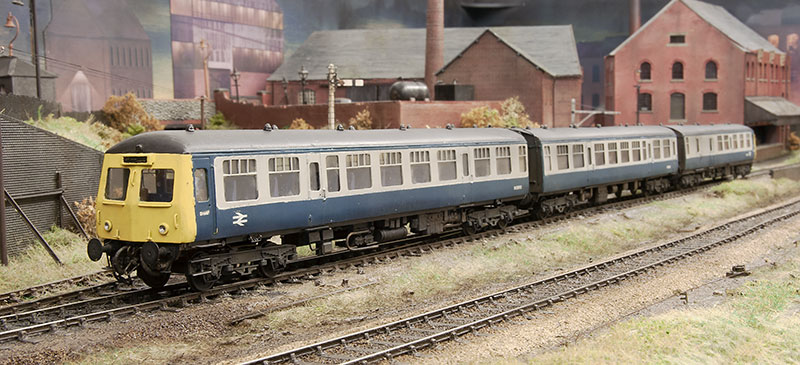
 Long time followers will recall this old picture of a Hornby Class 110 DMU that I intended to chop up into something a little more ‘local’. With the acquisition of a Bachmann Derby lightweight as a gap filler it kind of fell off the radar a little. I did debate doing another class 100 but in the end I have decided that a Park Royal class 103 would be the target of my attentions.
A little about the prototypes
These units were introduced in 1957 to the Birmingham LMR region. 20 sets were produced and the last vehicle in passenger use lasted until 1983. A few vehicles survived a little longer in departmental use (Derby RTC Lab5 lasting until 1991) or as a Sandite unit (1985). There was another oddity in that one set was converted to a Viaduct Inspection Saloon. This was withdrawn in 1978 but was saved for preservation.
The 20 sets were all allocated to the Birmingham area for their first decade operating mainly Walsall services before moving on initially to Chester then spreading further afield. Although none standard they did use the blue square coupling code so could work with the majority of other DMU types. Pretty early on they started to suffer from cracking in the bogie frames and their poor reliability saw steam hauled services return to many of their diagrams while the problems were sorted out. Aside from the oddballs mentioned earlier they only carried 2 liveries. Green (with or without whiskers and later with a small yellow warning panel) or BR Blue (small panel or full yellow end). None received blue and grey livery.
The Model
The similarity between a class 103 and the class 110 is reasonably obvious and (as with my class 100 and 114 conversions) the desired result can be achieved buy cutting parts out and shuffling them around, Plus a few spare panels from previous projects.
 The above diagram may be of assistance. The red lines are cuts or areas than need to be removed. The orange areas are surplus and the blue areas need filling in. On the driving trailer everything aft of the last door stays the same as the class 110. I didn’t cut into the roof.
 Initial stages of assembly. You can see the additional panel from another body shell in white.
 Face on you can see where the windows are opened up to match the class 103. The new frames are 10 x 30 thou microstrip secured to the inner edges. Incidentally in working on this conversion I have come to the conclusion that the class 110 windows aren’t right as supplied. They need to be wider and the angles tops need a slight curve.
 The 2 body shells after a coat of primer and more work with filler. The angled tumblehome Hornby used has been rounded off and any missing hinges replaces with etched ones from Southern Pride. I need to add another cental filler to the DMBS yet.
Why do one when you can do 2?
 While in a DMU kinda mood I have started work on a class 129 DPU using a DC kits body kit.
A bit on this prototype as well
3 of these single car units were ordered from Cravens by the LMR. These had a none standard coupling code (yellow diamond) meaning that the could work with the original Derby Lightweights. Introduced in 1958 they lased until 1973 with one going to the RTC initially for brake testing but later for hydraulic transmission tests and gaining the name ‘Hydra’. None of the 3 survived into preservation. Although 55997 was initially allocated to Walsall it was 55998 that was most often to be found working int he Birmingham area during the late 1950s mainly on New Street to Walsall, Wolverhampton or Coventry services. Later it would regularity continue on to Rugby and one slightly unusual service was Alrewas to New Street with produce from market gardens. As with the other DPU class, class 128 they would regularly pull a tail load.
The Model
Charlie supplied his class 129 kit with a standard class 105 cravens DMU cab moulding (no doubt tooling up another cab just for this class of 3 units wouldn’t make a huge amount on commercial sense). So there is a little work to do to make it closer to the prototype, mainly removing the destination box and moving the marker lights down. I elected not to use the supplied flat bass etch for the route indicator box and made my own from microstrip.
 The main bodyshell assembled with extra little details. On something so plain sided it pays to add these little things to break up the sea of grey plastic
Class 120 revisited.
One of my earlier DMU conversions was a class 120. Built from Craftsman overlays on a Lima 117 it’s done many shows on Moor Street and was probably due a bit of an overhaul.
I had already rebuilt the underframe to better match the prototype and a few years ago I swapped the bogie side frames for Dapol ones* as they better matched the Swindon design the class ran on.
*the older ones from their trans pennine mode not the newer ones from their bubblecars

The big thing I wanted to address was the inner ends. When I built the model the inner ends were void of detail and the instructions just said to stick the Lima gangways and exhausts back on. However the class 120 exhausts are somewhat distinctive and look nothing like what Lima supplied. So the ends have been detailed up to better match the real thing.

As mentioned before I am a fan of the Masokits gangways for DMU’s however I don’t see a lot of point using them if they are hidden behind the exhausts. So for this model i have use paper bellows and moulded gangways I had in my spares box.


Another ‘tweaks’ post
Bit of a random post this time but I have been revisiting a few things. Be warned though these are all really subtle and if I didn’t point them out I suspect no one would ever know.

Starting with the safety valves on my prairie. As supplied it was a pretty flat dish with 4 blobs to represent the valves. A bit of drilling and some wire gives something a little better.

I’ve also gone back (again) to my Dapol railcar for another little tweak.

As its not all that obvious I have fiddled with the bogies a little. Some 3x4mm triangles and some microstrip was used to change the sideframe shape to something more accurate. I also got a spare set of sideframes and cutting the springs and axle boxes of the new ones, filing down the old ones and sticking them over the top had given me more relief.
Sometimes its nice to look back at where we started to see how far we have come.


While i was in a railcar kinda mood this is my detailed Lima one. I haven’t done anything to it, it just tends to avoid the camera for some reason.

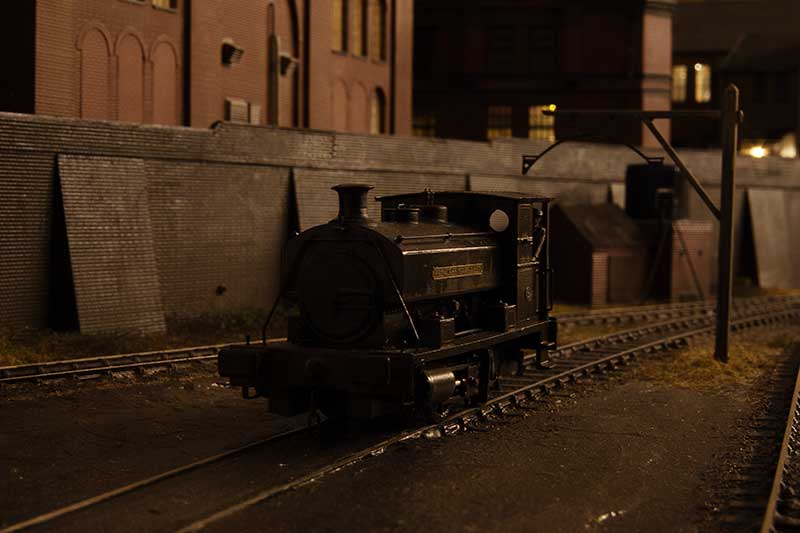
Austerity hides at the headshunt. Again no tweaks just a piccie.

Now this is properly subtle. I have revisited the layout with some Tamiya smoke and AK wet effects to see if I could increase the wet look a little. The smoke provides the darkening effect of the rain.

It a little easier to see on the light walls of the pub.

The thing is I know its darker because i knew what it was like before. In order to give fresh eyes something to compare it with I needed a few areas of contrast.

By the warehouse i can leave the area under the canopy dry to give the contrast I was looking for.

and at the other end the areas shaded from the rain by the bridges. Its important to make sure the rain falls in the same direction. So the buildings don’t have smoke applied to the sheltered walls. Its the area above where I feel the effect has come out best.


Local Flavour
This post can best be described as a taste of local flavour if not the full meal itself.

Anyone familiar with railways in the Stourbridge area will be aware of the Parry People Movers that operate between Stourbridge Junction and Stourbridge Town. Little 4 wheeled railbuses that spend their days shuffling along the UK’s shortest passenger branch line. The line itself is still jointed track meaning the ride is somewhat best described as lively! While famous now for these little vehicles Stourbridge didn’t really embrace the railbus idea the first time around, The line begin operated by autotrains and GWR design railcars at the time railbuses were being tried elsewhere.

However as Brettell Road is a loose interpretation I have gotten hold of a Heljan one as a nod to the little people movers. This was always going to be a nice to have rather than a need so having kept my eye on eBay for a cheap one, just on the off chance, this AC version popped up as a non runner with a dodgy motor for less than half the price the runners were going for.

The motor was replaced with a small Mashima I already had. One of the drive shafts was bent out of shape too but as these little models are very heavy for their size I binned that and now its just powered on one axle. For what it needs to do that seems absolutely fine.

I’ve fitted a Zimo MX634D decoder in the space in the roof linked to a TCS KA2 stay alive hidden behind the door and weathered it, The wheels are Branchlines 3ft using the original gears and bushes. You do need to grind a little bit of the chassis away to get them to fit. A couple of passengers and its good to go.


Same idea – different generations!

Another bit of local flavour. The yard crane at the real Brettell Lane was a bit of a chunky affair. In line with my upcoming demo at Scaleforum on making the most out of older models, I’ve come up with this representation using the Airfix dockside crane as a start point. The jib is scratchbuilt from plasticard. I’ve only seen a few distant pictures of the real thing so this is very much a loose interpretation.
Just a few pictures.
Just decided to do a few images, including a view of the canal which I’ve never gotten round to and a few experiments.


Bubble part 2
I was kind of hoping to avoid a repaint on the bubble car even thought the lining was closer to a class 121 than a 122, but when tried to remove the number and the roundels (which were off register) the underlying paint came with it so a repaint it was.
 I toyed with doing 55012 as it has a local significance. Being one of a few bubble cars that on the Stourbridge Town shuttle had a bit of a problem and ended up hanging over the road (see https://www.flickr.com/photos/69498057@N03/6353358089) but ironically I had already done it for New Street. I don’t recall selecting it specially so 55018 it was instead.

Bubble part 1
 I’ve always liked bubble cars (let’s be honest, who doesn’t?) and i recently stumbled across a cheap Lima class 121 so Brettell Road will get a class 122 to play with. Here it is ready for paint.
The roof has had the grooves filled (not sure why lima did this when the retooled the 117 as the roof was the only bit of that model they got right ) with new vents from MJT. The cab domes are spares from the DC Kits 304 kit with my own etched fronts. The exhausts are spares from Dapol (with thanks to Geoff of Western Thunder for pointing out they were available as spares.) and the headcode boxes are microstrip. Buffers are from 51L and the bogies are Hornby class 110 as per most of my DMU’s. Buffer steps are my own etch and the underframe had has some strategic holes drilled in it to open it up a bit.
Tweaks
Afraid there’s nothing new in this post, just tweaks of things already seen.  Ok so you can’t see this one really but in testing the parcels stock shown last time, this point wasn’t as reliable as I liked. I have a view that all stock should go everywhere and while the parcels stuff probably wont run over this point at shows. it did show up the problem. To be honest its always been not quite right so having tracked down the problem to the nearest point blade the old one was removed and a new one filed up and put in its place. The old one and a few dead chairs can be seen in the ballast and I thought why not let the layout have a bit of its own history, so they are now firmly glued there.
 Looking the other way nothing more than a bit of oily track. After the initial coats of track grime and gunmetal I treated it with AK interactive wet effect and engine oil.
  At the recent Derby Show (where we were showing Moor Street) my friend and fellow layout operator Paul pointed out that railcar 14 had lamp irons on the nose. I dunno how I missed this. So given that I hadn’t sorted the horns either (should be 4 not 2) I have set to work. I also found that there were cab end handrails and Dapol had missed the double door handrails as well.
  Another small tweak that I’ve been meaning to do is to sort out the cab side windows on the class 20. The original Bachmann ones slid open and like most RTR gimmicks were a bit naff. So using a spare pair of window frames from Extreme Etches that I had lying around I’ve fixed this little bug bear.
  My Derby lightweight was always a bit of a rush job for Scaleforum. The gap between the vehicles being much too big was the main eyesore!
  Closed up and a masokits gangway fitted.
  Another problem was that the on board lights lit up the cab. Some simple blinds from black paper resolved that.
  Moving on to the warehouse. I’ve finished the guttering and added a low handrail along the top of the wall. Although Brettell Road is set well before the health and safety culture we have now there was still a reasonable chance of a driver falling off the wall!
  A bit of the gutter has fallen off at some point. So some water stains and higher weeds below are the results.
A little wander around.
 The point of the above picture is nothing more than the drainpipe. Yeah so what? you are no doubt thinking, we’ve seen this stuff before! Well you would be right but modelling this sort of stuff is now a lot easier thanks to some useful bits from Alan at Modelu. See here. I still need to add the actual gutters yet.
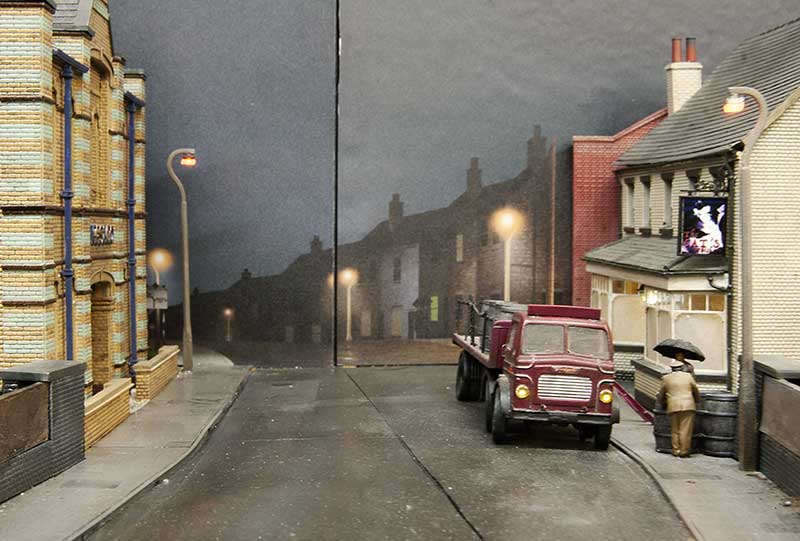
 Speaking of Modelu a couple of Alan’s figures discuss the latest delivery of real ale to the pub. The chaps umbrella is actually a parasol intended for Z gauge. The lights and indicator on the lorry do work as can be seen in this little video of a wander around the layout.
For those who like to see things, here’s a daylight version too!
Finally a couple of images starting with Brettell road trying to impersonate a small depot somewhere! 


Dapol GWR Railcar, finished off
I can draw a line under my Dapol GWR railcar project as its now weathered and finished. The new numbers came from Steve at Railtec transfers (click here). Here are some pictures of the end result.


More on bananas, couplings and a short time lineside.
 With the motor sorted out I cut away the molded hump (as well as the seats) and added a new floor from 20thou plasticard. The replacement seats were from DC kits (I think). The interior was then sprayed a reddish colour as that’s what pictures seemed to show. I added some curtains (drawn up in photoshop and printed) along with 3 passengers – Brettell road being very sparsely used by the public.
Although I will be keeping the railcar as no14, I removed the numbers in preparation for adding the later off white version at the other end to the way Dapol had them. The numbers came of very easily with a spot of turps substitute on a cotton bud. Be very careful around the lining as that comes off almost as soon as you look at it!
Returning to the coupling conundrum
If you remember I was toying with the idea of using a UV torch for my coupling pole but the one I had gave out a lot of visible light. I’ve upgraded to a much better UV laser torch and since photographing it is quite difficult I did a video instead. I did try adding a filter to block the visible light completely but it made it extremely hard to use.
On the subject of videos, may I invite you to get a comfy chair and a mince-pie and spend a while line side watching a bit of shunting. (this one is all diesel)
The Dapol flying banana – part 2
As mentioned last time I planned to use a Brassmasters 7ft bogie for the none powered end of my GRW railcar.  The Brassmasters bogie is longer overall than the Dapol one – you can see the adjusted one at the top of the picture.
  Here is the bogie in position with pick ups on the far side. The near side picks up through the bogie itself. If all you want it a p4 railcar then you can stop here. I tested mine at this point and all seemed fine but its worth noting that the pickups are wired the opposite way round at each end. The red wire at this end goes to the opposite rail at the other. A bit odd!
 Naturally I didn’t stop there. This is the interior without the body. That huge moulded lump has to go.
  The culprit is this huge motor. No idea why its this big, the thing only has to move itself and you can’t couple it to anything anyway! The Mashima sitting on top is a 1020.
 The good news is the motor and its mounts simply unscrew from the underframe. I mounted my 1020 on a bit of 80thou plasticard and on the floor. By moving the motor back from its original position you can mount the flywheel lower too. A bit of 1.5mm ID/ 2mm OD tube meant I could use the original flywheel which contains the universal joint. The drive shaft was cut in half and lengthened with a bit of tube. There’s a small lip in its channel at the motor end that needed to be ground away. While I was hacking the chassis about I cut a hole to allow me to represent the engine. Spares from the Heljan class 128 underframe sprue did the job.
  Next, the interior and finishing.
A brief return to the 101
You may remember the discussion on improving the Lima 101 turned to the windscreen problem as this is the only area (at least in the body) where the Bachmann model scores over the Lima one. Well a kind-hearted soul sent me some window frames to fix the Lima model and the results are presented below.

I was never that put out by the Lima windscreens but side by side it’s quite a difference.
It’s alive!
With the track finished and wiring done the first train has had a run round the layout. Surprisingly for a first running session, nothing fell off! In the absence of suitable stock 08610 and a short rake of modern wagons did the honours!
I think my fascination with chopping up hornby class 110 DMUs is turning into a bit of an obsession! A quick browse on EBay saw another victim picked up cheaply (although this is the first time I’ve ever had a complete one). Question is what to do with it. Looking at some early ’60s pictures there’s a couple of options and I present the case for each below.
Class 100
For.
Seemed to be quite common in the area.
I’ve done one before so I know what to do
It appeals to my function over form tendencies.
Against.
I’ve done one before!
Class 103
For.
Quite an attractive looking unit
I haven’t done one before
Against.
Less common than the class 100s
Perhaps I need to ask my audience what they would prefer to see?
Room for a 101?
So far Bachmann have done quite well with their first generation DMUs. OK the mould lines on the 108 cab were not ideal and the oversize metal chassis block is a poor design decision but they fill a much needed gap in the RTR market place. Not so their latest offering offering as the 101 is already available and given its Lima origins isn’t bad at all. Of all their DMUs the 101 is the the one that Bachmann could least afford to drop the ball on but sadly it seems they have. Given that this is the first DMU thats a victim of the new price structure it’s a bit of a double clanger!
I feel I must take some responsibility for some of the online fuss as I may have been the first to point out that the bottom of the main windows and the door windows all line up on the model when they shouldn’t. One online commentator went to great lengths to draw lines on photos of the model and the prototype that show the error very nicely (although in a bizarre piece of manufacturer brown nosing he then try’s to convince us that the model is right)!
On its own the window error isnt much but it’s one of those relative errors that just screams out at you. Lima themselves seemed to have a good understanding of this and while literally everything on thier earlier 117 is wrong it all works together so it looks ok. Correct one thing and suddenly it looks worse than when you started!
A few years ago the obvious thing to do would be to combine the strong points of both models to produce something accurate. Lima body on the bachmann chassis and while that’s fine for something like a class 25 where your outlay can be less than £50 do we really want to be forking out close to 3 times that for a DMU?
So given that fixing the bachmann 101 is going to be quite difficult, the easy route this time is just to fix the Lima under frame. People have remarked for years that it’s bad because it’s just a box with surface detail but lets think about this for a second. What is depicted is about right it’s just that the holes are filled in (you can see where this is going can’t you?)
Option 1 the quick fix
Ok this is a total bodge but all I did was weather the chassis and repaint the ‘holes’ in matt black. It was only ever meant to be a temporary fix but it’s stayed like this for a good few years now. I have also replaced the undernourished Lima bogies with spares from the Hornby 110.
Option 2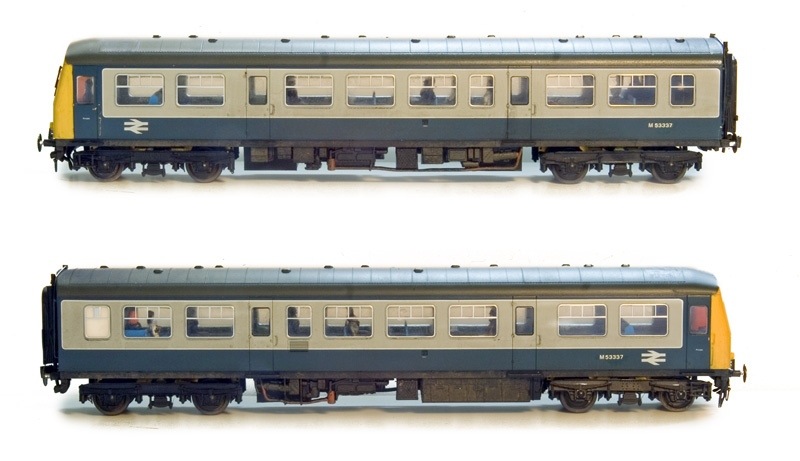
It’s not actually much more effort to just drill out the holes and tidy them up with a scalpel or circular saw in a mini drill. I’ve re-added the tanks from bits of plasticard. With hindsight I was never going to replace my Lima 101s anyway but if I were to buy another I’d definitely be looking at buying a cheap second hand Lima model than feeling the need to have the latest thing.
10th April 2014

Those who follow the workbench section of the site will know that I have been converting a Hornby class 110 into a class 114. Well its nearly done now (just a few tweaks to do) and a new page has been set up for it in the units section.
There are also new pictures in the coaches section and a new page for steel wagons (admittedly with only two to look at so far).
13th March 2014
 Its been a good while since I wrote anything for Model Rail Magazine but this months issue has a short article on my model of LEV1 for those who like buses!