HEA steps
As you may be aware my friend Phil has taken over the wagon bits and kits side of Colin Criag’s useful range and set up Stenson models. Its hoped this will grant Colin more time to develop stuff as well as new things Phil wants to develop himself.  One of the new bits is this rather handy etch for the HEA steps. Phil has used some good thinking in the design ensuring that the end result has a neat and robust way of actually attaching to the wagon (some purveyors of etched bits take note). The same steps were found on the MEA and MFA wagons too. One down 17 to go!
Grampus test etch
A few years ago I was working on a fleet of grampuses (yes that is the plural before anyone asks) for New Street but the project stalled when I decided i wanted to etch new baskets, door bangers and steps for them. This has been on my to do list for a long time but things have changed in that time and when Justin at Rumney models said he was thinking of looking at the same I dropped my plans in favour of just waiting for his. I don’t see a lot of point in duplication in this hobby (although some of the RTR chaps seems a little obsessed with it at the moment) especially when I’m just doing bits I want and someone else is doing bits as part of their business. I’m more than happy to let the guys doing this for a job get on with it basically.
 Justin has kindly sent me a test etch to try out and the results of which can be seen above. There is, of course more detail to add but a this point if what you see is plastic it’s from Parkside. If its metal then its from Rumney models.
  The wagon the right way up (I’ve straightened the bent door banger). Justin is hoping to have these ready for September so keep checking his website. I’m going to need a fair few of these!
94xx tank – thoughts on the footplate
With the chassis complete and test fitted thoughts turn to the footplate.  Left hand side. One little point to mention, I mounted the valve gear rivet backwards on the coupling rods as the hollow appearance seemed to match prototype pictures better.
I tend to carry forward things from one project to the next and stuff I’ve worked on before seems much more obvious in the future. In this case the splashers are too big and the rear one is in the wrong place. so these will need changing. Somewhere in the history of owning the model the forward footstep has broken off and been long lost.  The lower part of the firebox is much wider than the upper part – no doubt to accommodate the RTR mechanism. So this will need looking at. It also means that the details on it are all a bit flat.
  And after! I filed up new forward tank supports from a bit of H section. The forward steps are from a mainly trains etch, I replaced the steps under the cab too and the rear-most steps are knocked up from a bit of brass. The splashers were cut off about a mm from their base and remounted. the ones behind the toolboxes coming from a scrap chassis
  I carefully cut away the lower firebox sides – leaving the front bracket in place and made new sides from plasticard. The injectors were an enjoyable little project, soldered up from bits of brass and tube. Below is a close up of either side.
trying a little tenderness.
I never planned for Brettell Road to be populated with anything other than tank engines but as with most things I have planned it’s all gone a bit wrong! So…
 I present you the Brassmasters easychas for the Bachmann 4f, not that its going in one mind you. I found a picture of an interesting little loco at Saltley in one of D.J. Nortons West Midlands books and there was a ancient kit for it too. However the chassis supplied is literally 2 bits of brass with 6 holes in it. It wasn’t really going to do!
The chassis has been built kind of as intended although I needed to shorten the tender wheelbase a bit. I also added a few Alan Gibson frame spacers to the chassis and a high level gear box (smaller motor is in the post) . The p4 frame spacers were a tad wide and I wonder if the EM ones might be better if you are following a similar approach?
 Having never built a tender loco before and figuring if you are going to do something you may as well go for the ultimate solution (or potential failure) I decided to have a go at Brassmasters working inside motion too. It certainly ticks the fiddly details box that’s for sure but was fun to build.
 This is what it looked like before fitting to the chassis. But what loco is it you might wonder?
 A Kirtley goods, I was attracted to its ancient appearance. These loco’s (the 700) class were introduced in 1869 and the last one made it to BR as 58110 being withdrawn in 1951 when she had seen 71 years service! The body and tender (shown losely mocked up) are the Keyser kit and the kit itself is nearly as old as I am. I’ve removed the springs to be replaced with something a little more refined and shortened the footplate so that it doesn’t overhang the bufferbeam, All the rivets have been sanded off, the ones on the smokebox were too crude and the tender of 58110 was flush riveted in the end. I’ve also reduced the with of the tender footplate slightly to add some 0.7mm L section from Eileens (the actual prototype being very thin in this area and nothing like the chunky cast floor thee kit comes with.
Containers and other things
I picked up a few Parkside container wagon kits at Scaleforum and over the last week or 2 I have been putting them together. Along the way a Bachmann example was added too as it was cheap and had the smaller container that I was after.
 Above are the Conflats themselves, the 2 on the left being the Parkside ones and the 3rd the Bachmann one. The first one is built as intended with the usual additions of buffers and brake pipes from Lanarkshire models, safety loops from Bill Bedford and tie bar from Eileens emporium. (I’ll come back to the chains in a moment). The second one uses the Red Panda underframes as a lot of those pictured on Paul Bartletts site (link here) seemed to match this configuration. For the Bachmann one it looked a bit of a faff to sort out the underframe as the brakes were set for 00. Strangely Bachmann had the wrong brake levers on either side meaning that the brakes wouldn’t actually work anyway as lowering the lever would pull the shoes even further away from the wheels! A Parkside chassis is the easy option and I had a spare from the second wagon.
  Above is a view of the different underframes. You could go much further than this if you wanted too but this is a representation of what I feel you can see in all the gloom. If you did want to go further then the obvious start point would be one of Justin Newett’s excellent etched chassis but even if you didn’t he puts his instruction on his site anyway and there’s some good references and info on how it should all look. Well worth clicking here! The wagon at the front is the BR clasp underframe.
  I mentioned earlier that I would come back to the chains and to my eye Parkside have been too delicate in the details on this kit. There’s a tendency to think that finer is better but I don’t think it works here. The chain I used is 23 links per inch from Langley models Which as supplied has quite round links with a twist to them. You can see the original shape on the container on the right. To get them to the more lozenge shape it’s simply a case of putting one end of a length of chain in a vice and pulling the other to stretch it. Nothing cleverer than that! The lifting shackles on the roof were also too fine and were replaced with spared from Justin’s Bogie Bolster E underframe detailing kit. In case you are wondering the wagon on the right was destined for the smaller container which is why the raised links are towards the middle.
  The finished wagons – Both large containers were sprayed with Halfords Rover damask red. The apparent difference being due to the weathering. I might be stating the obvious here but it pays to weather the wagons and containers separately meaning the weathering process is earlier in the build than normal.
  The shackles are from Roxey models and use the same Langley chain links. While a little fiddly it does mean that they can be assembled without resorting to the soldering iron! I didn’t use the supplied eyelets for the containers as I felt they didn’t really look much like the prototype pictures I was using so I just used a bit of fine wire instead. Once the chains are in place it worth treating them to a thin coat of ZAP thin CA (the pink bottle) to set everything solid.
 I’ve been doing other wagons too. Above a Dia 1/002 Lowfit from the Red Panda kit.

D2109 LMS 16t mineral wagon from the Cambrian kit A couple of Banana vans – Wrenn bodies on Red Panda underframes with additional details.
  And finally a couple of brake vans – on the left the Airfix kit with Bill Bedford springing and extra details. On the right Hornby RTR.
Some handy links
Parkside Dundas (also for Red Panda)
Eileens Emporium (also for Bill Bedford)
making a start on the left hand upper side.
I was recently asked for a track plan but I thought a satellite style image was better so here it is.
 While the left hand end is coming along pretty well the right hand side is looking a bit neglected so more building work is required, starting with…
 …a bit of cheating. This is actually to go behind the large warehouse on the left and is a blatant short cut. The reason for its existence is an excuse for the chimney, perhaps when the warehouse was a factory in its previous life it had a small steam engine or something? In truth you will only see the chimney so I could have missed out the building completely or just used a box but I had an old Hornby water tower so why not just use that instead? I knocked up a new roof, gave it a light dusting of red primer and blanked of the windows with a bit of scrap ply I just need to paint the door and weather it.
  No such short cuts on the more visible bits though. This little building is based on a picture I found on the brumpic site. Construction is 2mm card clad with plasticard while the arches are left overs from New Street. The steps are plastruct and microstrip.
  The real life Brettell lane and surrounding area has an awful lot of pubs so I decided to have one on the layout. Construction is the same as above and the windows are modified Brassmasters ones. The roof slates are from Mr Horns laser cutter.
  This is the rear view in roughly the position it will occupy on the layout. I knocked up a little store hut too.
  I find things like guttering to be strangely therapeutic. The actual gutters are half round brass from Eileens while the rainwater downpipes are 1mm brass with a single strand of electrical wire double wrapped to form brackets. Experiments have shown mounting the gutter brackets on top of the wall is the most robust way to secure them with the roof adding extra reinforcement later.
illuminating secrets
 What we have here is a typical midland type yard lamp from RMLectronics, link here They kindly supplied me an incomplete model as I wanted to change the flat ladder supplied (an understandable commercial compromise) with one of Colin’s 3d versions. I felt the light was a bit white so I painted the LED with some revel translucent yellow. The effect of this can be seen below.
  Although Brettell Road is basically a personal plaything there has been interest in it going out to an exhibition or two at some point. With this in mind I have included a couple of viewer friendly hidden details in the warehouse for those who like a good look at little details.
  First up a lorry unloading scene using a modified base toys lorry and a couple of Airfix platform figures painted to look like factory workers.
  Secondly a hand crane included to give a suggestion of how goods get from one floor to the other. This is very loosely based on one at the SS Great Britain museum in Bristol (well worth a visit if you are in the area. There are a few remains of the railway there too along with some old wagons that are also worth a look.)
who let the cat in?
Picking up where I left off last time, a few more dark pictures.

 I’m sure we have all had the frustration of glancing something interesting out of a train window but it being hidden away so that a proper look is impossible? That was the idea behind this image.
I’ve been building more wagons too.  More of the same! Another Airfix 16 ton mineral wagon and another 12 ton LMS diagram 1832A van from the Cambrian kit. (C101)
 I’ve done a Cambrian single plank wagon before too (diagram 1987, kit number C93) but the last one was a fitted example. The Standard 12 ton van, diagram 1/208 is a Parkside kit and is an upgrade for one of their older models (PC07A)
 A few more Parkside kits. The ‘french’ mineral wagon is one of their older kits (PC22) but I liked its quirky look, the prototypes for these were built just after the war . The 7 plank wagon is a 1923 example with fixed ends (PC73)
 Another Cambrian diagram 1667 5 plank open (C57) along with a Ratio GWR van of some description (v23 I think) this wagon is a bit of a freebie. I brought some cheap ‘random’ ratio bits and included in them was the sides and ends for 2 of these, the roof for 1 and no underframes. I had a box of underframes that I picked up from somewhere else so this wagon was born!
  Finally for wagons an ancient Three Aitch Mouldings kit for a LMS 20 ton coke hopper. Built with Bill Bedford W irons. I know Hornby are going to do one of these but building a kit is much more fun!
 A slight diversion as a GWR railcar trundles past!
 My warehouse is starting to look a bit more like a building now. The canopy is another old Arifix kit adapted to suit. I’ve mentioned before wanting to depict some life inside this and the following pictures hopefully do that.

 Most of the figures are Dart castings ones with a Bachmann gent thrown in. The last picture is the reason for the title of this entry as the cat is modelled on my own cat Moo! Anyway remembering that Brettell Road is set in the rain, Moo has obviously snuck in to somewhere nice and dry!
Dave Hewitt
Long time readers will have seen mention on many occasions of a little company called Unit Models. When I first came across them they did a range of resin bits mostly for US modellers in HO scale but what a range it was. Noting spectacular but they produced no end of useful little bits and pieces for people who scratchbuild buildings and the like. Things like vents, wall fans, lockers etc. The sort of stuff that was a bit of a ball ache to scratch build yourself.  The roof vents you see here are from them and as they didn’t do the exact ones I needed Dave was only to happy to do some for me, he didn’t even seem to charge any extra for them either! Well Sadly Dave passed away recently and the business is up for sale. I hope someone picks it up and continues to produce this specific but invaluable range of bits and bobs and its sad to see such a lovely chap taken from us. My thoughts with his friends and family.
moving stuff around
I want to depict some sort of activity within the current building or at least evidence of it either about to occur or that it’s just occurred (luckily the vans will block the view when the place is the most active) . So I need some way for my mini workers to move stuff around.

These barrows and sack trucks are from Scalelink and depict items of Midland origin. I thickened up the wheels on some using old handwheels from various etches as a single etch didn’t seem thick enough. On the larger sack trucks I couldn’t figure out how the mount for the wheels was supposed to fit, you can see my best guess on the one lying down. On the others I just mounted the axles on plasticard blocks as mounting them on blocks seemed to be more in keeping with a picture of something similar in LMS miscellany bu H. N. Twells. the wheels on the last barrow were supplied as a flat etch so I used some of Colin Craigs handwheels instead as they had a better look. I think the rear wheels are actually too far forward now its built mind you.
Incidentally the brown used for these is from Halfords range of camouflage spray paints and would make quite a good basis for general track colour if you are looking for something for this.
 A spot of research showed fork lift trucks to be a lot older than I thought they were so I figured that the owners of the building had got hold of one to move stuff around. My idea is that the building was originally a factory of some sort but now being used as a warehouse so a make do approach seems more sensible than everything being designed for a purpose. Anyway this is a JPG Models kit backdated to look like a generic earlier forklift. I ditched the safety cage and added a grill on the side and some vents on the back as it seemed that the earlier fork lifts tended to be more like this.
Signal wires and a spot of playing.
 Ive recently been adding the signal wires to the layout. The wheels are from Brassmasters with the majority of the actual wires being from easyline. The posts are made from 1mm strip with 0.7mm brass rod for the pullies.
  As with the point rodding I wanted to include some leftovers from the branch line, No wires but some pullies and posts along with a rudimentary walkway over the now long gone wires.
  The abandoned building is now fixed in place too, a bit more work needed to bed it in but here’s a pic of the Deeley tank simmering away in front of it. Ive done a little video of a spot of shunting that shows all of the Brettell Road loco fleet (so far) the limp you can see on the deeley was caused by one of the rods being a bit too long, now corrected.
More brass bashing
 I’ve been busy fiddling about with more etched kits. This time a Brassmasters kit for the Deeley 0-4-0 tank engine. It’s all gone together pretty well with just a few areas that needed a tweak or 2 to get right (if that’s down to an error in the kit or my ham fisted effort to bodge it all together ill leave up to you). For the benefit of those who might want to try the same kit i’ll share my findings. On the valve gear the connecting links (part A36 in the kit) are too long and needed reducing in length by about 1.5mm. While the eccentric rods (parts A37 and A38) are also too long and needed shortening by about 3mm. I didn’t bother using the supplied buffers and new etched heads and replaced them with some A1 models sprung oleos. (part A81) Don’t worry as I know the real loco didn’t have oleo buffers but the A1 models ones don’t look much like real oleos anyway.
 I found adding the rear lamp irons to be a bit of a faff and lost some anyway. Its much easier to use a bit of fine strip to form a lamp iron with a long foot so that you have something to hold on to while soldering them in place. I decided to make the roof removable by soldering some scrap etch to the edges so that it can be gently sprung into place under the sides. Brassmaters supply the sides for the earlier flush sided loco as well as this one. I prefered the look of the later ones as it looked more antiquated somehow.
 I’ve never done valve gear before. The instructions say that valve gear rivets make the job easier but I elected to use brass pins with the heads filed down and located out of view. A slip of cigarette paper and a drop of oil means that the whole lot doesn’t solder together in one big, rigid lump. I’m pretty pleased with how it came out if I am honest.
One of those finished things posts.
The advantages of working on more than one project at once is that, firstly, I don’t get bored and secondly every so often you seem to finish a lot of things together. This is one of those instances with several things that have featured recently have reached the finish line sort of together.
 My loading gauge has been painted for a while but now its been planted too. I love stuff like this as its one of those things that I hope disappears into the scene and becomes unremarkable. Perhaps once in a blue moon someone will notice it but, much like the real thing I like stuff like this just to be ‘there’. It’s not supposed to get people’s attention. (don’t worry about the big gap under the wall – that’s not been permanently attached yet)
 My Ford Thames and Austin A40. The colours of the Austin have a somewhat obvious Birmingham influence. Cartwrights was a furniture store in Brierley Hill but I have no idea if they used Austin vans or even if they had any road vehicles at all.
  This was a quick win project – Started life as a Bachmann Coke wagon which I imagined was sold to Round Oak and had the coke rails removed. I just liked it because it had a local livery and i’ve never done a distressed private owner before. The lettering was attacked with one of those brass brush wheels in a mini-drill and then the wagon was weathered. The w-irons needed a but more work with the mini-drill and a burr to get the wheels in but this was really minimal effort modelling!
  And so to the big project of the last few weeks – the DE2 shunter. I have to admit I didn’t relish the thought of painting its striped livery but by using some 4mm making tape from a company called Jammy Dog it wasn’t too bad at all. (click here for their website) A few more pictures below.

 This is the sort of train I had in mind for the loco – Pushed up the hill with the loco at the rear and no brake van. I will need to add a shunter to the front wagon at some point.
 Finally another moody shot of the Jinty heading out of the yard on a train of vans.
Yorkshire Engine DE2 part 2
 I can call the build stage of this project complete. The chassis is all wired up and runs and all the little fiddly bits are in place.
More vehicles, greenery and a first for me.
 The above 2 vehicles represent a return for me in a small way in that both come from manufacturers I have used before and in both cases I was a little bit disappointed previously . On the left an Austin A40 from Road transport images who I used before for a dodge cab on New Street. In the case of the dodge cab I felt it was a bit too rounded and didn’t really capture the look of the real thing all that well but I must say I’m much happier with this little van which was an impulse buy at this years Scaleforum. This is one of their all in one kits which is unusual for them as they usually sell all their bits separately so you can build the vehicle you want. Road Transport Images
The Lorry is a Ford Thames from John Day models. In this case my previous experience was with a diesel-powered Transit bus and again I wasn’t all that impressed. This model couldn’t be further from the transit though as its much better cast with very little work to do. I swapped the supports in the bed for wire as they were a tad scruffy and the bed and cab both needed a little bit of evergreen 40thou section to make them fit a little better but I like it! John Day Models
 I decided that the track in my little yard looked too neat so I have attacked it with some powder paint (rubbed in with a finger then sealed with Klear) and some weeds. I’m much happier with how it looks now.
 Although I don’t have a goods shed I do need a loading gauge. I’m reliably informed that these were used to ensure that wagons leaving the yard were within gauge and not as some sort of protection for goods sheds. The above example is a typical midlands one and started out from the Smiths kit, I filed off the moulded lifting gear and replaced it with some spare handwheels (from Brassmasters) and bits of wire and brass.
 I mentioned in the title a first for me and this is it. Not that i’ve never built a weighbridge before (Although I haven’t) but i’ve never actually built a kit building before. When I was a kid my dad built some for me, usually Airfix kits and Linka, but all my buildings have been scratchbuilt up to now. So in the interests of breaking new ground this is a Wills kit. I turned the door over as hinges on the outside indicated it opened outwards which seemed a bit odd to me. I also filed off the panels on the end and rescribed the bricks and fancied a brick-built chimney but it is still a kit building. Oh and the guttering is bits of brass from Eileens!
Finally, you may have spotted earlier that Ive bedded in (most of) the abandoned warehouse, a few pictures follow:

Point rodding and hints of the past.
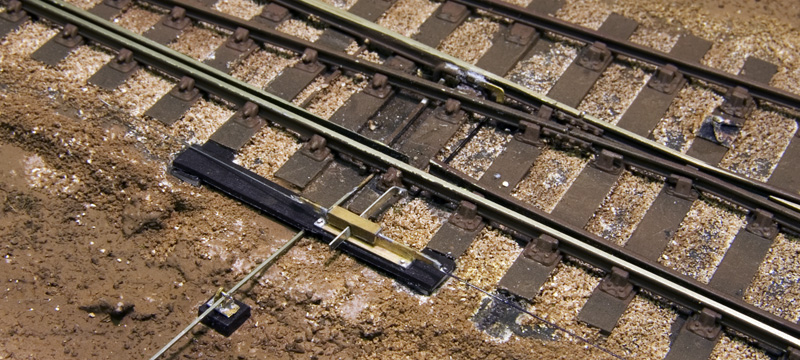
What you see above is a representation of a detector for the ground signal on Brettell Road. It was knocked up from scraps of brass using photos and Steve Hall’s articles in MRJ 113 and 115. I always enjoy fiddly details like this even though I know it will go unnoticed to most people.
There’s only going to be 1 point on Brettell Road that’s operated by the off scene signal box, the rest being operated by hand levers. However I wanted to include remnants of what was there before meaning the double slip would have been operated either end with facing point locks. Also given the distance a couple of compensators will be needed so while it’s not exactly complicated stuff it is worth doing.
My chosen route is the Brassmasters etched bits with rodding from MSE. I have also included the odd rodding stool where the rodding has been removed to help with the idea that it’s not so much added to the layout as taken away.
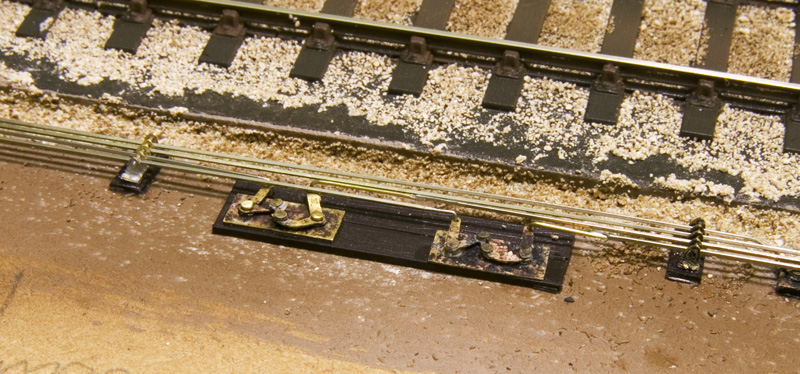
Most of this stuff is quite basic if a bit fiddly. Above are a couple of compensators. The ones supplied are cosmetic and don’t move and that’s fine for the disused rods as per the one on the right however with only 1 run that does anything it would be rude not to make it work. Ok it’s driven from the point rather than driving the point itself but let’s not worry too much about that. 2 Brassmasters compensators were used to make the one on the left with the centre arm from one and a few brass pins meaning it will move when the point it thrown.
All in a fun little project.
http://www.youtube.com/watch?v=5QrJsLczids&w=600
back to the Gronks
Once the springs and hangers were added to my class 08’s I started looking at other things that could be improved in the frames area.  The obvious thing missing from the Bachmann model is the speedo drive but its dead easy to add from a few bits of evergreen strip. There are also some holes in the frames that Bachmann missed so these were drilled using photos as a guide.
 On the other side the missing holes were added as well as a drain cock – this was simply made from a brass pin with the head filed down, a bit of fine tube and a bit of brass rod. Fiddly but a nice quick improvement project.
a small side project
 The above picture really highlighted just how flat the Bachmann class 08 spring detail is, so I started looking at them with a view to laser cutting an overlay when I next visited Tim’s as a little side project.
 Looking at the real thing they are not only flat but bear only a passing resemblance to the real thing with only about half the number of springs represented, the vertical rods could also be improved by shaving them off and replacing with wire.

Above the final result, it needs the weathering to be blended back in but im pretty pleased with how it turned out.
Ready to Plonk
I do understand the simple pleasures of Ready to Plonk stuff (RTP). The idea of opening a box or packet from your model shop and adding to the layout without anything to do. It’s where we all started from I guess. Building New Street RTP had been a rare occurrence on the scenic side and actually comes down to just 2 instances so far where I have used something as supplied without having to modify it or scratchbuild.
 On the left the Bachmann traffic bollards and on the right GPO relay boxes from Unit models. In last years new releases from Bachmann I thought there might be another opportunity for some more RTP activities with the announcement of the humble grit box. With no rush on these but knowing I needed some I decided to wait and see but sadly what emerged seems to be a design I havent seen before and certainly not the sort found on the platforms of new Street. (hey there was a chance it might have been, admittedly a slim one!) Bachmann’s commercial skip bins were another potential but the design is too new sadly.
So armed with a few bits of plasticard and some yellow paint and some dimensions from the website of a company that supplies the real thing. I set to work to make my own. The results are below.

Variations on a theme.
 With 3 more class 86’s working their way along my workbench some thoughts on variety might be worth sharing. Eagle eyed folk will spot that the one on the right is a class 86/1 while the others are class 86/2 but I have omitted the chassis for this exercise as that’s the big difference between the sub classes. It’s not even about the detail differences (TMD cables, headlights, extra door handles) but what I want to focus on this time is the livery. All three are, of course, Intercity livery and yet all three are different. The obvious difference is the amount of yellow on the fronts but the more subtle difference concerns 86260 and 86242. Aside from the front 86260 is actually the same as 86102 with the numbers the same size, data panels and nameplates in the same place and the double arrows on the bodyside. 86242 however had slightly smaller numbers, data panels behind the cabs, nameplates mounted centrally on the body, over the white stripe, and no double arrows.
Things get even more tricky if you consider that a year or two before the period my layout is set 86242 had the same livery treatment to the front as displayed by 86102. All this goes to show that you should really work from a photograph of the loco you are modelling taken at the time you are modelling. As I have said before, model what you actually see, not what you think you know.
Sticking with variations on a theme some thoughts on couplings.
The good old Kaydee, reliable easy to use and most importantly faff free in use. I use them between coaches and multiple units. Problems to my mind are as follows
- If you want them to work as intended (with magnets under the track) then you need to mount them too low for 4mm scale – this looks awful and to be honest from a visual point of view not much better than the current crop of smaller tension locks. By that I mean it jarrs to me that the coupling is kind of floating in mid air and not really attached to the vehicle in a way that makes any sense.
- Not a lot of UK stock uses buckeye couplings for coupling locos to trains, or should I say not a lot of uk stock used to use them. In my era it was pretty much EMUs and class 33/1’s and 73’s (the latter not completely unheard of at New Street but very unusual.
- Now this last one is the one that modellers have been ignoring for years – they don’t actually look much like a real buckeye coupling.
The first one is easy – dispense with the hands free and mount them through the bufferbeam where they should be. Mid rakes it not a problem to use Kaydee as, like i said at the start they are reliable and faff free but on the front of an EMU there has to be something better. There is and its called the Sergent coupling.

I have been aware of these for a few years now but only just got round to getting hold of some. The difference is, to me at least, like chalk and cheese with the Sergent coupling looking like a copy of the real thing. The Kadee looks almost toy-like by comparison. For those wondering they are not compatible and the way they work is different – the Sergent has a tiny ball bearing inside which holds the knuckle shut. This is released by using a magnet on a wand (from above) but in reality as I am not planning to do a lot of shunting with EMU’s I am using them purely for their cosmetic benefits.

Revisited locos part 2
Progress continues on my class 25’s. I cut out a little jig for the triangular panels on the sides of 25059
 It was then a simple case of scoring round it for the panels (1 on one side, 2 on the other)
 It’s not that the Bachmann roof fan is course as it’s not too bad for what is quite an old RTR model. It’s that it’s so small compared to a scale one. I’ll need to order some more from Brian (and some for the 45 too while im at it.)
 Progress on 25059. The window has been deepened and the top of the gangway door raised by 20 thou. The bodyside grill hinges are 10×40 thou strip and are only on this side. I re-did the tail lamps, lamp irons and handrails while I was at it.
Extreme etches – Apt I think!
 Some companies in the world of model trains are very aptly named such as Extreme Etches (Masokits is another one). The above example is Hood’s crest which is a 3 part etch for something only 3.5mm high! (I think i need to buy a magnifying glass if im honest)
That said just because something is small and fiddly doesn’t mean the design or thought process that goes into it is poor, quite the opposite in fact. There are many examples of add on bits that are, on the surface, easier but in reality due to poor design are a struggle. Things that don’t fit, are not the right shape or are nigh on impossible to put together (or stay attached to the model). Those who were around in the 1990’s will remember the craze of hacking great big holes in their models to stick on etched bits that if you took a step back and look at properly were worse than the molded stuff you had just sent to the bin. Sadly there are still companies producing stuff like this but at least we have a choice that if we are going to do something, we can do it properly!
Some more thoughts on puddles.
Thanks to everyone who commented on the last entry about the weather. I have been looking at puddles (ok that sounds REALLY weird I grant you) and have done some more experimentation on a scrap bit of card (sprayed to look like tarmac).
 There’s 3 rows here, on the left just Klear and in the center and on the right I sprayed a very light coat of black first (the Klear was applied with my airbrush in all cases)
 The pre darkened areas look much more like the real thing I think.
Dont forget the little guys
Although a fair way off yet I can see the light at the end of the tunnel regarding the platform. What this means though is that some serious thought needs to be given to the subject of people. It goes without saying I’m going to need a lot and that’s going to get expensive. However the more there are the more they merge from an individual person to a crowd and the more confused they get. It also means the more corners can be cut. An example of this can be seen below.
 The more observant will notice that some of the passengers on this bus are black. Observation of people inside things like buses and trains leads to the realisation that sometimes you really do see little more than a shadow or a dark shape. There’s no need to paint some 4mm scale chaps tie if he is sitting inside a model. The fact that he is there is often enough.
 Other than the sheer cost of lots of little people the other thing to consider is the repeats. No point buying 20 packs of the same figures. The 2 chaps on the left are from Bachmann the 2 on the right cheap Chinese figures from ebay. The difference is obvious but the Chinese figures still have their uses. Before I come to that some thoughts on paint. A lot of modellers follow the way the military guys paint larger scale figures but is that the right approach? Most large scale figures are the point of the model but not only that they are highly stylised, kind of like a style in a painting but do they actually look real? More importantly do the same methods scale down to to a figure that’s only 24 mm high?
Its my opinion that they don’t and that we can easily fall into the trap of modelling what we think we know and not what we actually see. For a real person to look about an inch tall they need to be a good few hundred feet away and you cant see detail from that far away. Figures 2 and 4 in the picture above have had a light wash of black applied to bring out the shadows a tad but that’s it. The other thing I quite like about the mixing of figures is that they are not all the same height.
All this talk of distance and what we actually see doesn’t mean that the 2 chaps on the right are OK, Far from it they are crudely moulded and crudely painted but all is not lost.
 By mixing the figures and putting the better ones at the front a crowd is born and for a lot less money than using all higher quality figures. If you could try to imagine how I think the platforms will look they will be reasonably dark, what light there is will be a horrible colour and the ceilings are low with a lot of stuff in the way of a lot of the views. The people need to do what all the other details on the layout do and that is kind of disappear into the scene, They shouldn’t scream out at the viewer but just simply ‘be there’