Some lorries for a trio of layouts.
A small selection of Lorries have recently been completed. Starting with…
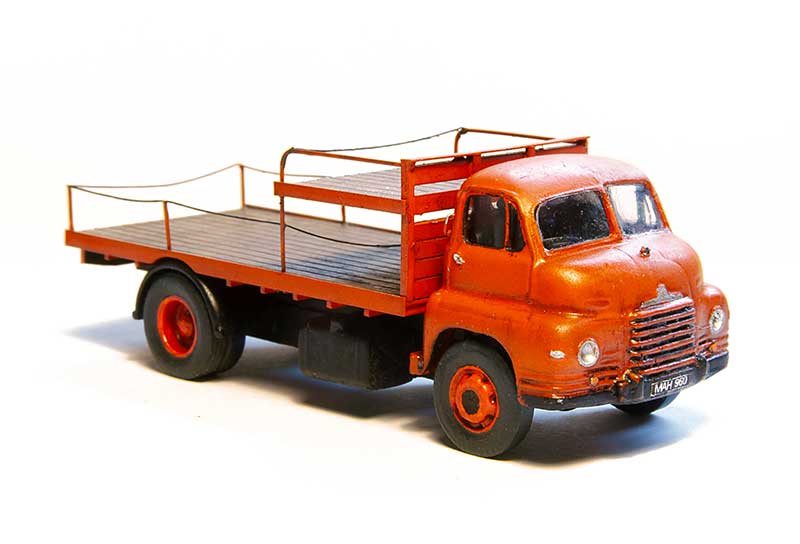
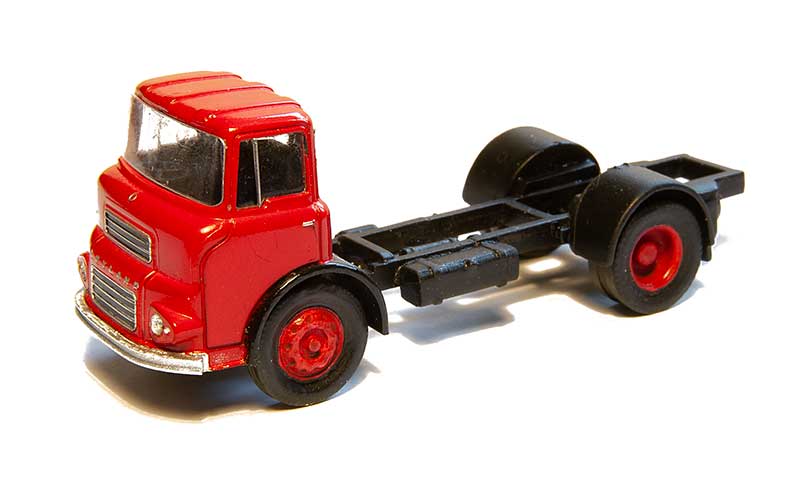 A leyland LAD cab and chassis, destined for a wagon load on Brettel Road. The cab is Base toys with some minor tweaks and windows added to the rear. I was aiming for a new vehicle being delivered and wanted an open chassis. The source for this was a cheap Langley Models kit for a Guy Otter/ The chassis was shortened and wheels are from RTI.
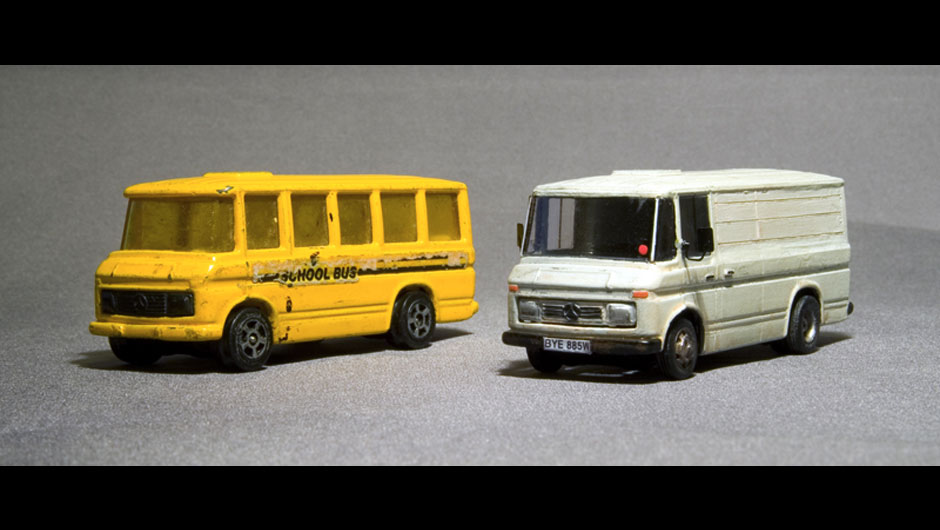
Some of you may remember this. A Mercedes 407 van from the Corgi School bus. Ive carried the unmolested one around for a while now from when I did a short stint on demos on modelling road vehicles. A picture of one of these in the form of a low sided light lorry appeared on Western Thunder so I decided to do something with it
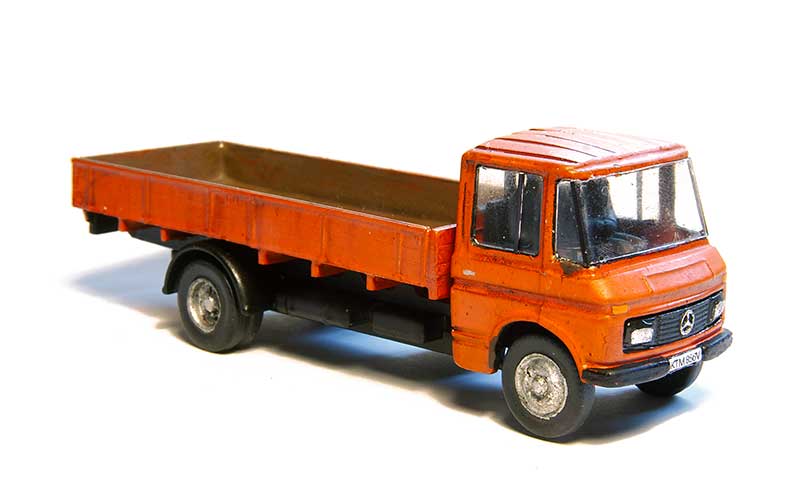 The Body is from the previously mentioned Langley kit mated to a Base Toys chassis and more RTI wheels. I need a spot of work with a sheet of sandpaper on a flat surface to get it to sit properly. This will be a reasonably old vehicle on New Street.
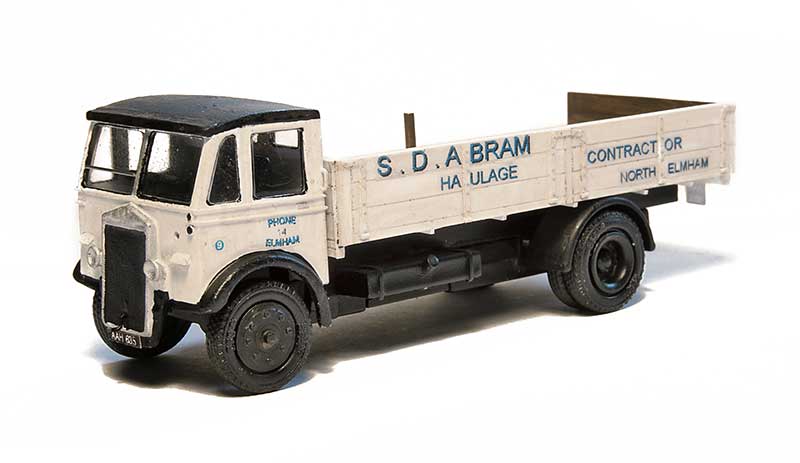
Next up over to Norfolk and a couple of Lorries for North Elmham. Tim provided a few images of vehicles that could be found lurking around the dairy so I set to work. The first is an Albion something or other (I don’t know – I just copied what I saw) using a modified Base Toys cab with a scratchbuilt dropside body. The transfers are home brewed on decal paper.
A Bedford S type from an RTI cab and wheels again with a scratchbuild body. I’ll leave the many milk churns these 2 will need up to Tim and John.
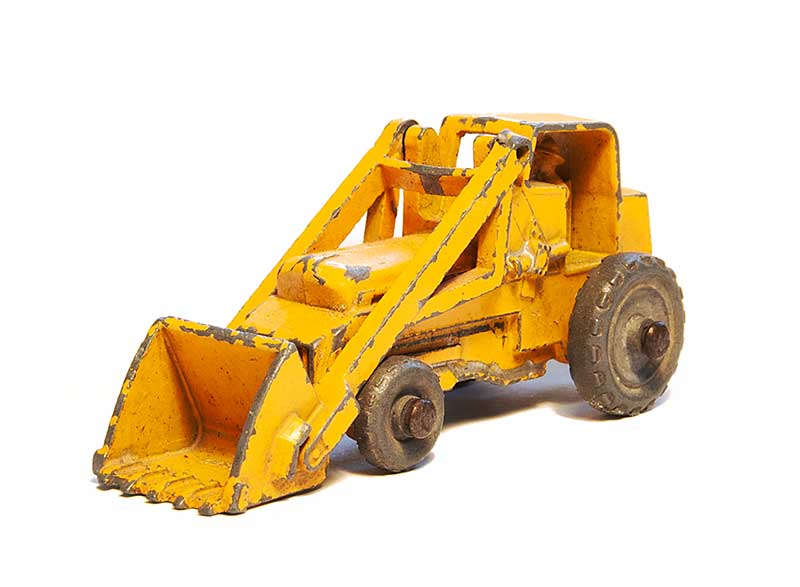
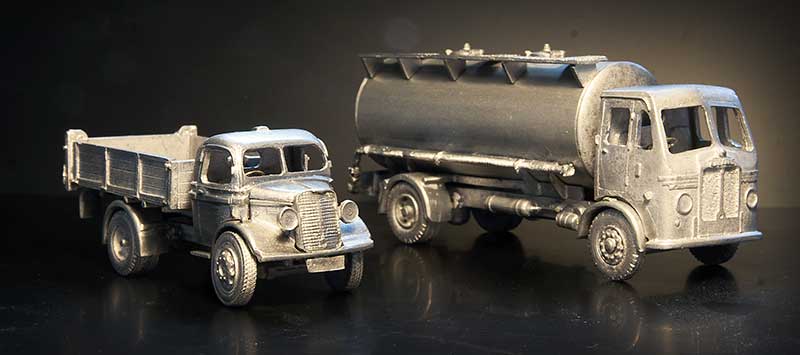
Weatherill Loader
While at Scaleforum with Cades Green it was mentioned that Iain had a Lesney Weatherill Loader that he intended to do something with for the layout. Given my fascination with doing stuff with things from the toy-box this was pretty much an irresistible project to have a look at.
Weatherill Hydraulic
Weatherill were not a company I was aware of before now. F. E. Weatherill Limited was founded the late 1940s in North London before moving to Welwyn Garden City in the mid 50’s. Mr F.E. Weatherill was formerly of another similar company Chaseside. Their machines were generally built around Ford components but later moved to Perkins and later still Leyland Engines. Chaseside used cable operation and F.E. Weatherill had tried to get Chaseside to look at the Hydraulic route for their machines but Chaseside weren’t interested. The lineage from cable operation to hydraulic was somewhat apparent in the layout of the earlier Weatherill machines.
By the late 70s Weatherill were struggling, They could not match the prices of machines imported from Scandinavia, Japan and the USA. They met with the UK government to ask for protection of UK manufacturers but that plea fell on deaf ears. They downsized and closed the Welwyn Garden City factory, moving to Tottenham where the plan was to focus on smaller high lift two-wheel drive rigid loaders but they couldn’t carve out a market for these and in the mid ’80s the firm closed down.
Lesney
It seems strange then that Lesney would be all that interested in producing toys of Weatherill loaders but they produced 3 in total. A big factor in this could be that the Weatherill Factory and the Lesney factory were next door to each other! Of the 3 toys produced 2 were the same 2H loader. The difference being that the first was to 1:75 scale (the yellow one), and the second (the orange one) was larger, no doubt to fit the standard sized box. The third toy was a later design and part of the larger ‘Superkings’ range.
The Model
 I’ve bashed quite a lot of toys into something a little more accurate over the years but I admit I had to look quite hard to see the potential in this one. In the end only the main body was usable with the cab and the diecast driver being cut away. It was painted in something that resisted all efforts to remove it including dunking it in cellulose thinners overnight!
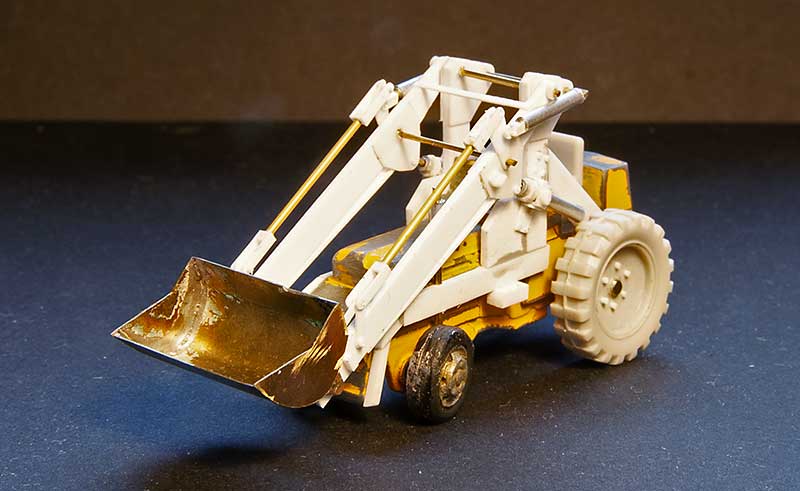 So out with the microstrip mainly. The driving wheels were from a JCB kit and the front wheels from my box of things that might be useful one day, Paragon models I think. The shovel was knocked up from bits of brass using photos as a guide.
  The finished result.
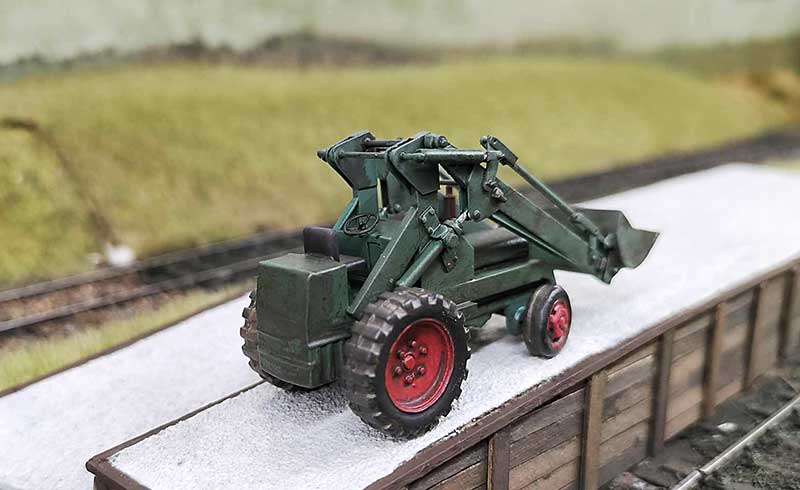 In its new home on Cades Green. It seemed quite popular with the Kids at the Uckfield Show this weekend.
A bit random this one.
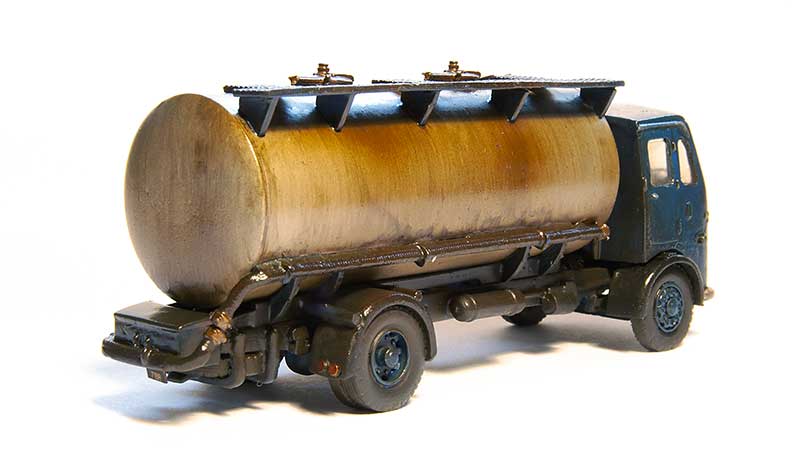
While the somewhat uninteresting work behind the scenes for taking Brettell Road out was going on I did distract myself from it with a few road vehicles to maintain a semblance of sanity.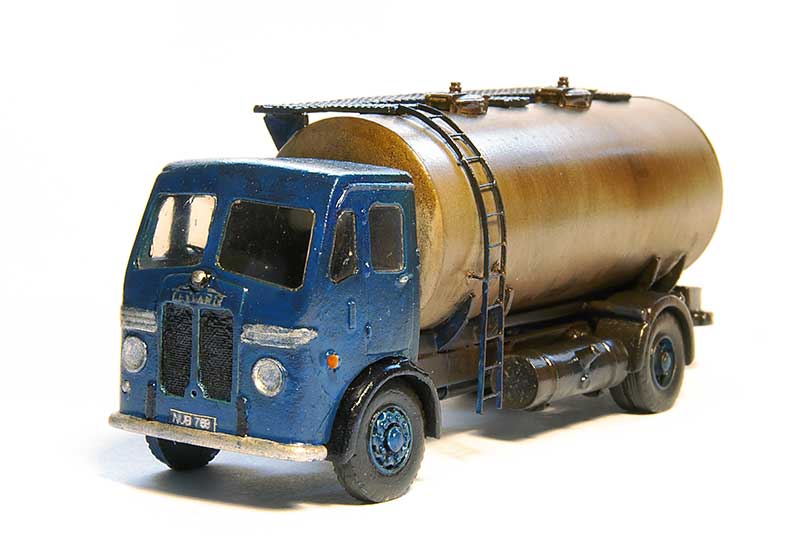 The Leyland Beaver milk tank I’ve featured before in an unfinished state. It had kind of stalled for a while but now I have finished it off. This is a Langley Models kit.
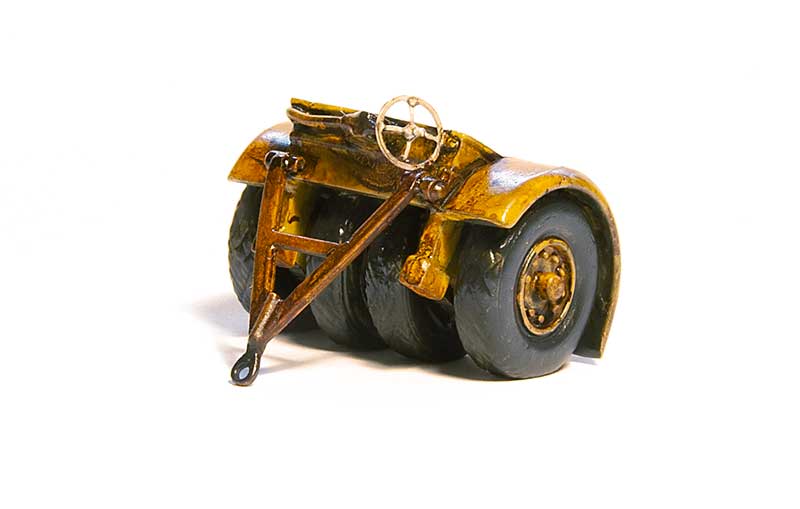 On the subject of Langley models I picked up this 4 wheel dolly from ebay for next to nothing. Thinking it looked like the sort of thing that could be found lying around at a steelworks, I though it would make a nice bit of background clutter.
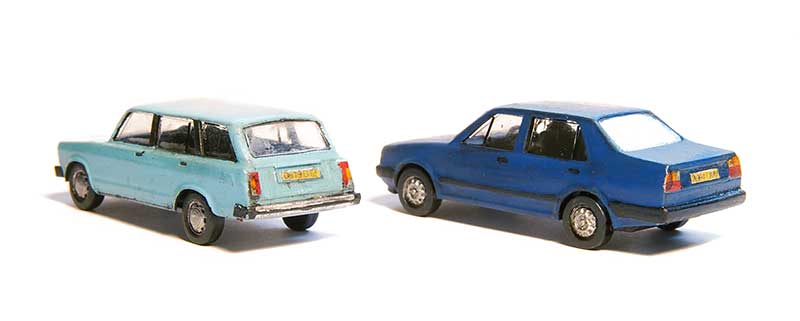
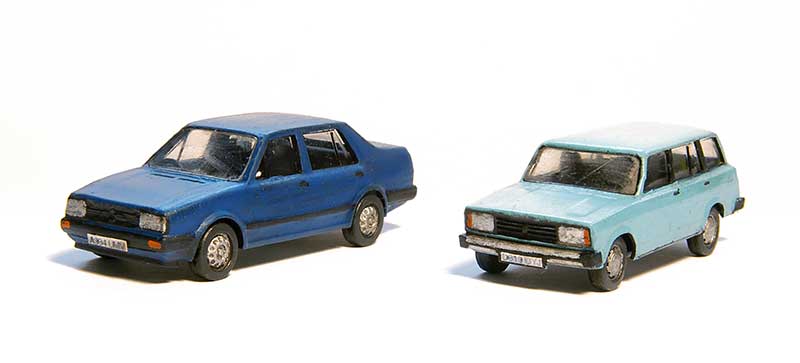 On to New Street – These 2 are 3d printed kits from CMAC Models. On the left a VW and on the right a Lada Riva Estate. Nice kits, I recommend them.
Ive recently managed to get myself involved in one of Iain Rice’s old layouts, Cades Green. The layout has been rescued by the Norfolk area group of the Scalefour society and turned from a home layout into an exhibit-able one. Its first show in its revised form was at Scaleforum back in September. One thing that stood out to me were the road vehicles, not only was there a bus on a bridge but they were tipped straight from a box! I guess Iain never managed to get round to them?
 Given that they were straight from a box, and Iain hadn’t done anything to them, there weren’t any real qualms in me taking them away to have a fiddle. Its not like I would be messing with Iains work after all. The above is an Oxford Diecast Commer van given the basic treatment of darkening the window frames and a bit of weathering. I changed the tyres as the originals went all sticky. Ive had this happen before and it seems completely random as to why it does. Any ideas?
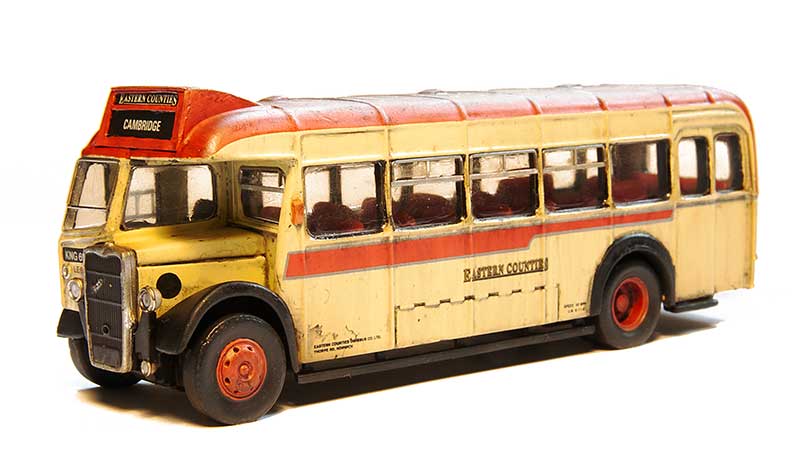
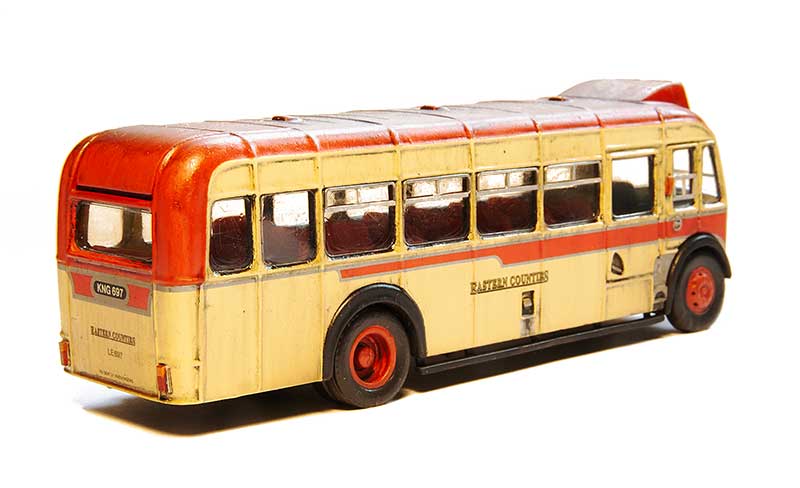
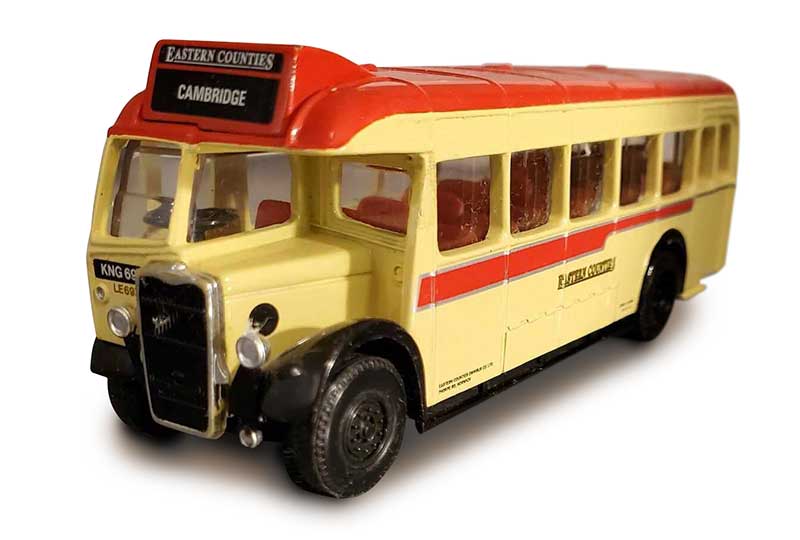 Next up the offending bus on a bridge – Original Omnibus Bristol L5. There was a bit more to do to this one. The glazing was just too far recessed for the black edge trick to work on its own, so that would all need to be redone. The wheels where a nice rendition of the type found on a Routemaster but not right for an L5 . There were no indicators or tail lights and the destination box was nothing more that printed on. Results are below.
Links
CMAC Models (Ive linked to their Ebay page as they seem to have more stuff on there than their website)
Epiloge to the last post
Just a couple of pictures of the 2 older vehicles in the last post making themselves at home on Brettell Road.

Bit of a mixed bag
Bit of a mixed bag this time, Ive been raiding the toy box again!
 Starting with the Commer BF. Available as an ancient Lesney toy it came in 2 types, a TV repair van and a food truck with open sides. The wheels were replaced with RTI ones and the central pillar in the windscreen filed down as far as I dared. I increased the width of the door window and added the bodyside detail from 10 thou microstrip.
 Next up the good old Corgi MAN cab. I fancied something a little different so I converted it to the longer cab version. It sits on an Oxford diecast chassis.
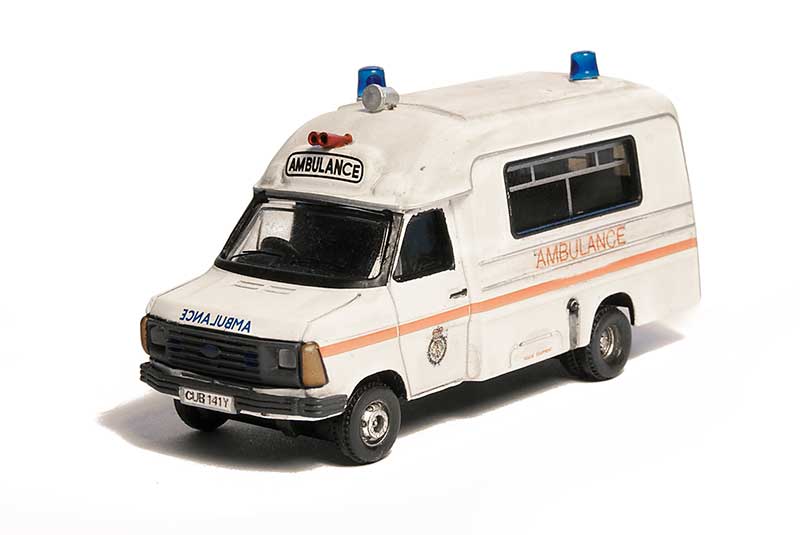 Remember the Tiny City police van I did? At the time I mentioned they also did a decent looking ambulance and this is it. I removed the Hong Kong markings. Painted the window frames black and the blue lights were given a coat of Tamiya clear blue (as supplied they were clear). I figured since I work for the ambulance service I probably should have one somewhere. Don’t worry I’m not planning any car crash cliché scenes!
 Finally the little Langley models Dodge tipper. As suggested I swapped the lights for some smaller ones (again RTI)
A few in progress lorry kits
With my first demo in a few years (my first exhibition in any form in a few years actually) coming up in a few weeks*, I thought it an idea to do a couple of in progress lorries as a change to all the finished stuff I usually drag along to this sort of thing.
Both are Langley kits and were chosen for absolutely no other reason than they popped up cheaply on ebay! OK they were a little interesting anyway and i thought the dumpy little Dodge 5 ton tipper truck was kinda cute. The Milk tanker is a Leyland Beaver and both hail from the end of the 40s so they would likely be pretty tired by the time they reach Brettell Road. The make do and mend attitude of the Black Country would mean they might soldier on for that long but the impending Motor Vehicles (Tests) Regulations of 1960 must mean their days are likely numbered!
*See the news page
Bugs and BTP
A few more vehicles for New Street, starting with…

The VW beetle (this is probably asking for trouble!) Both from Oxford Diecast. On the left I filed off the canvas roof and filled the back window to make an earlier oval window version. This is based on the actual car that a chap I used to work with owned but he did a load of modifications to it not long after he found it in a barn. On the right a ‘cal-look’ version. I ground of the bodyside trim and that on the bonnet off as well as filling in the holes for the bumpers. The front suspension has been lowered and on the back some wheels from a Cararama Porsche.
![]() Long time followers might be aware of my liking of the good old Mk2 Transit. My small fleet being a combination of ABS bonnets and Corgi bodies. However now theres Tiny City. A Hong Kong company that does MK2 transits ready to plonk. All of far eastern prototypes and mostly bus type bodies (they do a handy looking ambulance by the way). This one was stripped and re-liveried into British Transport Police livery. My liking of the mundane is pretty well obvious by now however the BTP offices were at New Street station in the 80s and there was always a police vehicle or 2 parked at the station.
Long time followers might be aware of my liking of the good old Mk2 Transit. My small fleet being a combination of ABS bonnets and Corgi bodies. However now theres Tiny City. A Hong Kong company that does MK2 transits ready to plonk. All of far eastern prototypes and mostly bus type bodies (they do a handy looking ambulance by the way). This one was stripped and re-liveried into British Transport Police livery. My liking of the mundane is pretty well obvious by now however the BTP offices were at New Street station in the 80s and there was always a police vehicle or 2 parked at the station.
A few more trailers
Been busy knocking up a few more trailers.

Starting with this offering from Knightwing. Although the cabs they supply are to a slightly larger scale the trailers, or at least this one, is pretty much spot on for 4mm scale. I changed if from a 3 axle type to 2 axles and fitted some spare Base toys wheels but that was pretty much it.

This 40ft flatbed is something I’ve had for a while. Its from RTI, brought when Frank was still with us. It’s a somewhat basic kit with just the bed, bogie and wheels supplied. The rest is knocked up from bits and bobs.
When I built my last batch of tractor units I printed enough registration plates for the trailers too. Do you think i can find them now?
Stobart bashing
Last time I ended with a selection of Eddie Stobart vehicles that looked somewhat nervous, not without good reason.

The simple (or should I say least mauled) option from these is shown on the right. Basically a simple repaint with a new headboard (is that what they are called?) of the DAF 2800 tractor. On the right the same cab mated with the chassis of the much out of period volvo unit. The fuel tank and other chassis details were cut off and transferred over as well.

The left over chassis was mated with an old KeilKraft (now Knightwing) Mercedes cab. Like the Volvo mentioned in an earlier post it was reduced in width by about 3mm.

Finally the tipper truck (the same base model that I have cut about previously) was mated with the Daf 2200 cab and chassis to produce yet another variation. I shortned the body on this one as well but not by as much as my AEC blue one.
In all the vehicles that have logos these were drawn up in Illustrator and printed on Crafty computer decal paper.
My Leyland and post post.
With apologies to those coming here to see trains road vehicles are still drawing my attention. This time let’s start with some Leyland products.

The Leyland roadrunner (1984 version). A combination of cab and wheels from Road transport images, chassis from the Atlas stobart ford cargo and a body from scratch.

Next up a terrier in post office colours. Although a 70s design these seemed to last quite late. Again RTI cab and wheels, base toys this time for the chassis and the body from scratch.

The tail lift is an approximation from a photo I found years ago and kept in my ‘that might be handy one day’ folder.

Sticking with the post office. I did this Roadtrain cab years ago and never got around to the trailer. the source is the Atlas curtain sided one I used last time for my Link51 lorry. This time with the sides replaced and modification to the leading end. It was a faff to cut the old sides away so I would just scratchbuild the box next time…

… which is what i did for this smaller version. Again the tractor unit was finished off years ago although I have recently replaced the wheels with RTI ones.

Overall I have put together quite a fleet of Royal Mail vehicles now.
Next time…

More Atlas Stobart vehicles are lined up for the chop at Jim’s Dodgy Car and lorry dealership. ‘lovely little runners, one careful owner, service history? Yeah I’ll just write one up for you!!’
A few old and a few new

Lets start with the humble Austin Maxi. A recent-ish release from Oxford Diecast. My first impression was ‘they have used their oversized tyres again but on looking at the real thing I think what threw this one off was the track was too wide with the wheels filling the arches much like a more modern vehicle. So with the track was slight reduced, inner window frames picked out in black. matt varnish and weathering I can call this one done.

Added a bit of a load to one of my smaller trucks. The wheelbarrow is a nice 3d print from 3D Printing Corner. click here

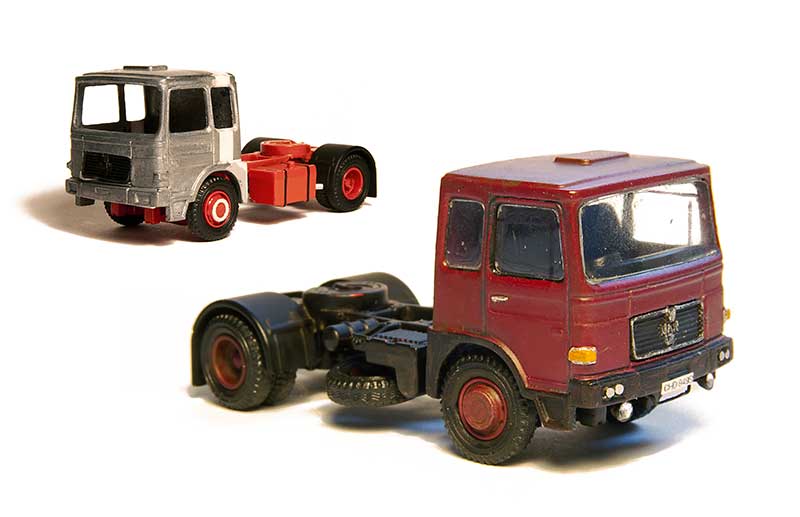
One of my early kit builds that has never been quite right is this Volvo from a Knightwing kit. Its always looked out of proportion to me so I have had another look at it.

I binned the chassis and used a spare from one of the cheap Atlas Stobart models you can find on ebay. for the cab itself I cut about 2mm out of the width. I am happier with it now.

Back to the new. The trailer that came with the chassis used on the Volvo was stripped and resprayed. I used a different tractor chassis and a cur down Base toys roadtrain cab. The windbreak is also a spare from an Atlas ford cargo.
I came across this livery wile looking at old shots of Brierley Hill for Brettell Road. I thought it nice to tie the 2 layouts together a little. The logos were drawn up in illustrator and printed on crafty transfer paper.
A couple of AEC products.
A very brief history
AEC (or Associated Equipment Company) was a fairly early producer of vehicles being founded in 1912 and lasting up until 1979. Initially focusing on buses their first prototype commercial vehicle was based on a bus chassis but with the outbreak of the first world war they were ideally placed to produce lorries for the army. After the war lorry production continued right up until the companies last days.
In world war 2 they produced something like 10,000 vehicles for the war effort and readers familiar with Airfix kits have likely come across the Matador model at some point. the company acquired a fair few other companies during its time with Crossley Motors, Park Royal and Thornycroft being just a few of them. They were taken over themselves in 1962 by Leyland Motors.
Leyland fitted their own ‘Ergomatic’ cabs to the AEC line of lorries but they retained the AEC branding. So Ercomatic is a type rather than a model covering Madator, Matador, Mercury etc (the lorry models always began with the letter M).
The Models

So the victims both picked up cheaply from ebay. On the left Atlas editions and on the right from EFE. Both are similar in a way. Both have nicely done cabs with rather rudimentary bodies and slightly odd looking wheels. The proportions of the Stobart example look a little odd as well.

Having looked at pictures of the real things I decided to shorten the chassis and tipper body. The ribs were beefed up a little and a new hood fabricated from plasticard. The hydraulic ram came from my spares box.

The livery was stripped form the cab (as its all metal nail varnish remover is ideal for this and the wheels replaced with some from RTI. Below shows the model after painting and weathering.


The body on the Mammoth was metal and to be honest im not sure what its supposed to represent. I think its some sort of pressed steel effort but I binned it and made up a new body to represent a planked body instead. The strapping is from the mainly trains etch.

I decided to keep the livery on the cab this time and just gently sanded the sign writing off. Wheels again are from RTI. The usual matt varnish and light weathering finish it off.


A simple little project


A few more road vehicles – Back to the defender.
Of the 3 cars i did last time the Land Rover defender was the easiest. That’s before I encountered the phenomenon of the Land Rover enthusiast. At least as bad as the VW enthusiasts and enough to give the most ardent P4 modeller a run for their money I was (in a very polite way and from several sources) informed that it was wrong as in a too late version.

Friend and fellow Calcutta Sidings operator Brendan supplied the above image of (one of) his. Turns out the Oxford one is a ford engined one and you can tell by the different bonnet shape (not sure why i didnt notice this). These were introduced in 2007. Also Brendan’s didn’t have a sunroof and the roof ribs were different.

So the bonnet ‘hump’ was ground down and the new raised bits added from 5 thou plasticard. The sunroof was filed and new ribs added from microstrip. The wheels came from a RAC version again from Oxford Diecast.
A few more road vehicles.

Been tweaking a few more road vehicles starting with fitting better wheels (from RTI) to a couple of old cargos. The WH Smiths lorry seems to draw a lot of attention at shows and for many people sets a time and place quite specifically.

Next up another little batch from Oxford diecast waiting form my usual treatment…

… which is to paint the inside of the window apertures and wheel arches black and a quick spray of matt varnish before some gentle weathering. I might see if i can get some more standard looking wheels for the Land Rover.

The Volvo (760) required a bit more effort as out of the box (on the right) it did not capture the look of the real thing very well at all. The solution was to file the windows so that they are much deeper. I enlarged the windows of the Rover 3500 too but not by anything like as much. Wing mirrors are just a bit of microstrip.
More vehicles
In the absence of Scalefour North I have finished off a few vehicles that have been lurking near my workbench for a while now.


Starting with a couple for New Street. A Ford Fiesta and Range Rover from Oxford Diecast. These follow my now standard approach of blacking in the window frames and wheel arches before a coat of matt varnish and some subtle weathering. On the fiesta i turned the wheels down a little and binned the little plug in numberplate as it stuck out to far. For the Range Rover its worth chopping off the mounts for the screws that hold it into the box.

Moving on to Brettell Road. On the left a BMC FG lorry. This is a combination of 2 FG lorries from different manufacturers. The body and chassis come from a Chinese company called Best Choose. Initially these look a lot more detailed than the base toys version but there’s something not quite right about the proportion of the cab so I replaced it with a detailed Base toys one instead.Wheels are from RTI and i don’t fancy doing the glazing again any time soon.
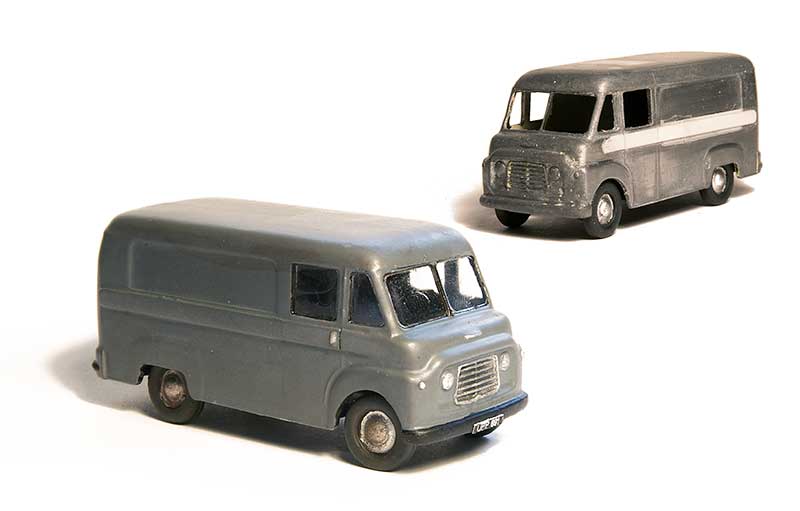
The van is a ford 300E from the Classix range.

Finally a Fordson tractor (Oxford Diecast) modified with a front loader from the Dapol JCB kit. Quite a neat little project this one.
End of the year – end of a sub project
With 2017 drawing to a close I have also (nearly) finished off the road vehicles I will need for Brettell Road. Despite having 5 bridges over the railway I’ve resisted the urge to do any buses to put on them and I also haven’t done any cars either. Above is the latest and last batch.
 Starting with some kits. On the left a resin Ford Thames 400E from Road Transport Images and on the right a white metal ex military Austin 3 ton dropside from MMS. Unfortunately MMS have now closed so this kit is no longer available.
 I found this part built Langley models kit on eBay for next to no money. Its a 45cD tractor unit from the very late 30’s and once disassembling the more sketchily assembled bits I decided that it once belonged to one of the business owners. Some sort of engine fire meant it got dumped but with the intention to restore it to its former glory. However it ended up forgotten and is now rotting away. The tarp is from a black latex glove and I attacked the inside of the front mud guard with a burr in a minidrill to depict the rust working its way through. The rear mud guard is hanging on for dear life as well and some parts have now long gone.
  Finally a Leyland Steer from a combination of base toys bits. I find these lorries quite intriguing with their (to my mind) odd wheel arrangement. The base toys Steer has a different cab to this so I swapped it from an ‘8 legger’ box van. If you look at the inset picture you can see that I’ve widened the wheel arches and reprofiled the front windows to get something looking more like the pictures I found of the real vehicles. I could have done more with the chassis but where its going you wont see it. Wheels are from Road transport images.
Some more road vehicles
 Oxford diecast continue to act as lifesavers in the world of road vehicles for more recent layouts. Yes, they do tend to go for the more exotic (or chavvy) versions but when it’s that or nothing we can’t really complain a great deal. Hence the Vauxhall Astra – supplied as the Mk2 GTE but still very handy for New Street, the Mk2 being first introduced in 1984. The middle one shows the quite nice casting once you strip the caked on white paint off! I know I have gone on about this before but the super thick paint really does the toolmakers no favours. White seems to be the worst culprit. On the right a more standard version achieved by cutting the spoiler off, filling the vents on the bonnet and tweaking the radiator a smidge. All finished in a fetching shade of mud brown (why did people buy this colour?)
 Also from Vauxhall the Cavalier, also a Mk2 but i think this is the post 1985 face lifted version. I’ve picked out the grill in black and outlined the window frames. Some light weathering and a blast of matt varnish as is my standard approach with all vehicles. I also removed the rather naff looking sunroof which was literally just a printed on silver panel. It seemed to withstand efforts with thinners and IPA so I sanded it off in the end.
Similar treatment for the Volvo which would be a fair bit older on New Street. A Volvo 300 series would be a nice addition to the range if Oxford are listening!!
Finally an EFE Bedford TK which cropped up really cheaply on Ebay. I brought it just because it was orange as much as any better reason, being in GM buses livery. The livery elements on this one responding well to IPA. I’ve just fitted new wheels from RTI and weathered it with a mixture of enamels and gouache.
moving stuff around
I want to depict some sort of activity within the current building or at least evidence of it either about to occur or that it’s just occurred (luckily the vans will block the view when the place is the most active) . So I need some way for my mini workers to move stuff around.

These barrows and sack trucks are from Scalelink and depict items of Midland origin. I thickened up the wheels on some using old handwheels from various etches as a single etch didn’t seem thick enough. On the larger sack trucks I couldn’t figure out how the mount for the wheels was supposed to fit, you can see my best guess on the one lying down. On the others I just mounted the axles on plasticard blocks as mounting them on blocks seemed to be more in keeping with a picture of something similar in LMS miscellany bu H. N. Twells. the wheels on the last barrow were supplied as a flat etch so I used some of Colin Craigs handwheels instead as they had a better look. I think the rear wheels are actually too far forward now its built mind you.
Incidentally the brown used for these is from Halfords range of camouflage spray paints and would make quite a good basis for general track colour if you are looking for something for this.
 A spot of research showed fork lift trucks to be a lot older than I thought they were so I figured that the owners of the building had got hold of one to move stuff around. My idea is that the building was originally a factory of some sort but now being used as a warehouse so a make do approach seems more sensible than everything being designed for a purpose. Anyway this is a JPG Models kit backdated to look like a generic earlier forklift. I ditched the safety cage and added a grill on the side and some vents on the back as it seemed that the earlier fork lifts tended to be more like this.
Sherpas ticked off
 My 4 Sherpas are now done. Aside from the Royal Mail one the transfers were all drawn up in Illustrator and printed on crafty computer paper. I decided that the paragon models wheels that I used for the minibus were too big so swapped them for the wheels from and Oxford beaver tail transit. As supplied they were no smaller but by changing the types for some from their mk3 escort they look much better. Its worth doing this even if you are keeping them under the transit to my mind. On the subject of tyres I tend to paint them Humbrol 67 grey rather than black. You only really see black tyres in car showrooms or at car shows.
The Sherpa can take it!
 Long time followers of my efforts might recall a batch of 4 Sherpa vans I did from the kingfisher Miniatures kit. I said at the time that I wanted to do more and after a long wait the kit is back in stock so a second batch has been started.
Sherpa’s were a common sight in my childhood as they were produced locally at Washwood Heath. While my travels didn’t take me over there often I tended to see rows of brand new ones parked up between Tysley and Small Heath waiting for shipment by rail. Public bodies were urged to buy British and BR, the Post Office, BT and schools used them extensively over the (better) Ford Transit. The suggestion was that Ford couldn’t make Transits fast enough to meet demand anyway!
Unlike the last batch which was relatively simple (the conversion of 2 to sliding door variants was about as adventurous as I got) this batch is a bit more involved. On the left a BT version with swappable body/ The body being a simple plasticard box. Second along what will become a minibus in the livery of my secondary school. This is a bit of a best guess as I cant find a picture of one. We definitely had them and I am pretty sure they were long wheelbase ones. The back of the BT one was used to stretch the body but minibuses were wider than vans so the whole model was cut in half (2 cuts down the bonnet on the panel lines and spread with microstrip before gluing back together.The wheels are from Paragon models.
Third along is how the kit was intended, this one is destined for British Gas livery. Lastly another port office one, this time long wheelbase and high roof. I remember PO vans being slung round the streets of the midlands with the driver’s door wide open. Careful consideration of where you cut the van bodies mean you can get 2 long wheelbase vans from a single spare shell.
This is the basic surgery stage. The detailing stage starts next.
One of those finished things posts.
The advantages of working on more than one project at once is that, firstly, I don’t get bored and secondly every so often you seem to finish a lot of things together. This is one of those instances with several things that have featured recently have reached the finish line sort of together.
 My loading gauge has been painted for a while but now its been planted too. I love stuff like this as its one of those things that I hope disappears into the scene and becomes unremarkable. Perhaps once in a blue moon someone will notice it but, much like the real thing I like stuff like this just to be ‘there’. It’s not supposed to get people’s attention. (don’t worry about the big gap under the wall – that’s not been permanently attached yet)
 My Ford Thames and Austin A40. The colours of the Austin have a somewhat obvious Birmingham influence. Cartwrights was a furniture store in Brierley Hill but I have no idea if they used Austin vans or even if they had any road vehicles at all.
  This was a quick win project – Started life as a Bachmann Coke wagon which I imagined was sold to Round Oak and had the coke rails removed. I just liked it because it had a local livery and i’ve never done a distressed private owner before. The lettering was attacked with one of those brass brush wheels in a mini-drill and then the wagon was weathered. The w-irons needed a but more work with the mini-drill and a burr to get the wheels in but this was really minimal effort modelling!
  And so to the big project of the last few weeks – the DE2 shunter. I have to admit I didn’t relish the thought of painting its striped livery but by using some 4mm making tape from a company called Jammy Dog it wasn’t too bad at all. (click here for their website) A few more pictures below.

 This is the sort of train I had in mind for the loco – Pushed up the hill with the loco at the rear and no brake van. I will need to add a shunter to the front wagon at some point.
 Finally another moody shot of the Jinty heading out of the yard on a train of vans.
Abandoned warehouse, nearly there!
 My abandoned warehouse is nearly there now. A spot of paint, Brassmasters windows and roof tiles kindly supplied by Mr Horn. These images show it roughly positioned. You can see a glimpse of the canal which I have also decided to depict as derelict and ill come back to that in a future post.
 Unusually for me the more interesting side is actually the side that people will see! The yard has been suitably strewn with waste from plastic strip and Scalelink bits. The 2 tanks are from Unit models.
