Heavyweights done
Just a super short post this time. The wagons featured last time are done and can be released into the wild.
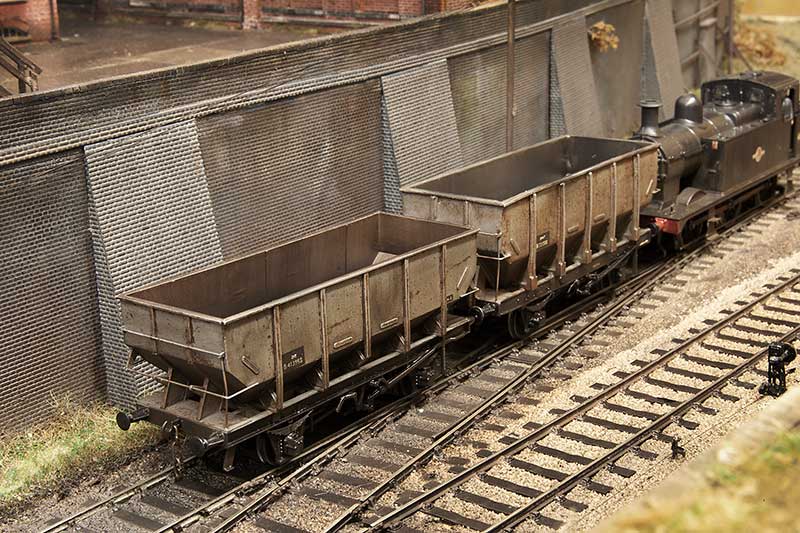
Is it just me or do metal kits always just seem a bit ‘meh’ once they are painted?
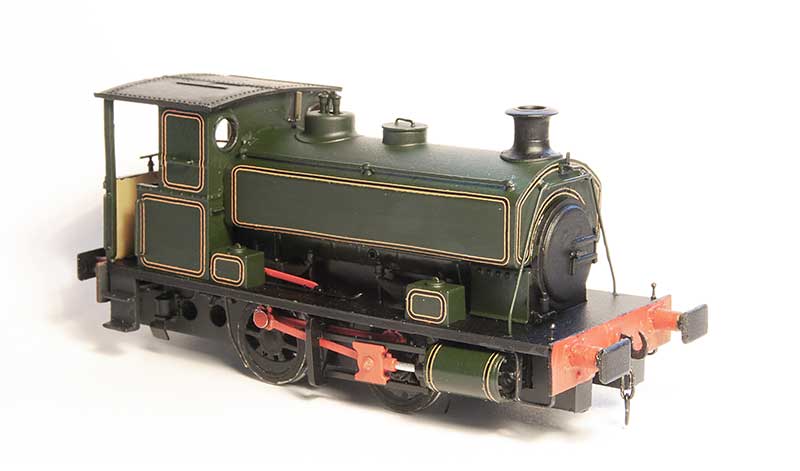
An unremarkable little tank engine – Part 2
Thoughts turn to the remaining detailing on the body of my 57xx tank. I like to take pictures pre paint for prosperity before it all disappears under plain black and grime and no one really notices what you’ve done anymore!
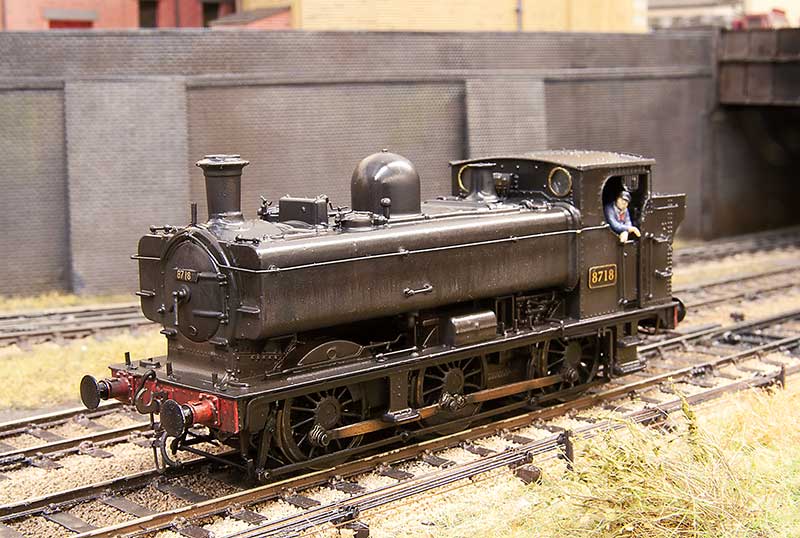
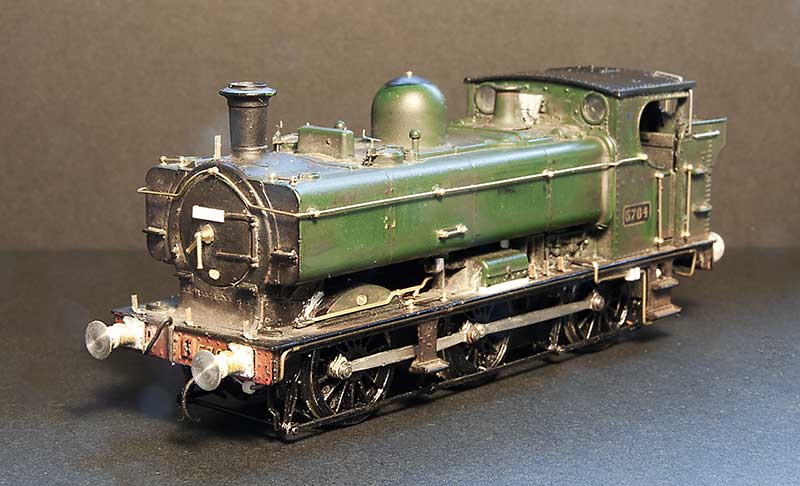 Front 3 quarter view. You will notice that the buffers are different. Due to a timely new casting arriving from Lanarkshire models. Lamp irons are from Masokits and the sanding levers from RT models.
  The footplate pipework has been replaced with wire The Whistle shield is from Modelu reinforced with a bit of wire. The tool box seemed a little ‘floaty’ as mainline had modelled it so I filled in the gap and re-scribed a finer one.
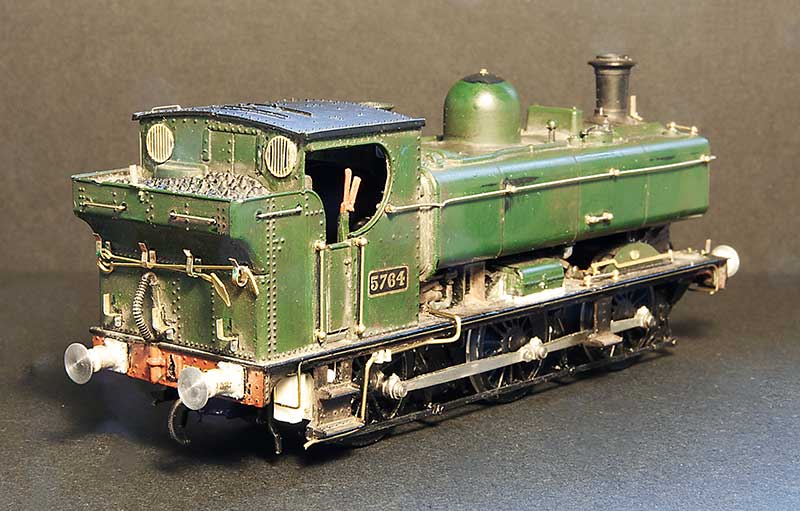 Rear view. The fire irons are from Springside Models and the rear windows from Mainly Trains (now Wizard models). I’ve thinned down the cab sides
 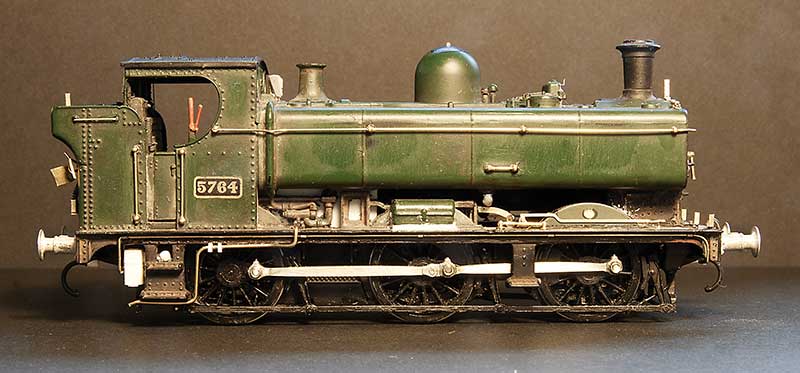 I tried to do the water balancing pipe as one piece secured by magnets but as its all a little bit small the magnets weren’t really strong enough. I had fears of it falling off and causing havoc with the inside motion so I had to settle for it being in 3 parts instead. Not sure what the little box is behind the rear footstep not all locos had them. I think it might be related to the AWS gear.
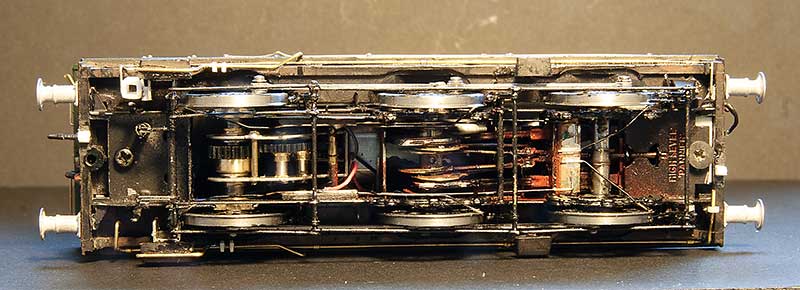
Underside view – you can just make out the way the pickups are arranged.
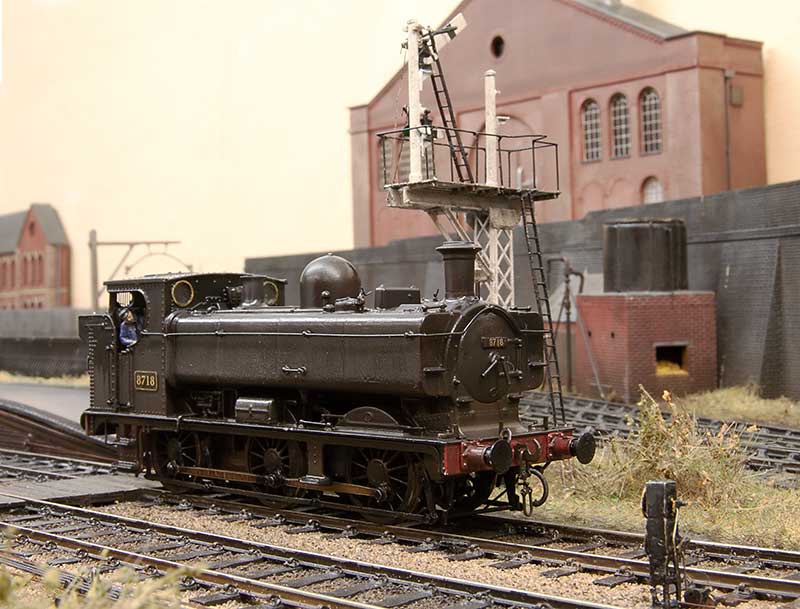
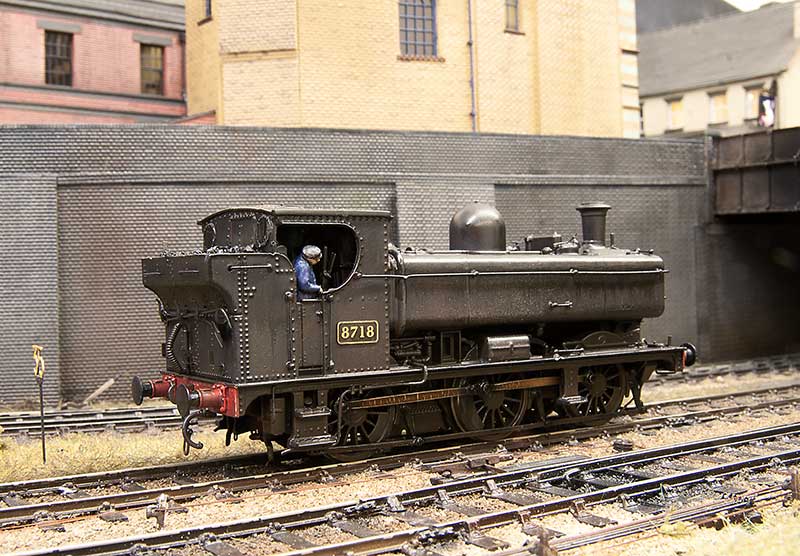
My intended victim for this model was 8718 which in Brettell Lane era was a Kidderminster Loco. It later went to Stourbridge where it lost its number plates and gained painted on numbers in a reasonable attempt at the GWR font. I preferred the proper number plate. Searching for pictures I couldn’t make out a BR logo on the tank sides. A request to the GWR modellers and British Railways Steam era 1948 to 1968 facebook groups didn’t yield any answers either so reverting to my ‘model what you see, not what you think you know’ approach I left the logo off.
Below a few images of the finished loco. The crew are the customary Modelu products.
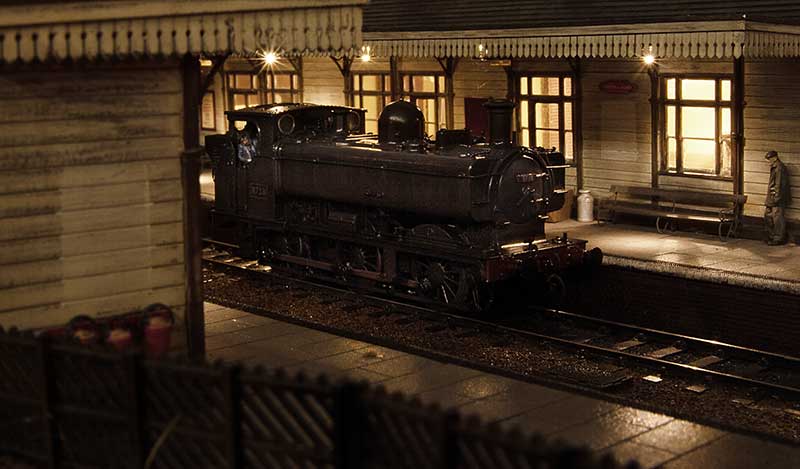
So there you have it – An unremarkable little tank engine.
Funny little Alien
For all of my lifetime, certainly my time aware of railways, mainline diesel locomotives have been powered by a diesel engine driving electric traction motors. However the Western region was never really one to follow what everyone else was doing and invested heavily in Diesel hydraulics. Of those the largest class and the only one to fit into the type 3 category were the Hymeks of which I missed out on. When I was born there were half a dozen still in service and they were withdrawn before I had transitioned from a 4 legged human to a 2 legged one. So they are all a bit alien really.
Apart from the transmission (and the idea of a mainline loco with gear changes) there were other things that were a bit odd. Why wasn’t the radiator fan housing central? Why didn’t they use no.1 and no.2 ends, Instead of having A and B and why was the radiator at the back not the front like everything else? Despite all the weirdness they were attractive little locos though so when a Heljan one popped up cheaply on Ebay (described as having intermittent running) I put in a cheeky bit and as no one else did, a Hydraulic is coming to Brettell Road. 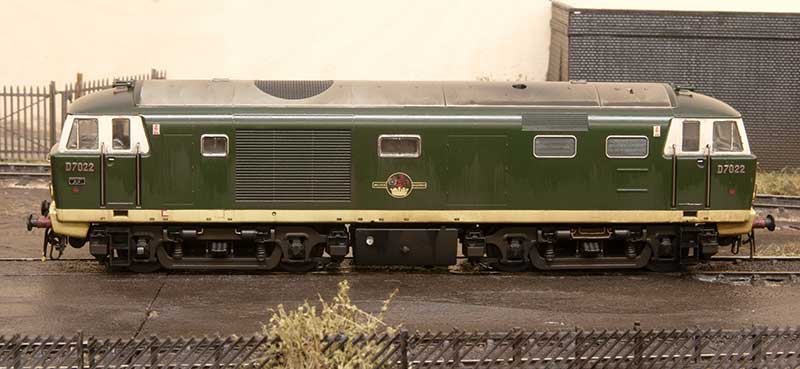 Not having any 00 track I didn’t investigate the reported running problems but the Heljan wheels were filthy and having swapped them out for some Alan Gibson ones no running issues were encountered. This model is one of Heljan’s early efforts and in terms of getting the shape right still one of their best. However there are a few tweaks that can be done. The roof horns were broken so they were replaced with Markits brass ones. The buffers were a bit naff so those were replaced with Lanarkshire Models ones. The numbers and builders plates are from Shawplan/Extreme etches. The rest is really down to working with what Heljan give you. The bodyside windows are flush glazed but not flush enough so they were cut out and remounted. The cab side and door windows are fine but I did add the droplight strips from 10×10 microstrip.
Not much to do on the chassis really – I added the mileometer on the leading axle of the B end (left) and I thought the pipework on the bogie frame at the A end was a little too fine so replaced it with wire.
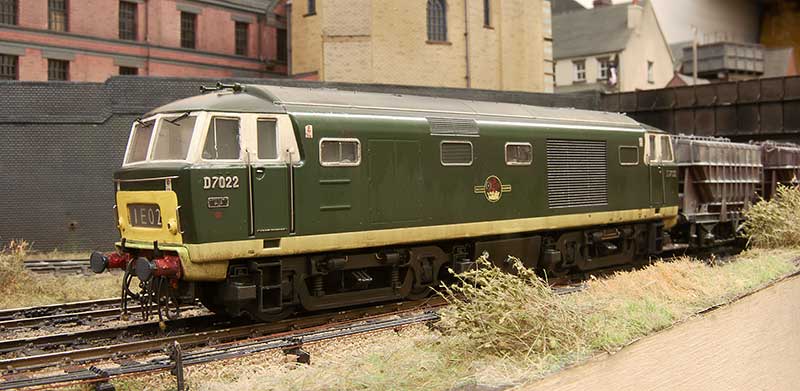 This is the A end from the other side. As I was doing an early batch loco I carefully cut off the headboard clips and touched in the yellow. The windscreens were also not flush enough but it was easier to just replace them with clear plastic cut to shape. Oddly the glazing on the headcode box (yes i know the headcode is wrong for the train) was too flush so this was replaced as well. Windscreen wipers are again from Shawplan and the brake pipes are from Hornby (the loco wasn’t supplied with any). I also remounted the tank under the bufferbeam and added a little pipework. To avoid confusion when it comes to DCC I’ve followed the diesel electric convention and set the fan end as forward.
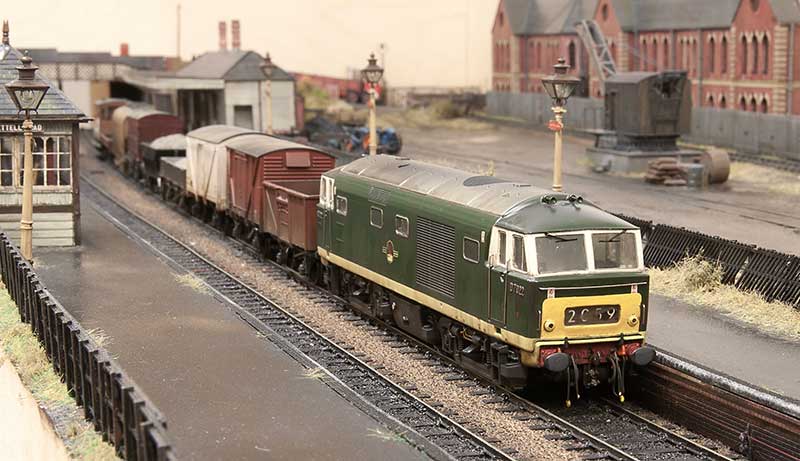 The model is weathered to look new but not 10 yards from the factory new. Im aiming for a few months and bear in mind the layout is set in autumn. There seems to be a tendency among modelers to weather Hydraulic locos to look an absolute state and most of them did end up that way in real life. So basically washes that I’ve pretty much cleaned off again as best I can before light dustings of track colour and roof dirt. This was followed with streaks from AK interactive spilt fuel and grease before finally the obligatory rain effect. Diesel locos tend to have characteristic weathering which is unique to each class (something which a lot of professionally weathered locos you see seem utterly devoid of). Class 24 to 27 have the water stain from the roof, just inboard of the fan. Class 50s have 3 leaks that run down the fuel tanks, class 20s have an odd direction for the staining deposits from the exhaust and class 31s have the oil leaks through the bodyside at floor level. Hymeks have this too but not as much and from my research only later in their (short) lives. They do however have a distinctive leak on the fuel tanks and this seemed to have been from new.
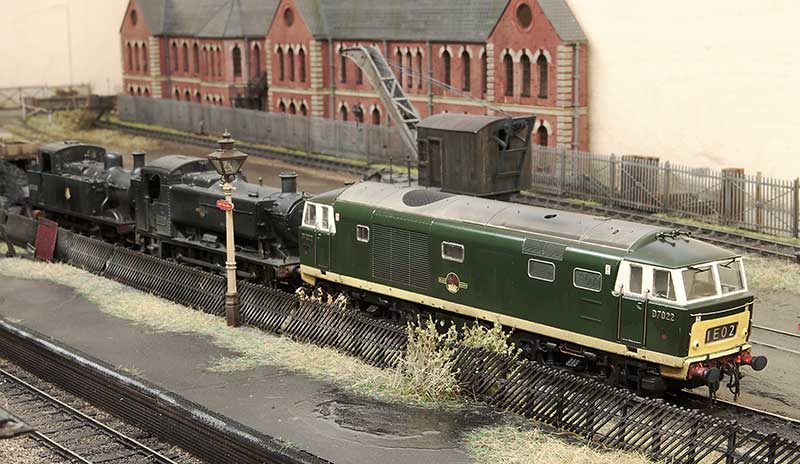 Any reason for D7022? Ive always had an affinity for the Lickey incline and these 3 locos were all regulars on banking duties over the years. The Hymeks went there much later than Brettell Road is set and were the second class of diesel to work the incline. The first being English Electric type 3s (class 37). A lot of Hymeks worked the Lickey but the initial ones were D7021-D7025. In his book, A life on the Lickey, Pat Wallace talks about them and mentioned that early on they preferred to have the A end facing north (up the gradient). If a loco turned up the wrong way round it was sent to Worcester to be turned on the triangle. He doesn’t give any detail on why this was the case but you could lock out first gear in a Hymek and the equipment cabinet for this was in the A end. The locos definitely had first gear locked out while on this duty. This was because the change from first to second gear was right in the range where trains were banked and they could snatch. The Hymeks having only one engine were a little worse for this than the Warships and Westerns.
One little anecdote Pat also mentions concerns the 17th January 1968 when a kitten was discovered in the engine room of D7025. He was adopted and named Hymek (of course). He crops up again 10 days later when he had managed to hide himself in the bogie of D7022 and refused to come out. It was reported that Hymek the kitten did 4 trips up the Lickey!
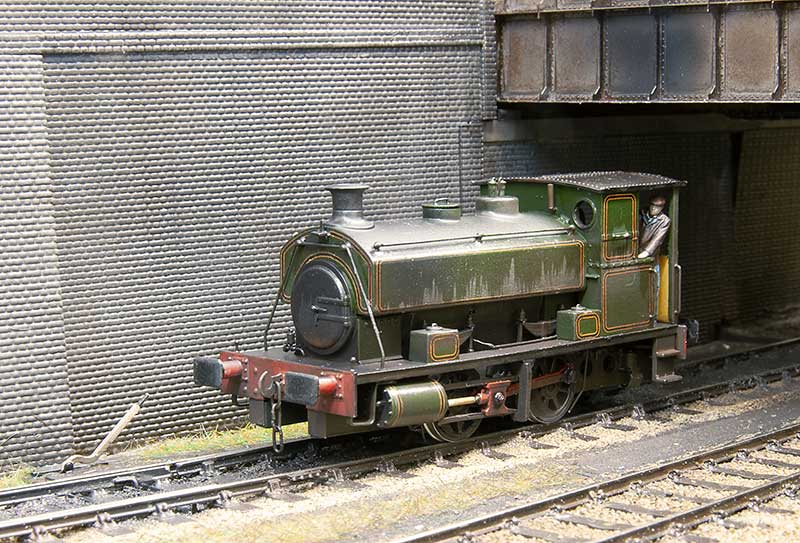
Hattons Barclay Tank Part 2
One change since the last post on this little tank is I’ve replaced the tantalum capacitors with a Lais stay alive unit on the recommendation of Nigel Cliffe. With this little motor I’ve now got about 4-5 seconds of off the juice running which is a big improvement.
 The model has been finished and lined with Fox transfers lining. I just need the number plate and name which is on order with Narrow Planet. I decided to take a quick shot of it for prosperity before i covered it all in goo!
 And post goo!
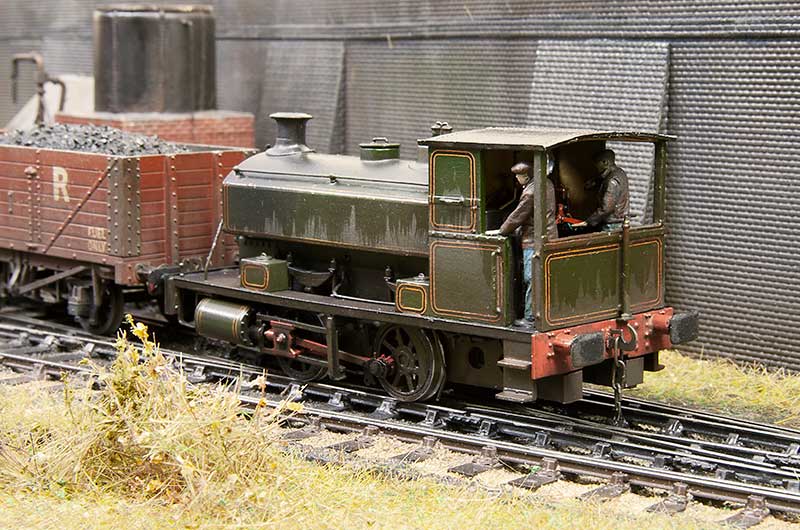 The crew are, the almost customary now, Modelu Figures
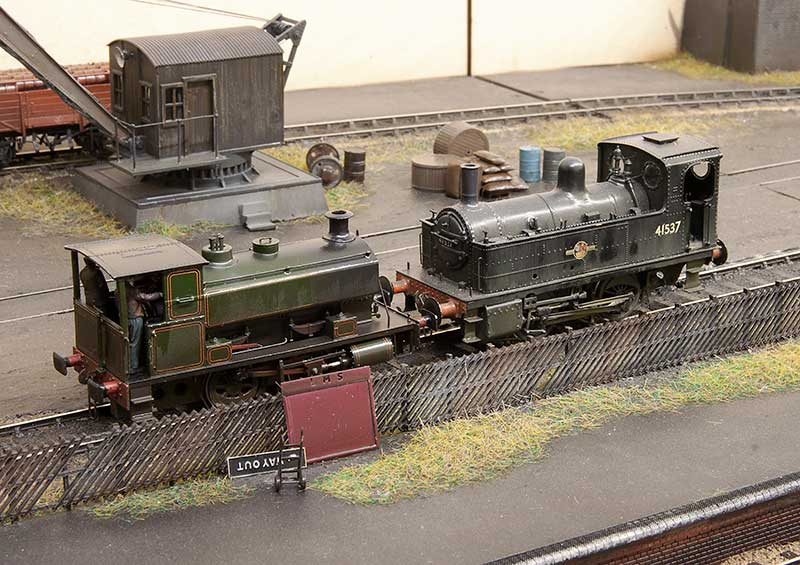 I used to think my Deeley was tiny!
Here comes the PR!
A while ago I showed a picture of a Powsides ED 7 plank wagon. ED stands for Earl of Dudley and I said at the time that it was a bit early for the layout and that that PR, Pensnett Railway would be more appropriate. A chance discussion on an industrial railway modellers Facebook group revealed that Planet Industrials actually do a set of transfers for PR wagons so a set was duly ordered.  A couple of existing wagons were repainted into red oxide (the ‘shunters truck’ and a grey 7 plank RCH design) and a couple more RCH wagons were knocked up from good old Parkside kits. I decided to keep the Powsides ED one as it was (although weathered a bit more to make it look more tatty) and do the shunters truck as ED too in a sort of crossover period. Ive never found a photo of ED and PR wagons mixed together mind you.
The above train is all very ‘corporate’ and it wont appear at shows like this. The PR wagons will be jumbled up among other mineral wagons. One thought I have had though is by making Brettell Road 2 tracks the industrials will look too out of place on the mainline so the plan is to extend the siding the train is on to the fiddleyard and have them appear from behind the warehouse, using the yard as a exchange sidings.
 I was intrigued by the recent Oxford rail tank wagons and decided the yellow Carless Petrol version would break up the sea of grey and bauxite wagons on the layout. As with the ED wagons its really a bit to early for Brettell Road so I’ve weathered it up to look pretty tired. Theres a few things worth noting with this model. The first is the axle length is odd. Happily its still 2mm and its not odd in a crazy short, Lima way so you can swap P4 wheels onto it and use the original axles. The second thing is that the lettering and the red stripe don’t react well to white spirit. If you want to remove them then great but if you use enamel washes thinned with white spirit for any of your weathering, as I do, and you want to preserve the livery its best to give it a quick coat of matt varnish first.

RTR wagons
I’ve been looking at a few RTR Wagons recently from Bachmann.

Slope sided mineral. I really like the chassis design on this one as the brake gear is separate and for P4 can be moved out to line up with the wheels with just a little bit of trimming. As well as my usual gouache approach for rust I’ve also tried out some weathering pencils from AK interactive. I won’t go into any detail on those as yet as I’m still getting to grips with them.

Bachmann’s presflo’s are a lovely little model with just a change of wheels, couplings and buffers required. The buffers on these were very odd and I’m not really sure what they were supposed to be so I have used Accurascale ones in their place. I’ve also added more weight as they hardly weighed anything as supplied.
Im not a huge fan of textures in weathering as I believe they often look too heavy in 4mm scale but on these wagons the dry concrete could often look really caked on so i used talc in wet paint as part of the process.
Return of the rain
Up until now I have been using various gloss varnishes to attempt to make Brettell Road look wet. The results have been somewhat mixed especially on the ground itself. So I’ve given a few AK interactive products a try, still water and wet effect. Here are a few pictures of the results so far (Yes it is dry)


The Still water is a self levelling resin and it’s quite thick. The wet effects is an enamel. What you see in the pictures is a mixture of both products.
Dapol GWR Railcar, finished off
I can draw a line under my Dapol GWR railcar project as its now weathered and finished. The new numbers came from Steve at Railtec transfers (click here). Here are some pictures of the end result.


Weathering track – some thoughts
One topic that seems to come up fairly regularly on forums and Facebook groups is weathering track. I thought I’d do a mini article on my thoughts and how I approach this subject. As always other methods apply.
The prototype
As with any modelling activity you need to look at the real thing if you want to copy it. You don’t necessarily need to understand it and the advice model what you see, not what you think you know applies. If you are modelling a real place then the jobs pretty much done for you but it pays to look at references as close as you can to the timescale you are modelling.  Even when track is brand new it actually isn’t. this was taken a few days after they relayed the eastern end of new street. Note the use of wooden sleepers, not all brand new track uses concrete or steel sleepers. The rails are very rusty and there’s already evidence of the trains using it. The visible colours of he pandrol clips wont last long.
  Some plain flat bottomed track that to any modeller would be considered clean. things to note are the welds where it was joined, the rail colour has spread to the sleepers in places and some of the ballast is on top of the sleepers. I’ve found when it come to track being really neat isn’t always he best thing. Its subtle but look at how the 2 rails are not the same colour. The inside face seems dustier than the outside.
  The weather changes things – the rails look very dark because they are wet. The wetness seems to mask some of the subtleties seen in the previous picture.
  Around points things have to move and as such they are greased. Note how the grease from the rod passing under the rail has manages to creep onto the web of the rail above it? The rail dust is visible around the baseplates and the third rail is a completely different colour to the running rails.
  I include this picture because it illustrates an important point. 2 tracks can be side by side and look different. There are many reasons for this. The tracks might be different ages. The trains might be doing something different depending on the direction they are going. If they are braking then there will be more brake dust. The trains themselves might be different too, loaded freight trains that carry loose material do tend to drop things and push dust along with them. If your line had a heavy use of a particular type of train then the material itself can affect the look of the track and distort its colouring. Also track weathering is directional. As the trains move along they tend to push any dust or debris along with them. As we run on the left in the UK the left hand line will tend to look the dirtier of the two when looking away from you. You can see this effect here and it pays to weather your track in the direction the trains are moving for best effect.
Modelling it.
If I am using wooden sleepers then I tend to lay the track first then give it a base coat of a mucky brown colour. I use JLTRT track colour but I’m not sure if you can still get it. Halfords do a decent matt brown in their range of camouflage spray paints which is good as well. You don’t need to be too precious as it is just the base colour. I then paint the rail sides with either Humbrol matt leather (look for tins with the union flagon the side, the others are weird and too green) or Revell 84 before ballasting. You can get a little tool for paining rails that consists of a little roller fed from a reservoir. To be honest I tried it ans didn’t get on with it. A nice flat brush seems much easier. Do all this before the ballasting.  Flat bottom track on New Street. It was pretty new in 1987 and the rails had a distinctly different colour to the bullhead stuff. As its bi directional i sprayed the track from both directions. Firstly with a light coat of Revell 84 and then a mix of gun-metal and black. Note the grease around the fishplates done with the same colour and a simple card mask to prevent overspray.
  Sidings outside New Street signal box, It pays to have all the scenery immediately next to the track in place before the weathering. Overspray onto these elements is something that would happen in real life. Note much more gunmetal/black colour where the loco’s stand.
  Make sure that you repaint the checkrails once you’ve cleaned the rail tops A black sharpie is good for keeping them dirty or you can chemically blacken them as well.
  Close up of the end of a double slip.
  Older sidings on Brettell road. I used my finger to ‘smudge in some powder paint to the ballast to give the less cared for look. Some static grass gives an impression that the yard is losing the battle with nature. While in some cases weeds can creep into sleepers or even force their way through them it pays not to have your greenery on top of them.
Its all pretty simple stuff really but as I said at the start, observation is the key.
Haven’t had a loads of finished things post for a while.
So lets start with a buildings and a request, When I posted the image of the pub at night I was asked for a picture of the area in the light so here it is This also shows the water tower I was working on too, speaking of which…
 Remember the lower part of the Hornby water tower I was fiddling with and how I didn’t worry too much about details? This is the reason why – you can just about see it, if you know where to look!
  Moving on to some wagons. This is the Chivers kit for a Dia1674 LMS Bolster wagon. A nice simple kit to build although given the long wheelbase I did opt for Bill Bedford springing.
 This was supposed to be a quick win. I liked the local livery and thought that it would break up the sea of grey and bauxite wagons. Its a Bachmann product but an older one that was stretched to fit their 10ft wheelbase steel chassis. Some careful cutting in 4 places lost some of the extra length and while it is still too long it does now fit the longer Cambrian wooden chassis.
  I’ve finished off the vans I was working on too. Not a lot more to add about them really but here’s the pictures. LMS 6 wheel fish van – Chivers Kit.
 LMS GUV
  Palethorpes 6 wheel van
 And the larger bogie version – Transfers are from Cambridge custom transfers. Sheet BL153 covers the 6 wheel vans while sheet BL154 covers the bogie vans.
Finally aside from the crew and some coal (plus a slight warping of the footplate) the 94xx tank is done too. Here’s a few images.


Kirtley finished (well nearly)
First up a short video of the inside motion doing its thing.
There’s still a bit of work to do on the Kirtley – add a crew and the weather sheet, some coal and the wet weather effect but its pretty much done. Below are a few pictures. 

 I have been doing a few wagons as an aside to the soldering iron.
  Another lowfit from Red Panda. This one has a Parkside chassis and buffers from my supply. I don’t know who made them or what type they are but they matched some of the pictures on Paul Bartletts wagon site Thanks to my friend Brendan for the lowfit transfers.
  The Dapol lowmac kit. Reworked with Lanarkshire models buffers, archers rivets and new axleboxes from the spares box. The brake lever is an etch and the ratchetey looking guide is from a piercing saw blade. This wagon is really too long to be rigid and there’s not a lot of room for any sort of springing or compensation units so the solution here (which I remember from a P4 society digest sheet years ago) is to file the bearings into a slot and use a bit of scrap etch in the centre of the axle to allow it to rock.
How to model roads
This is an older article that you may have seen on some forums before however its something I am asked about quite often so i thought I’d reproduce it here.
First up the basic structure. I thought long and hard about the camber of the roads but in the end decided to do them flat. The reason is partly ease but also looking at large vehicles they sit level on their suspension and to me a model leaning over doesn’t look right.
The kerbstones are cut individually from 80thou square microstrip, the paving slabs are scribed onto plastic sheet. Don’t forget things like dropped kerbs.

 Birmingham had a lot of large kerbstones that were cut from stone, a lot have gone now to be reused in posh buildings. To model them I softened Evergreen strip with liquid poly before attacking it with sandpaper and a hammer. Once I have a suitably distressed strip this was cut into lengths and laid individually.
When ready spray everything with plasticote suede paint. This gives a texture to the surface. When dry spray everything black and then a light dusting of grey primer – you are aiming for a tarmac look to the paint – don’t worry about the pavements for the moment.

Using thinned enamels block in the pavements – you can see how some of the pavement is tarmac.

When dry paint the road with neat thinners and then paint ‘wear’ onto the road. I use browns and blacks for the area where wheels go or not. Pay attention to how dust collects where vehicles don’t go such as arround the pavements, the gravel you get can be represented with pepper at the end. Use the paint neat and using a large flat brush blend it into the wet thinners. You will see I have picked out some paving slabs with a lighter grey – For darker slabs the fastest way is to use grey markers.

Road markings are added using paint markers – I cut templates to help me keep them neat.
These will need a little more weathering to tone them down a little. Once dry spray everything with matt varnish
Its worth considering when your road is set as the time of the year affects the colouring – for example in the winter the roads look much whiter due to salt being spread on the road. In the autumn there are leaves in the guttering etc etc
Due to health and safety people are not asked to lift as large slabs as they were, modern paving slabs are much smaller than they were 20 years ago.
Not all roads are tarmac though, this is how I did concrete

First up paint the area to be concrete with PVA glue – allow it to dry for a bit. When it is dry enough to hold a shape use a nit comb (I had to buy one specially – honest!) to draw lines through the surface.

When set use the plasticote suede paint to give the texture – I needed my concrete browny grey but if you need it grey-grey overspray with primer. Once dry cut in panels with a scalpel and then weather as before. The black tar was added with a fineliner.
 Since I wrote this an excellent book, Modelling Grassland and Landscape Detailing by Gordon Gravett has appeared which also deals with roads and especially older worn tarmac. Well worth getting a copy (ISBN 978 1 908763 06 8)
Some more thoughts on puddles.
Thanks to everyone who commented on the last entry about the weather. I have been looking at puddles (ok that sounds REALLY weird I grant you) and have done some more experimentation on a scrap bit of card (sprayed to look like tarmac).
 There’s 3 rows here, on the left just Klear and in the center and on the right I sprayed a very light coat of black first (the Klear was applied with my airbrush in all cases)
 The pre darkened areas look much more like the real thing I think.
Do the Brits really talk about the weather?
Yes we do! But do we model it? Not so much.
A lot of model railways are set in the summer or on dry days. There are a few set in the snow but what about the rain or just wet? According to the met office the average rainfall for the west midlands is 116 days a year or about 1 in 3 days. 1987 stood out for the great storm in October of that year (the one where the weatherman said there wasnt going to be one the night before, remember?) so it’s probably worth considering rain a little more seriously.  Ok in post processing its a doddle. A bit more contrast than usual, no harsh shadows and falling rain from Photoshop’s diffuse setting with a bit of motion blur. However its safe to say falling rain on a model is not going to be doable.
So we are left with the rain has just stopped or the rain stopped a while ago. Just stopped means everything is still wet and to be honest I have spent quite a while looking at different levels of sheen on things. Blasting everything with gloss varnish is not something i really want to do but nearly dry is different. A few puddles here and there perhaps? Time for an experiment!
 The beauty of this is by using good old Klear floor polish I can have a go and see what it looks like. If its naff I can simply spray it with matt varnish and its gone. Ok the puddle shapes are a but a bit iffy but as an overall feel I have got to say, im quite tempted.
Christmas Quickie (part 2)
Hi All
I have been continuing to work on the Bachmann 108 and due to the unusually warm (for January) weather I have managed to get the weathering done.
My thoughts on weathering are as follows, always look at the real thing, work with the techniques not against them to get the effect you want, one technique on its own is not going to do everything and aim for it all to disappear! This last one might be a bit odd but in the real world unless something is spectacularly dirty you shouldn’t really notice the weathering. In my opinion if you show someone a model and you are not discussing the subject, if the first thing they say is nice weathering you might have over done it! (other methods and opinions are perfectly valid of course)
Its also wise to consider how something gets dirty and the way the environment it operates in affects it. A rally car, splashing about in the mud will look splattered and heavily streaked – Trains don’t tend to do this. There’s some fabulous books on weathering from Military modellers (FAQ are a personal favourite) but again a Panzer tank in desert colours will weather differently to a train. Even trains don’t weather the same. An American locomotive will often be a lot dustier than a UK one that sits in our wet weather a lot more.
Anyway enough waffle – here’s what I did!
 Stage one – finish the painting stage – I used the maskol trick on the roof so some lighter grey showed through. I have also used a thin wash of grey/brown for the dirt that collects in the door frames etc – I don’t want it spotless but I want it to look like its been cleaned. Note that I haven’t touched the underframe yet except for painting the silver exhaust pipe brown.
 Here I have airbrushed the underframe with my own concoction of track dust. Think about the angle that the dust gets onto the underframe and spray it from a similar direction (from the side and below). Also do the inner ends while you are at it. The roof has been sprayed with a mixture of gunmetal and black and while I had that colour in the airbrush I picked out some of the darker areas of the inderframe to.
 The picture on the left is how the bogie looked after the Airbrush stage was finished – prototype pictures show a build up of grease on the bogie sides (as well as other areas of the underframe) and this was added by dry brushing. Dry Brushing is one of those throwaway terms that people use but it doesn’t really tell you what it is. Essentially its nothing more clever than using next to no paint so that it picks up the highlights. By working the paint that you do have you can blend it into the existing colour but you don’t want an effect that’s as smooth as an airbrush will give you. I use neat gunmetal for this stage. You can see the very subtle streaks on the lower body side.
 There are some areas that are a bit more bunged up than most and for these i use black (again dry brushed) and sometimes a bit of Klear floor polish for the bits that look wet. You don’t want to go mad with the Klear – just enough to give a glint now and then. While you have the paints out you can use a cotton bud to ‘blob’ a bit of Gunmetal on the buffer heads to represent grease.
 The finished result. By looking at the real thing and using techniques that do the work for you there’s nothing difficult about it. Sure there’s a large worry factor to taking your paints to a model if you haven’t done it before but you can always use a battered second hand model, a toy car or even a plastic tub to practise on first.
By the way I also finished off the 2 47s I was talking about earlier on the workbench. Pictures of those are in the class 47 gallery.